
Introduction
We're excited to present ReaWwise, a new REAPER extension by Audiokinetic that streamlines the transfer of audio assets from your REAPER project into Wwise. The extension also allows you to create complex object hierarchies in Wwise without leaving the comfort of your REAPER project!
A lot of research and time went into trying to understand and provide solutions for pain points encountered by sound designers integrating Wwise into their workflows. We conducted interviews and collected feedback to get more insight on these problems and the hacks, tricks and techniques currently being used to try to mitigate them.
In this article, we'll guide you through the installation process, give a brief overview of the UI, and then walk you through using ReaWwise in your project.
Installation
Pre-requisites:
- Wwise 2019.1+
- Windows 10+ or Mac OSX High Sierra (10.13) or more recent
Before installing ReaWwise, ensure that the Wwise Authoring API option in Wwise is enabled.
- Open Wwise and go to Project > User Preferences
- Click Enable Wwise Authoring API and then click OK
The simplest way to install ReaWwise is through REAPER’s most popular extension/script manager ReaPack.
1. Go to ReaPack: Package manager for REAPER to download ReaPack. Refer to the ReaPack User Guide for installation instructions.
2. Once ReaPack is installed, in the REAPER menu, go to Extensions > ReaPack > Import Repositories.
3. In the dialog, insert the url of Audiokinetic's Reaper Tools repository (https://github.com/Audiokinetic/Reaper-Tools/raw/main/index.xml) and click Ok.
4. In the REAPER menu, go to Extensions > ReaPack > Browse Packages.
5. Right-click on the ReaWwise package and select the version you want to install.
6. Then, click Apply in the lower right corner of the dialog to complete the installation.
7. Restart REAPER to use the latest installed version of ReaWwise.
Refer to the ReaWwise User Guide for more installation options.
The UI

1. Project Information
- Project Path - The location of the Wwise project you are currently connected to.
- Originals Subfolder - The location to which your audio assets will be transferred (supports REAPER wildcards).
- Import Destination - Wwise object that acts as the root for the imported Wwise objects (click
 to populate the field with the currently selected object in Wwise).
2. Wwise Structures
- Hierarchy Mapping Table - The Wwise object hierarchy to be created for each audio asset to be transferred.
- Selected Row Properties - Configure a selected node from the Wwise object hierarchy.
3. Conflict Resolution
- If Sound Name Exists - How Wwise should handle naming conflicts upon import.
- Apply Template - When Wwise should apply templates defined in the Hierarchy Mapping Table.
4. Preview Panel and Transfer to Wwise
- Preview Panel - Shows a preview of what the object structure would look like in Wwise.
- Transfer to Wwise - Transfers the audio assets and creates the object structure in Wwise.
Refer to the ReaWwise User Guide for a more detailed description of the UI.
Prepping Your Session
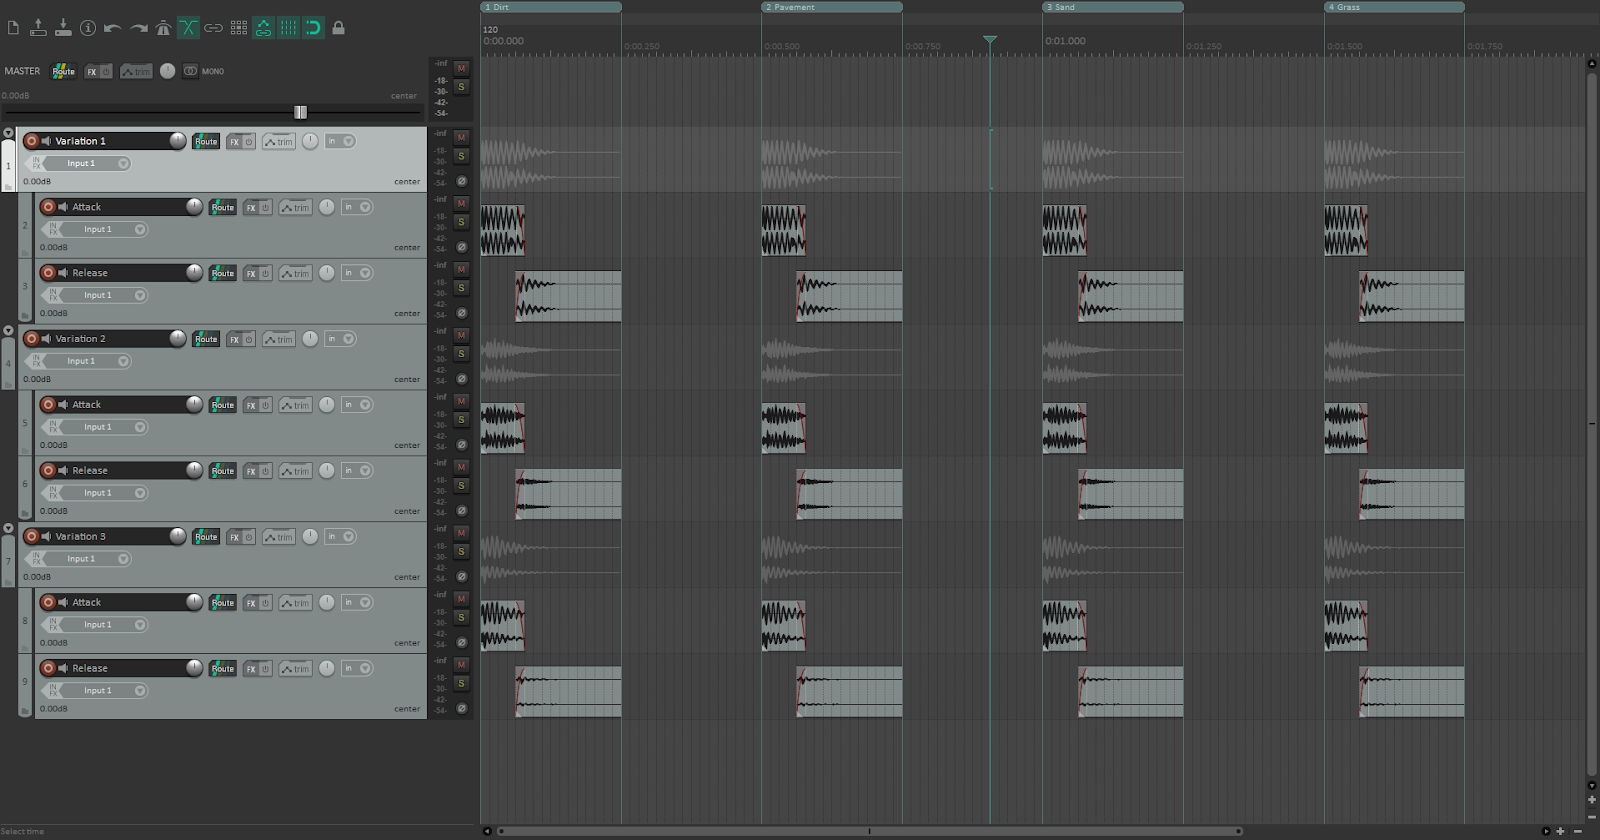
The screenshot below shows a simple REAPER project that contains the footstep sounds for a game I’m working on. The project is organized to take advantage of the region render matrix for rendering. Each variation of a footstep is created using two audio assets: one for the beginning of the sound (the attack) and one for the tail of the sound (the release). Each combination is grouped under a parent track that denotes the variation. The variations are then grouped by region vertically on the timeline.
Render Settings
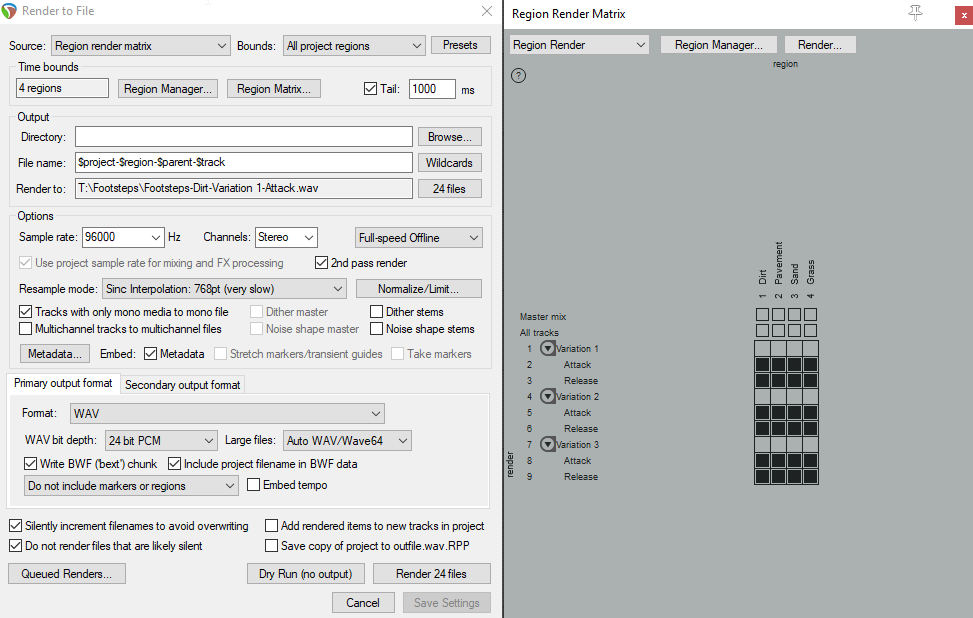
The ReaWwise import functionality is dependent on your render settings. It queries your REAPER session behind the scenes to get a list of audio assets that would be rendered based on your session’s current render configuration.
When you first open the extension, you may notice that the Preview Panel is empty. This is because you have no audio assets set to render. To open the render settings click File > Render. Below is the render configuration for my session. In my session, I am using the Region render matrix as the Source. In this case, I’ll also have to configure the Region Render Matrix by clicking the Region Matrix button.
The Preview Panel
Once the render settings are set up, make sure to save them. If there are audio assets to be rendered, the Render button will be active to indicate this. Now let's take a closer look at the Preview Panel in ReaWwise.
The Preview Panel shows you a preview of the audio assets that will be imported and Wwise objects that will be created upon transferring to Wwise. The preview is generated by combining the output of your REAPER render settings and the settings that are configured in ReaWwise.
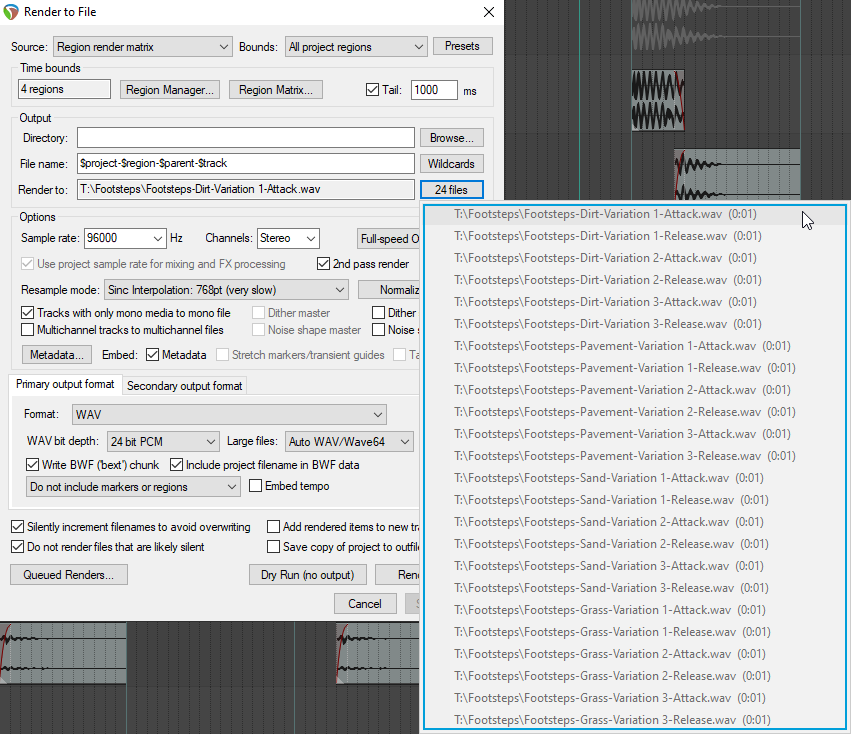
To understand how the preview is generated, let’s focus on the first item in the Preview Panel.
When ReaWwise reads the output of the REAPER render settings, the first item it sees to be rendered is the file T:\Footsteps\Footsteps-Dirt-Variation 1-Attack.wav. You can preview the files that ReaWwise uses to generate the preview by clicking the button to the right of the Render To input field of the Render to File dialog in REAPER.
ReaWwise then looks at the hierarchy configured in the Hierarchy Mapping Table (in the Wwise Structures section), along with the configured Import Destination, to build the Wwise object path for the given audio asset.
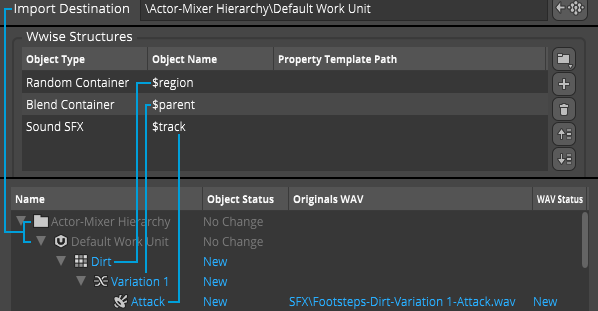
Wwise does this for every single audio asset provided through REAPER’s render settings. It then groups the Wwise objects together into the tree you see in the Preview Panel.
Conflict Resolution
The last thing to do before transferring to Wwise is to set the If Sound Name Exists option. This tells Wwise what to do if an object with the same name already exists. In our case it doesn’t really matter because our Wwise session is empty. In a scenario where you are iterating, this might be important. You may want to Create New or Replace objects every time you transfer to Wwise.

Transfer to Wwise
And now, for the grand finale, we would like to transfer our audio assets and the configured Wwise object structure to Wwise. To do this, simply hit the Transfer to Wwise button at the bottom of the window. You’ll see a render triggered in REAPER, followed by a summary of the import.
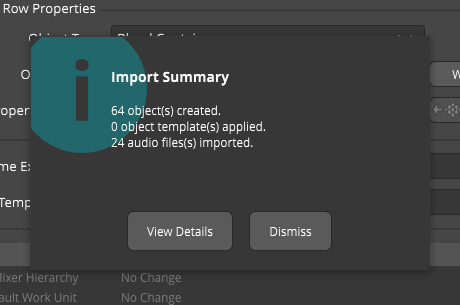
Note that Wwise might rename objects if it encounters a duplicate name or one with invalid characters. To see more details about the import, click on View Details.
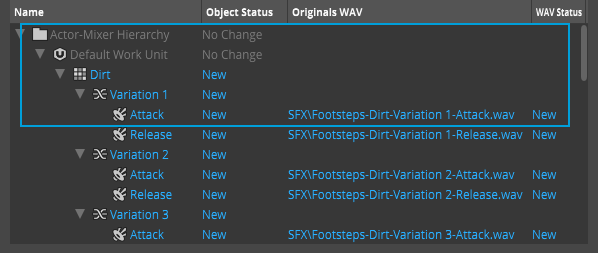
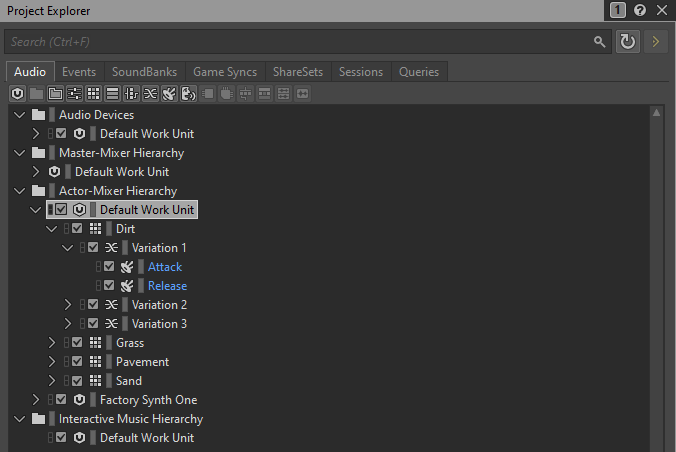
If we shift focus to the Wwise explorer for a second, we’ll see that our audio assets along with the Wwise object hierarchy were transferred successfully.
Conclusion
With this quick tour, you have seen how easy ReaWwise makes moving assets from REAPER to Wwise, as well as how simple it is to configure a Wwise object structure that makes sense for your REAPER session. We look forward to you using ReaWwise to simplify your workflow!

Comments
mark erickson
February 27, 2023 at 01:09 pm
Is your Reaper session available for download ?
Aaron Brown
July 04, 2024 at 01:50 pm
This is fantastic! Thank you to everyone on the team who made this for the game audio community! I tried this out today and noticed the preview stops updating if I change the source type in Reaper. It previews fine with the render at first, but if I go from Items to Regions, or any other change like that, the preview gets stuck on the original type. A temporary fix is to click "dry run output" then quickly cancel. This gets the preview to update to the proper asset list of items, or regions, or whatever else the Reaper render is set to. Mentioning it in case others run into that snag and in hopes that gets fixed up :)