
For those interested in going back in time to the land of MIDI-based music, you will find that you will not be able to tap into the built-in synthesizer of the PS4 (there isn’t one), nor will you be able to depend on your PC soundcard’s General MIDI assortment of instruments. And, although Wwise comes with a built-in synth now, I’d like to show you how to build your very own realistic synth using Wwise.
In this post I will go over some strategies which I have found useful for creating MIDI controlled sample instruments. You can find some examples in the online Wwise documentation (which I will assume you have read), but here, I will dive a little deeper. We will create a horn section capable of sustaining notes, has dynamic layers, can be controlled with your keyboard’s modwheel, and it will actually sound pretty good!
Here's a simple demo of some live playing, while adjusting the modwheel. This is the output of Wwise recorded into my DAW. Wwise "Original" button in the transport is unchecked. Conversion settings are at 22k Vorbis at 2.2 quality. This mp3 demo is almost as big as the SoundBank that contains the horn section.
Creating the raw material
So, assuming we’ve already set up a horn section capable of playing long notes in our DAW of choice, we must now sample our sample instruments! To do this, we must decide what notes we are going to sample. For a one-to-one ratio with the sample instrument in our DAW, we would typically go through the range of our horn section chromatically and sample each note. But this is video game development, and we need to conserve our resources. So, for this example, we will sample our horn section at minor third intervals. This means it takes 4 samples to create an octave. Starting on C, that would be C, D#, F#, and A. The notes that have been left out will be covered by pitching our samples one semitone above and below. I have tried larger intervals such as perfect 4ths, but artifacts will show up as each sample is assigned a larger range to cover. For instance, if your horn section has a lot of reverb, you will notice that the size of the reverb will be drastically smaller and larger at the edges of each sample’s range.
Now, since we want our horn section to be controllable by the modwheel, we must account for this as we sample. Depending on the manufacturer, the timbre shift of a horn section changing dynamics can be mimicked in commercial libraries by crossfading different samples and modulating a low-pass filter. Try listening carefully to your horn section while slowly moving the modwheel. Can you hear where the loud and soft layers crossfade? Yeah, me neither. However, I had good luck getting the end result I need by sampling with the modwheel all the way up, and then again in the middle. The modwheel is usually CC1 and since we’re talking MIDI here, this would correspond with CC1 values of 127 and 64.
But wait, how long of a sample do I need to create? Thanks to the Source Editor in Wwise, we will see later that this is not a critical detail. Just be sure to leave enough room for the reverb tail to ring out. And also, since long sustained horn notes are usually not played back in quick succession, we can get away with only having one variation. If you dig into your commercial sample instrument (by hitting the wrench icon in Kontakt), you may find that there’s only one variation there anyway.
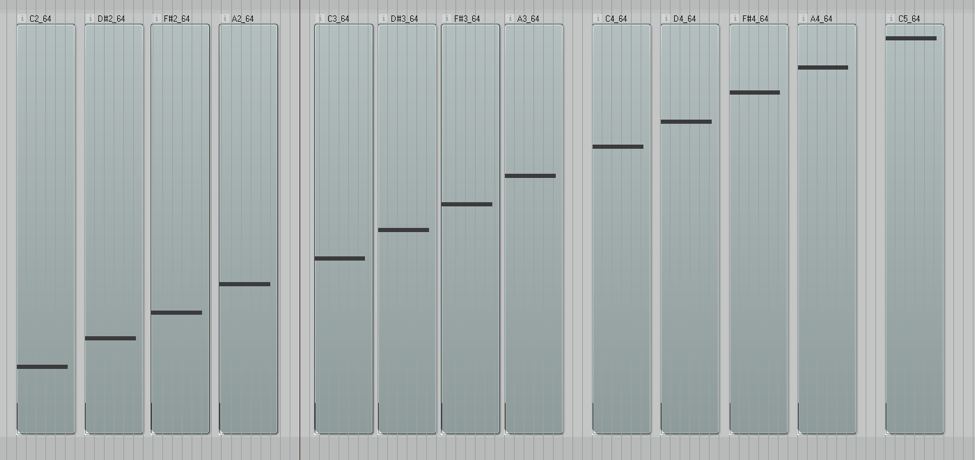
This is what my session looks like for 3 octaves at CC1 64:
Importing the first note
When importing, only do one note first. You’ll see why later. I’ll show the higher level structure first.

Here are my first note’s MIDI settings:
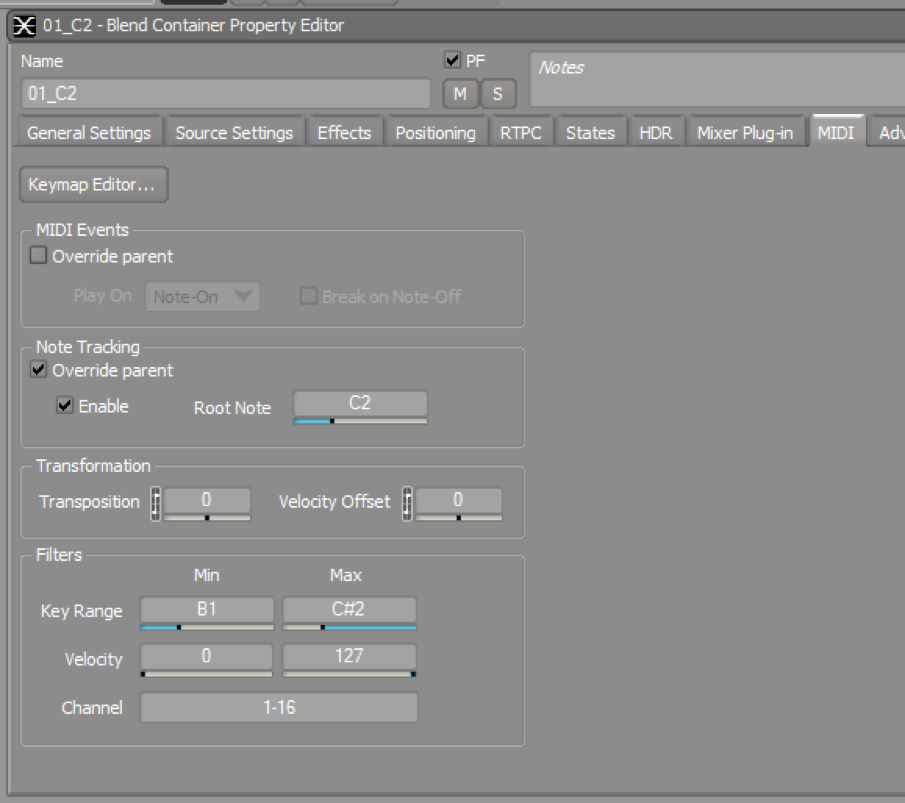
The note tracking means that this audio object will be pitched to match whatever MIDI note it receives. So, if a C3 came in, Wwise would pitch it up 1200 cents to match. However, that’s not going to sound too great as we’ve previously discussed, so we will use the key range filters to define what range of notes we want this sample to be tracked to. Since we sampled our horn section in minor thirds, each sample covers 3 notes: the root note (C2), and one semitone above (C#2) and below (B1).
Routing MIDI and CC data
To test your sample instrument, you can route MIDI from your DAW into Wwise. I don’t have space to go over the specifics since this is covered in other documentation. Once you have MIDI going into Wwise, you will notice that you can play the horn samples so long as you press the right note. To get the modwheel going into Wwise, you will need to add an additional Control Surface Binding. If you have the MIDI notes going in already, the MIDI learn in Wwise will pick up the movement of your modwheel right away but you will notice that the binding is specific to only one channel. Our horn section does not have any channel filter set, so this is ok for now. Add the new binding under the “Current Selection” group as shown:

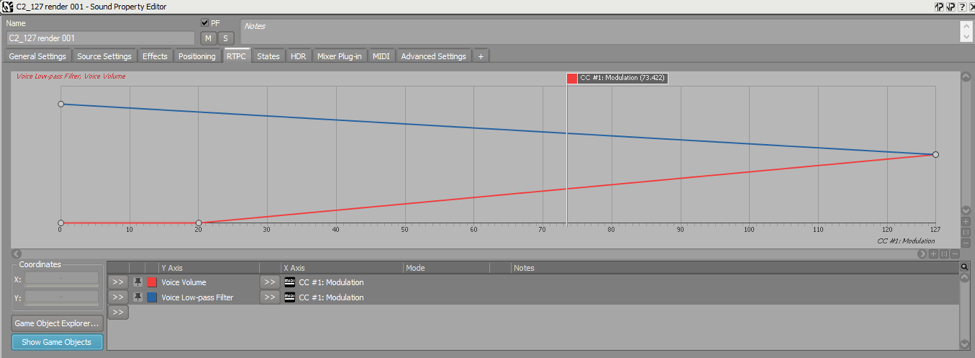
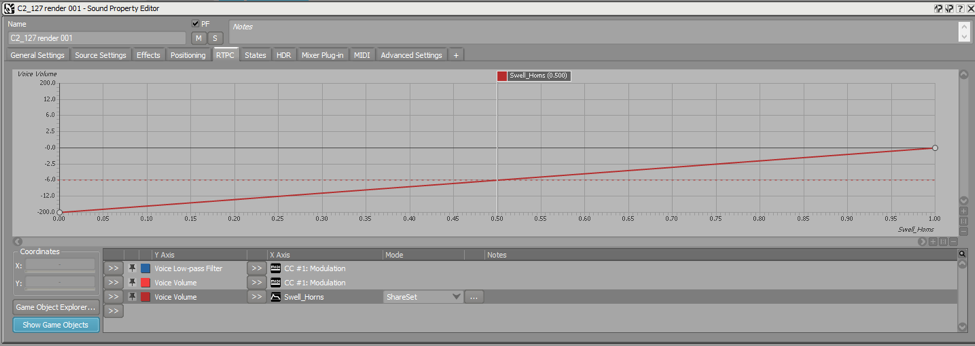
Once the CC1 binding is set, we need to add RTPC curves for it. I have used CC1 to control both voice volume and the low-pass filter for the CC1 127 sample as shown below:
The CC1 64 sample looks like this:
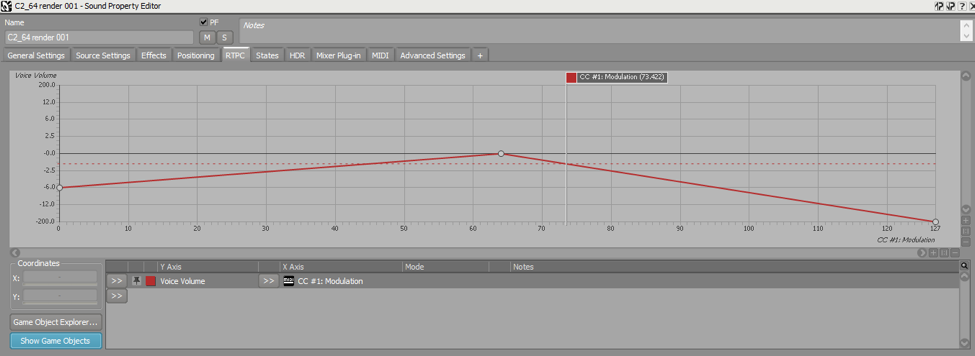
You’ll notice that the combined effect is that the CC1 127 sample fades in as the modwheel goes up and the CC1 64 sample fades out. At this point, you should also set the virtual voice settings to “Play from elapsed time.” Of course, you may have noticed by now that the samples are only playing as one-shots and do not loop.
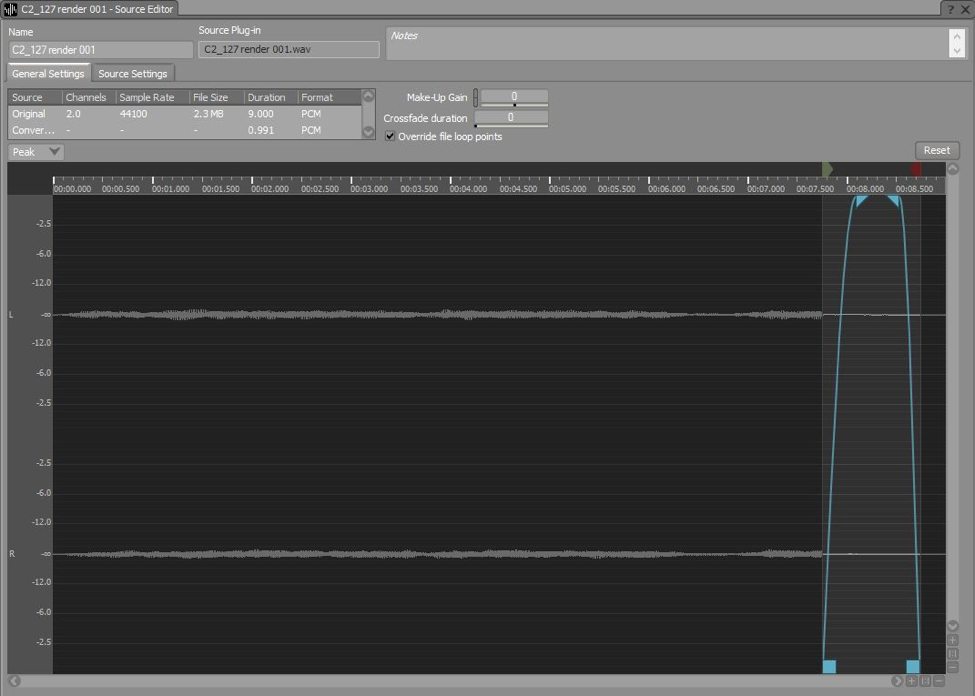
Defining the Loop
Next, we will define the loop points. Set the audio objects to loop as you normally would for any other looping sound. Bring up the source editor for each sample. You can manually define the loop points here. Here’s where my loop points ended up being:
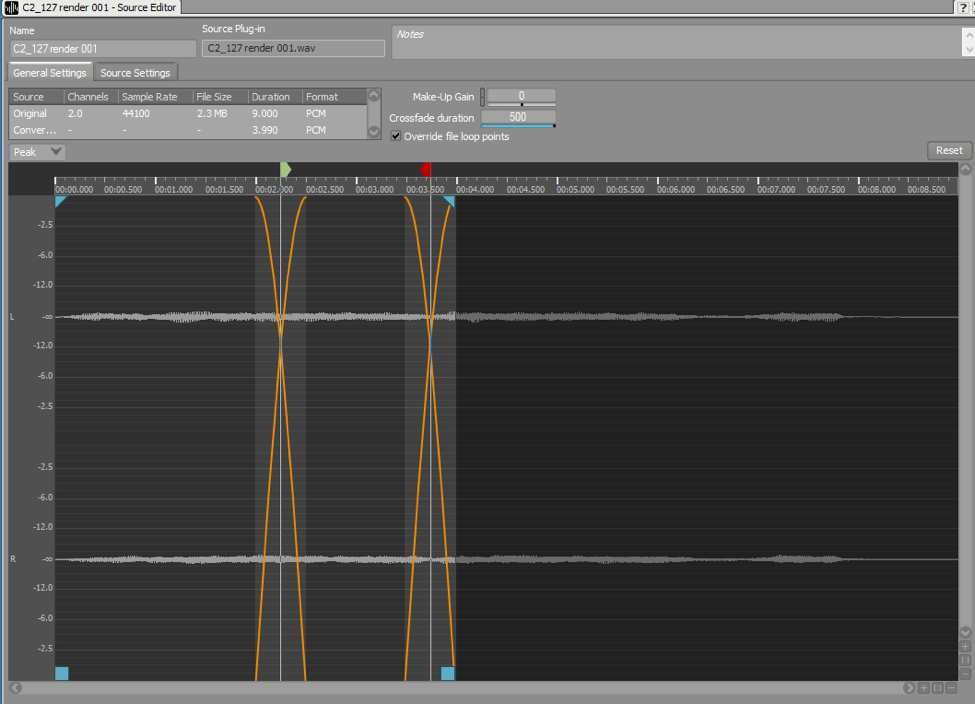
Don’t forget to move the end point of the file. With the loop points set up, the entire right half of this file will not be used. If you’re a perfectionist, setting up your loop points like this may not be satisfactory to you, but keep in mind that you probably don’t want to be blasting one note for 10secs anyway.
*Tip: you can manually type in a longer crossfade duration than the slider will let you.
Envelopes And Release
If you’ve tested your horn section after setting up the loop points, you would have probably noticed that now the horns don’t stop. To fix this, we need to add an envelope. Here are my settings that I liked:
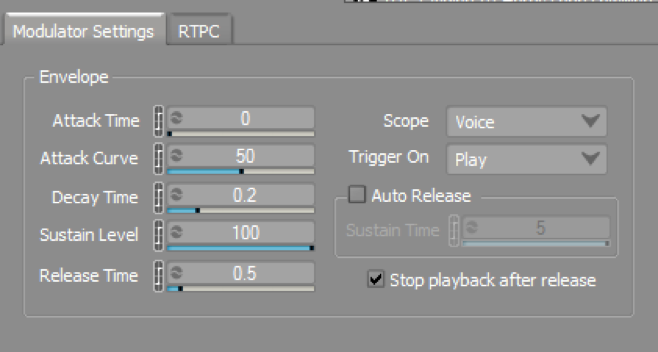
The most important part is the “Stop playback after release.”
Add a new RTPC curve for voice volume on the CC1 127 and CC1 64 samples and use the newly created envelope to control it. The default slope for the RTPC curve should work just fine. Here’s what my CC1 127 sample looks like now (with just the envelope RTPC curve selected).
If you test your horn section again, you should notice that the loop fades out over 0.5secs now when you release the note. It will sound unnatural because there is no natural decay of the reverb.
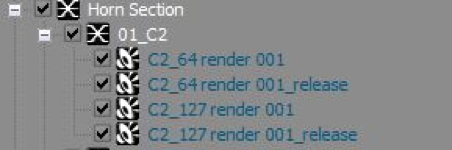
To fix this, we will create release samples for both CC1 127 and 64. The easiest way is to copy paste our 2 samples. Our C2 note now has four samples in it:
Now change some settings for these duplicates.
- Uncheck “Looping”
- Delete the RTPC curve with the envelope
- Under MIDI, change MIDI Events - Play On - “Note-On” to “Note-Off”
And then we will open the source editor for these release samples and crop out everything but the reverb tail at the very end of the file. Here is what my release sample ended up looking like.
Notice that I have a fade-in. Try to match the fade-in with the fade-out you’ve specified as the release time in your envelope settings. The goal is to have no noticeable jump in volume as the release sample plays.
Once the release sample is setup, your horn section should sound much more natural.
*Tip: If you have an exclamation point show up in the window of the source editor, change the Crossfade duration back down to 0.
Completing the full range
Now that we have done one note, we can repeat these steps for the rest of the range of our horn section. You can save yourself some time by using the notes you just created as import templates for the rest. However, you will still need to go into the source editor for each sample to set the loop points and crop the release tails.
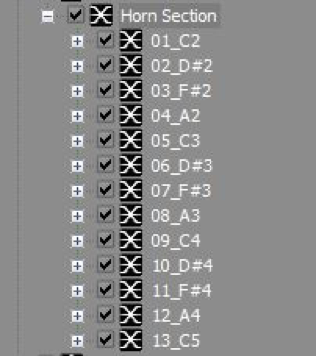
Once you’ve done all that, you may want to rename some of the objects. I add an “01_”, “02_”, etc. to the front of all my notes so that they alphabetically sort in a way that better reflects their layout according to pitch. My complete horn section looks like this:
Conversion Settings and Performance
To pack all this down into as small a size as possible, here are some tips:
- Use lower sample rates for the CC1 64 samples. With the modwheel down, the horn section doesn’t have as much high-end anyway.
- You may be able to set up a reverb that can take the place of the release samples.
- Use lower sample rates for the low notes, especially if they will rarely be heard in isolation.
- Use shorter loops. Again, lower notes and the CC1 64 samples are good candidates for this.
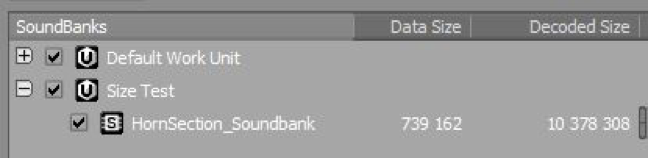
In the end, the data size of my 3 octave horn section is only about 0.74mb.
Final Thoughts
I hope this has helped you develop a strategy to create your own sample instruments for Wwise. It is certainly a new workflow. And you’ll see that the translation from your DAW to Wwise is not exact. Some commercial libraries have some pretty fancy programming going on and that may limit what you can actually bring into Wwise. Even simple things like how the instrument handles round-robin can create unexpected results. A deep understanding of Wwise is undoubtedly helpful in this process. If game audio continues down this MIDI path, I can totally see “Technical Music Designer” becoming a thing.
Legal notices
Unless you are planning on recording your own horn section, you will be using commercial sound libraries with this process. Although we will not be using the raw sample directly and many horn sections are commonly layered to create a fuller sound, please check with EULA, or even email them for clarification. Some companies have said no. This is somewhat new territory for game audio.

Comments
Gonzalo Schwindt
April 10, 2017 at 10:44 am
Daniel, this is an amazing post! Exactly what I was looking for a direct to the point. Thank you so much for this contribution