
Introduction
In this document, I will try to explain the different principles that we applied while profiling and optimizing the audio side of our game, Scars Above. This is intended to help fellow sound designers by giving them insight into processes we went through and offering advice on how to approach and plan for audio optimization.
Even though this is not entirely aimed at senior-level colleagues, some basic knowledge of Wwise and Unreal Engine and their workflows is needed to navigate the document more easily. I will assume that you, the reader, have experience in importing, organizing, and integrating sounds into the Wwise Authoring Tool and Unreal Editor.
Scars Above is compiled using our custom engine based on the Unreal Engine version 4.27.2 and the Wwise Unreal Engine integration version 2021.1.9.7847.2311.
Table of contents
- The principles of optimization
- Restrictions of our game
- Profiling
- Optimization
- Conclusion
- Useful links
The principles of optimization
Optimizing is an important process when working on a game, which, in most cases, occurs later in the production. However, planning for optimization in the earlier stages of production is recommended since it is prudent to define the audio budget and understand the limitations of our game. Staying within predetermined limits ensures that the game will work as intended on all platforms and configurations. When the audio is working properly, there are no sound issues. If we exceed the budget, a range of issues can arise, including sudden drops in sound, audio glitches, and lower frame rates that can negatively impact the gameplay. Therefore, striving for the best performing game at all times by planning for and optimizing audio is crucial.
When it comes to audio, there are several paths we can take to make the game run smoother. Some of them consider lowering the memory consumption of audio assets, while others focus on reducing the strain on the audio thread. Most practices benefit both memory and CPU usage.
Since we're working with Wwise and Unreal Engine, there are steps to take on both sides. I will cover all the steps we took while optimizing audio for Scars Above in the following pages.
Restrictions of our game
Somewhat later in production, we started to pay attention to how audio affects the performance of our game. After discussing with our programming team, we reached agreements on how to budget audio for each platform.
The main concern for our game in general was going out of memory (OOM) on Gen 8 platforms. The memory resources of Gen 8 are limited to some degree, especially on the bare-bones versions of PlayStation 4 and Xbox One (Gen 8 platforms’ usable RAM is about half the size of RAM available on Gen 9 platforms). We agreed that the memory budget for Audio on Gen 8 and lower-spec PCs should not exceed 250MB in total.
Audio can also put a strain on the CPU. Many calculations are made on each frame, and since we decided to have a complex Spatial Audio setup for the entire game, these calculations can become very expensive, especially on Gen 8 platforms. Budgeting for CPU was left to us, as we are able to easily profile the audio thread consumption in the Wwise Profiler. We decided that the Total CPU of the Audio thread should have maximum peak values at 100%, average CPU below 50% on Gen 8, and average CPU below 30% on Gen 9 and PC.
Budgets Summary
|
|
Total Media Memory |
Total CPU Peak |
Average CPU |
|
Gen 8 |
250MB |
100% |
50% |
|
Gen 9 |
250MB |
80% |
30% |
|
PC |
250MB |
80% |
30% |
Table 1: Memory and CPU budget limitations for Audio on all platforms
Audio issues with memory or CPU
There are a few ways that audio issues can manifest during gameplay. Here, I will cover the four most common ones: Out of memory (OOM), CPU spikes, Voice Starvation, and Source Starvation.
Out of memory (OOM)
Out of memory or OOM occurs when the system cannot allocate any more memory for new processes. This happens when we exceed either the maximum physical memory available on the platform or the maximum allocated memory for the sound engine (defined in the AkMemSettings::uMemAllocationSizeLimit initialization parameter). OOM issues can result in system crashes when exceeding physical memory or sound engine initialization failures, bank load failures, skipped transitions, or sound playback failures when exceeding sound engine memory.
There can be multiple causes for OOM errors. When managed properly, the audio usually occupies a small portion of the total memory consumption. Nonetheless, we should always ensure not to exceed the sound engine memory limits agreed upon when defining budgets for our game.
CPU spikes
The audio thread handles most of the processes for audio, which is separate from the game thread and continuously occupied by the Wwise audio engine. All CPU measurements in the Wwise Profiler are associated with the consumption of the audio thread.
In situations when the audio thread is unable to render all sounds in one frame, its consumption exceeds 100% in the Wwise Profiler. This can occur due to various reasons, primarily when the computational audio requirements for that frame are too demanding for the audio thread. In Scars Above, the main contributors to CPU spikes were Spatial Audio path propagation calculations and registering and unregistering a large number of audio emitters simultaneously.
Single CPU spikes that are not excessively high or frequently recurring may not result in audible issues. Hence, we can safely set the Total CPU Peak limit to 100% (Table 1). However, if the CPU spikes are excessively high (measured in hundreds or even thousands) or if there are numerous consecutive spikes, the audio engine may introduce audio glitches or drops in sounds.
Voice Starvation
Voice starvation errors occur when the audio thread is unable to render all sounds in one frame for multiple consecutive frames, resulting in 100% Total CPU consumption. These errors manifest as drops in sound and glitches. During our development, we encountered Voice Starvation errors on the Gen 8 console, particularly on the base PS4 platform, in areas of the game with lots of complicated Spatial Audio geometry and many emitters requiring calculations on each frame. Reducing the complexity of Spatial Audio and limiting the number of emitters that are loaded simultaneously greatly aided in resolving Voice Starvation errors.
Source Starvation
Source Starvation errors are related to memory rather than CPU and occur when sounds that are being streamed directly from the disk cannot provide data to the Streaming Manager in a timely manner. This can happen due to various reasons, often when there are too many concurrent streamed files playing or when the disk (the I/O device) is unable to process all the data simultaneously due to its slow speed. This again manifests as drops in sound, especially on sounds that are being streamed. While adjusting certain I/O settings can help reduce the occurrence of Source Starvation errors, the most effective solution is to limit the number of sounds being streamed from the disk at the same time (further details on streamed sounds will be discussed later in the document).
Profiling
Profiling is an essential step in the optimization process. When we start optimizing the game, it is crucial to assess the current state of memory and CPU consumption, as well as identify potential bottlenecks that may impact these parameters.
It is important to note that all testing should be conducted on the Testing or Shipping builds, rather than within the Unreal Editor or the Development build. While testing in the Unreal Editor can provide a general understanding of the game's behavior, performing tests within the appropriate build ensures accurate performance data that we can rely on for audio optimization.
Wwise Profiler
The Wwise Profiler serves as our primary tool for assessing audio performance. Although it may not appear very intuitive initially, it provides a wealth of data that offers valuable insights into the current state of audio and helps identify any performance issues that may have emerged during gameplay.
During profiling, we will be focusing on several CPU and Memory parameters, which are presented in the Performance Monitor section of the Wwise Authoring tool's Profiler layout.
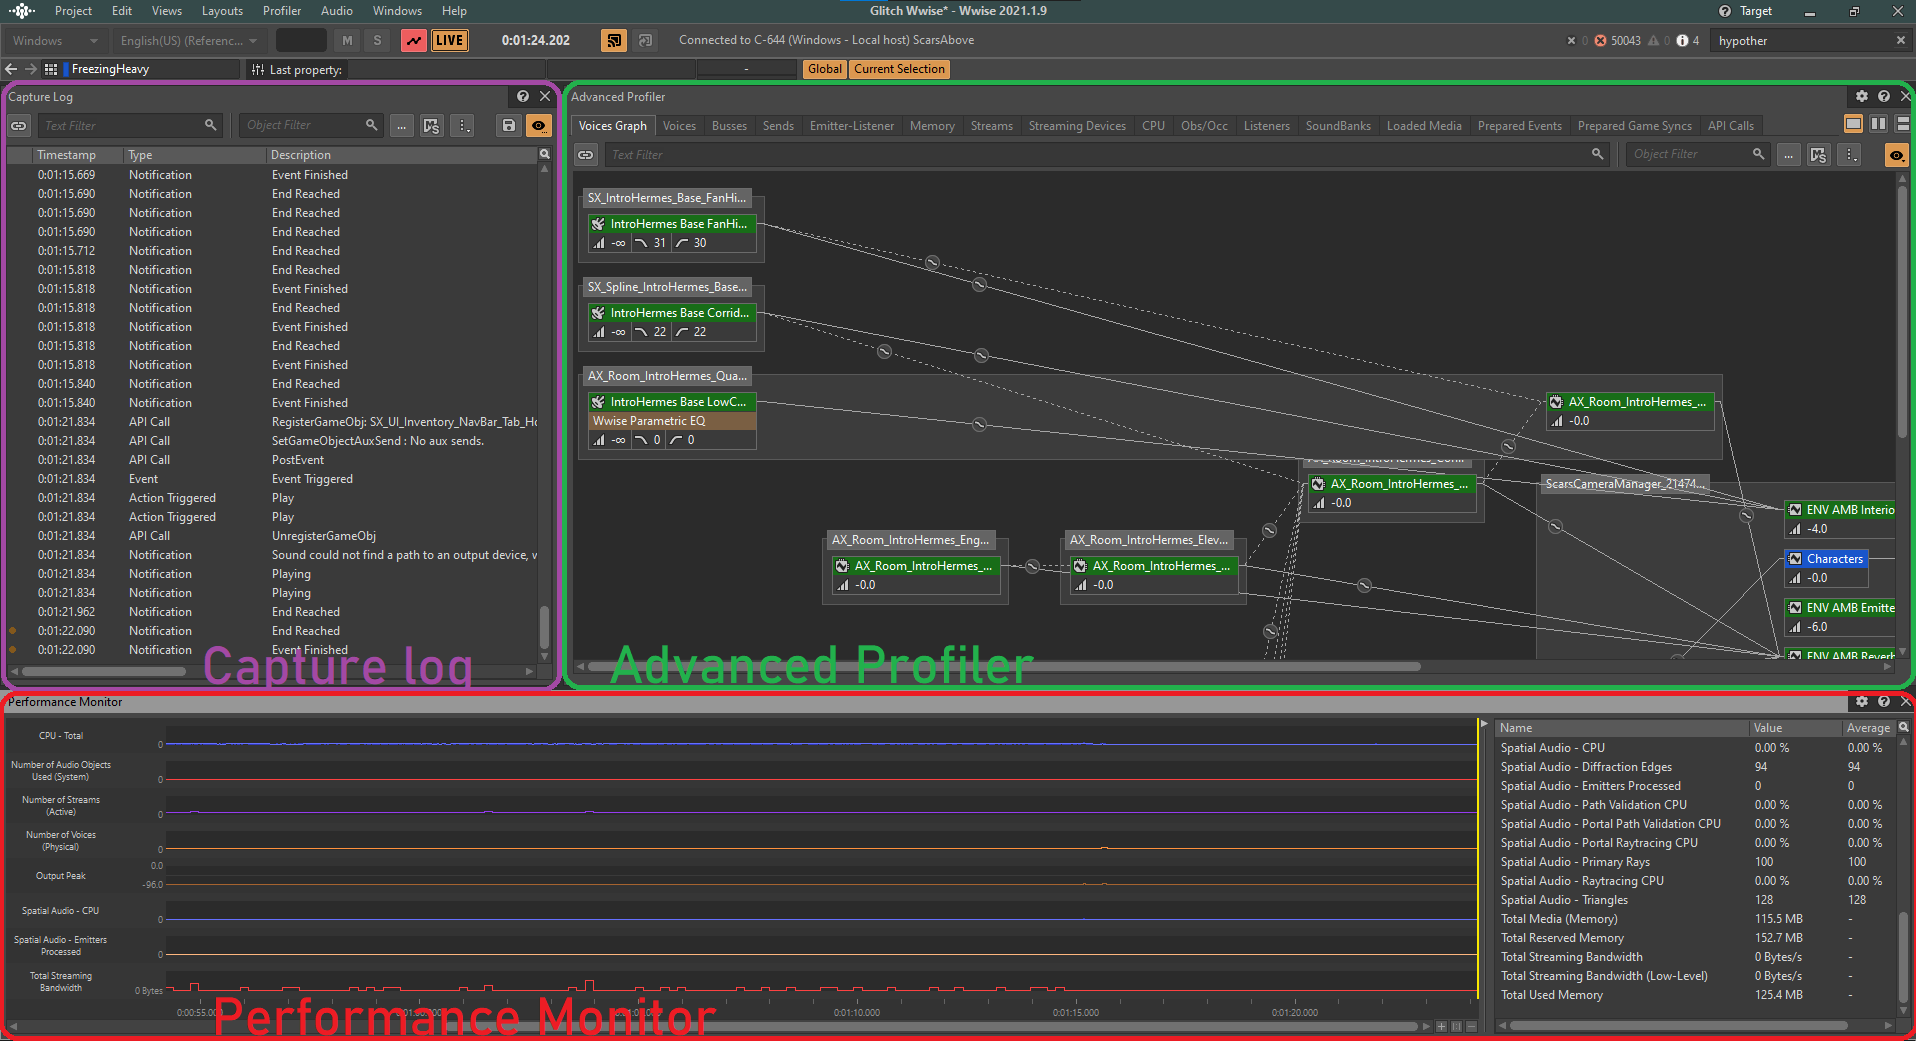
Picture 1: Wwise Profiler layout
From the Performance Monitor, we can observe the real-time status of various sound performance parameters in our game both visually and numerically.
By monitoring these important parameters, we can get a clear picture of our game's sound performance at any given moment. The Profiler presents a detailed log of all actions taking place during each frame of the game. To analyze a specific frame, we can navigate the yellow cursor along the monitor, allowing us to examine any point in time:
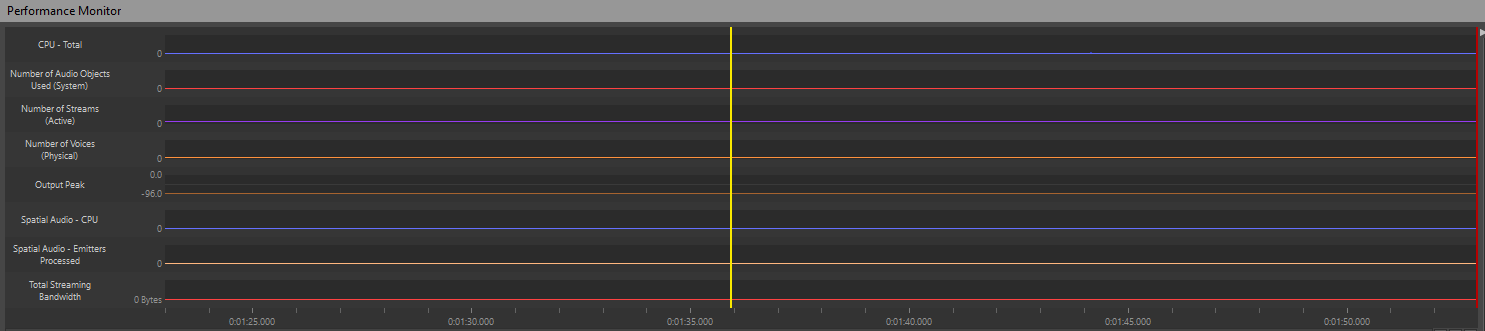
Picture 2: Performance Monitor timeline
If, for instance, we observe a spike in CPU consumption or a sudden increase in the number of voices on the graph, we are able to move the cursor to that specific moment and observe all the actions that were triggered during that frame, as well as CPU Total consumption.
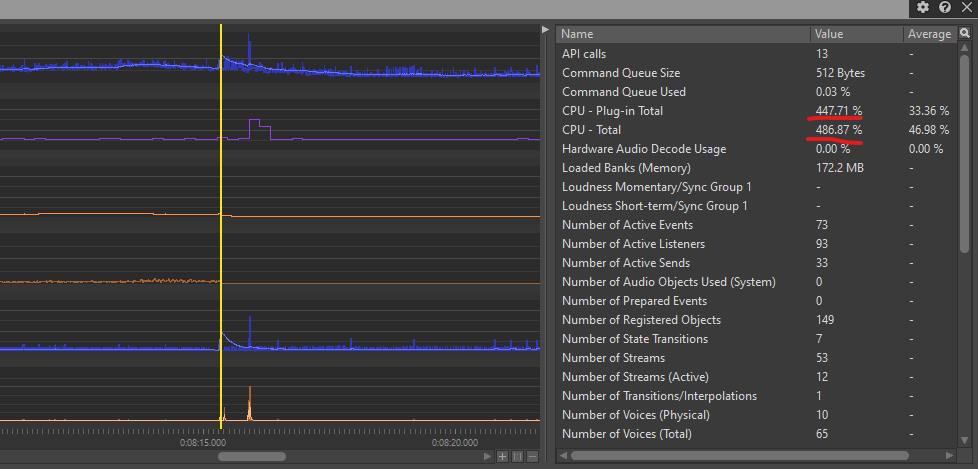
Picture 3: An example of a CPU spike
Wwise Profiler parameters
The following parameters serve as key indicators of sound performance in our game and are typically monitored:
- CPU - Total: Tracks the overall CPU usage related to audio processing;
- CPU - Plug-in Total: Measures the CPU consumption specifically attributed to audio plug-ins used in the game;
- Number of Voices (Physical): Indicates the total count of active audio voices being played simultaneously;
- Number of Streams (Active): Represents the number of active audio streams;
- Spatial Audio - CPU: Tracks the CPU usage specifically related to Spatial Audio processing;
- Spatial Audio - Emitters Processed: Shows the number of audio emitters being processed for Spatial Audio calculations;
- Total Reserved Memory: Reflects the amount of memory reserved for audio assets;
- Total Media (Memory): Measures the total memory consumption of media assets.
The parameters mentioned above are used to monitor CPU consumption, except for Total Media (Memory) and Total Reserved Memory, which track memory consumption.
Profiling in Unreal Editor
Unfortunately, Wwise audio data is not clearly represented in the Unreal Editor. Wwise does not communicate the data about the memory or CPU consumption back to the Unreal Engine, which restricts our profiling capabilities in that regard. Although tools like Unreal Insights or Low-Level Memory Tracker are helpful for profiling CPU or memory from the Unreal Editor side, they do not provide information specifically related to Wwise assets and processes.
What we can do out of the box is utilize the Output Log to identify errors caused by improper sound implementation. The log messages associated with the Wwise Profiler can be cross-referenced with the Output Log in the Unreal Editor. Wwise Errors displayed in the Output Log are typically prefixed with 'LogAkAudio', making our search for issues easier through filtering. When receiving an issue report from the QA team, they can easily attach the log file containing these errors for further investigation.
Asking for help from the QA department
Of course, the most effective method for reporting issues is to have the QA team test the game using the Wwise Profiler and attach the corresponding .prof file to the bug report. This approach asks from the QA team to have the knowledge on how to run the Wwise Profiler. Having dedicated QA colleagues specifically focused on testing sound performance has been invaluable for us, so it would be advisable to discuss with your management the possibility of including sound profiling as part of the long list of QA testing responsibilities.
Optimization
In this chapter, we will explore various optimization techniques to improve our assets' performance. This includes adjusting different sound settings, changing the way assets are played in the game, and organizing them efficiently to save on resources by loading and unloading them when needed.
Working on the assets themselves
When considering the source of our assets, which refers to the sounds we have created, we can apply various techniques for optimization. Depending on the situation, we can modify different properties of these sounds with the goal of reducing resource consumption while maintaining fidelity. The aim is to strike a balance where the assets consume fewer resources without compromising their quality.
Setting to stream from the disk
Setting files to stream from the disk is an effective and simple method to reduce the memory load of audio. This approach is best suited for long files that are not time-critical (meaning that they don't necessarily need to be in perfect sync with the image), such as looping ambience, music or dialogue. Short, one shot sounds that are closely tied to the image such as gunshots, impacts or footsteps should not be set to Stream from disk, since streaming can introduce latency to the sound due to the time it takes to load them from the disk instead of memory.
When set to stream, none of the streamed files' media will be included in the SoundBanks. It is Wwise Stream Manager's responsibility to open and read these files directly from the disk. Depending on the platform's streaming bandwidth, we can enable concurrent playback of many streaming sounds thus significantly reducing the memory load.
Enabling streaming for a sound is very straightforward. Simply check the 'Stream' box in the General Settings tab of the sound or its parent to activate the streaming option.
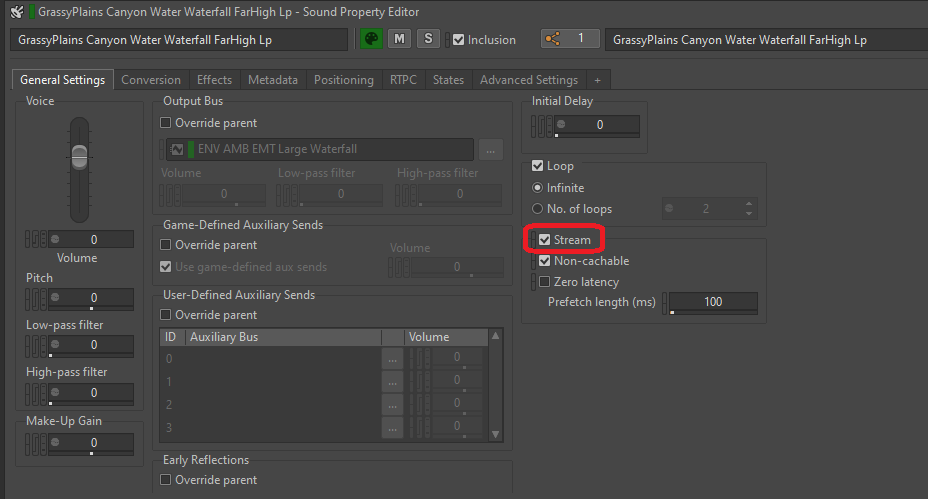
Picture 4: Turning on the Stream option of an SFX object
If we feel that there's a need for a streaming sound to be more in sync with the image, we can check the 'Zero latency' box. This will load a small portion of the file from its beginning into the memory, making it ready to be played without latency while the rest of the sound is being streamed. The length of the preloaded portion is determined by the Prefetch length time.
- Source Starvation errors
As mentioned above, Source starvation errors occur when the streaming bandwidth reaches its limit and the manager can no longer read data from the disk. This can lead to drops in sound and other issues, so be aware of possible issues when setting sounds to Stream.
Shortening sound sources
While on the topic of long audio files, we can revisit the audio files that are taking up a lot of space, but feature content that is mostly similar throughout the whole duration of the sound. This is usually the case with base ambient sounds, such as room tones and constant wind loops, also known as 'beds'. If for any reason those loops can not be set to stream from the disk, shortening their length can greatly reduce the memory usage of those sounds, especially if you are using a conversion setting that prioritizes quality over smaller file size.
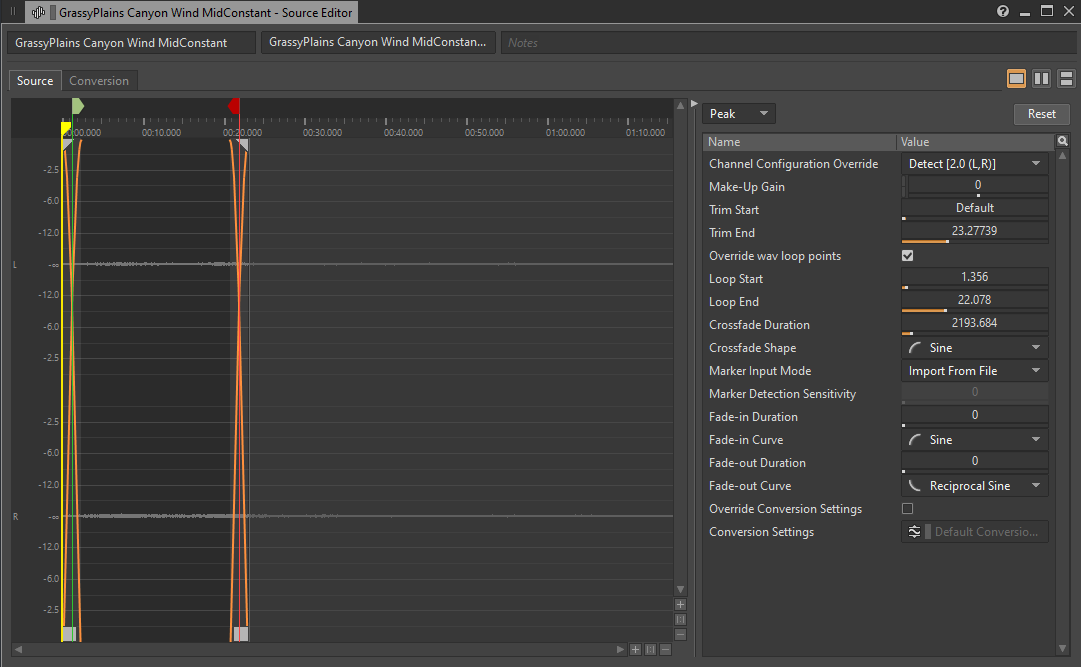
Picture 5: A shortened base ambient sound
One interesting approach to shortening ambient sounds would be to create a pool of short segments of a sound and put them in a Random Container. Having them trigger in a Continuous Infinite Loop play mode would give us variations in content with less memory consumption. Bear in mind that this may slightly increase the CPU load, as crossfading between segments would generate twice as many voices compared to playing a single audio file.

Picture 6: A looped Random Container with crossfading transitions
Setting up Conversion settings
When applying conversion settings to audio files, we are deciding on the final file format and the quality of the conversion for each platform. File formats are determined by the codec used to convert the original .wav file, the channel count, the sample rate and the quality setting of the codec.
Choosing the appropriate conversion setting allows us to further optimize the memory and CPU load of our game. Lossless file formats are generally unnecessary in the shipping build, as compressed formats like Vorbis can provide excellent compression ratios without significant loss in quality. Bear in mind that the coded files need to be decoded before playback, and some plug-ins that are doing the decoding may be more CPU-intensive than others.
Since most of the sounds will use the same conversion setting, we can use ShareSets to organize Conversion Settings into presets.
In our case, we found a good balance by using Vorbis with a quality setting of 4 in the 'Default Conversion Settings' ShareSet preset for all platforms. While other codecs like WEM Opus or ATRAC9 were also viable options that allow for hardware decoding on Gen 8 platforms, we were satisfied with the performance of Vorbis and didn't want to invest time in integrating them with the Gen 8 hardware (Wwise implementation of Vorbis has been highly optimized by Audiokinetic for all platforms). Additionally, Vorbis supports hardware decoding on Gen 9 platforms, making it an even more convenient choice for us.
The 'Default Conversion Settings' ShareSet preset is set in the Source Setting tab in Project Settings:

Picture 7: Source Settings tab of the Project Settings window
To help you make a more informative decision on which codec to use, here is a table comparing different aspects of available codecs supported by Wwise:
|
File Format |
Compression ratio |
CPU |
Memory |
Examples of how these are commonly used |
Limitations |
|
PCM |
1:1 |
Very Low |
High |
Sounds requiring high fidelity. |
None. |
|
ADPCM |
4:1 |
Low |
Moderate |
Ambient sounds and SFX. |
Looping on 64 sample boundaries only. |
|
Vorbis |
3-40:1 |
Moderate to High |
Moderate to very low |
Dialogue, music, ambient sounds, and SFX. |
Slightly larger metadata overhead than other formats, so you should avoid it with very small sounds (less than a few tens of milliseconds). Requires a seek table for seeking. |
|
AAC |
3-23:1 |
High (low when using hardware-assisted decoder on iOS) |
Moderate to low |
Background (not interactive) music. |
Very large metadata overhead. Long setup time. Not appropriate for sample-accurate playback. |
|
WEM Opus |
10-60:1 |
High (when not hardware-accelerated), Very Low (when hardware-accelerated) |
Moderate to very low |
Dialogue, simple music, ambient sounds, and SFX. |
Limitations differ based on platform capabilities. |
Table 2: Comparison of all available codecs (from Audiokinetic documentation)
- Sample Rate Automatic Detection
Sample Rate Automatic Detection is an option that allows the Wwise encoder to analyze the content of a sound file and choose the best sample rate for that specific content. For example, if a sound primarily consists of low-frequency content, a lower sample rate can be selected to reduce file size without significant loss in audio fidelity. However, in the case of Scars Above, we decided not to utilize the automatic sample rate detection feature. Our game doesn't include many sounds that are predominantly low-frequency, and we wanted to ensure all our sounds were at the same sample rate as the platform's native rate of 48kHz. This approach helps prevent aliasing artifacts when upsampling to 48kHz. Another thing we kept in mind was that the Vorbis encoder may result in poor audio quality when converting sounds using sample rate of 16kHz or below, since the codec was specifically tuned for higher sample rates.
Converting to Mono
A good way to reduce the memory load, the disk size and the CPU load of our game is to convert sounds to mono (where applicable) by using a Conversion Setting ShareSet preset with the channel configuration set to Mono.
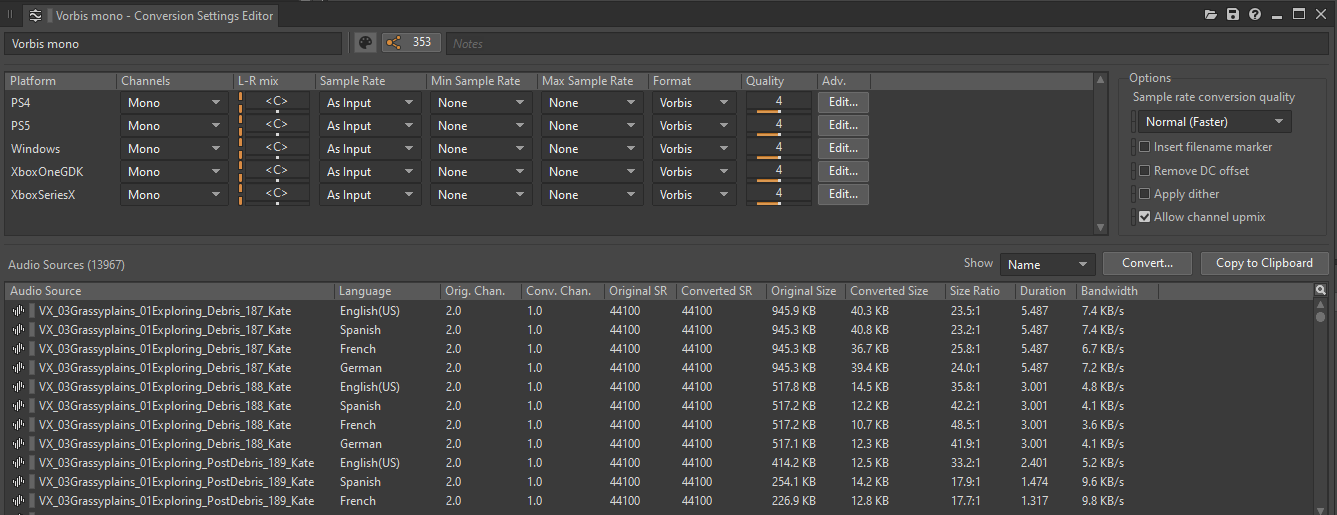
Picture 8: Conversion Settings ShareSet preset editor
Multichannel files have a significantly larger memory footprint compared to single channel files. For example, a stereo file with two channels will take up twice as much space as its mono counterpart.
More importantly, we should consider how multichannel files behave as sound sources in the game. Each channel of audio corresponds to one Voice in the game. This rule also applies to Audio Objects, meaning that each channel equals one Audio Object. When inserting plug-ins to multichannel sounds, each channel will create one instance of the plug-in. This effect propagates to all children in the hierarchy unless overridden.
It's easy to see how having audio files with many channels can add up when it comes to cost. More Voices/Audio Objects require allocating additional CPU resources for plug-ins, conversion, and mixing of those sounds.
Consider converting to mono any sounds that meet one or more of the following criteria:
- The content in all channels is the same or very similar;
- The sound is using an attenuation preset with a very small attenuation radius;
- The sound is using an attenuation preset with a very low Spread value.
Sounds that are usually a good fit for conversion to mono are voice overs, sounds made by small emitters on the level (such as small enemies and critters), certain UI sounds, Foley sounds (depending on their size and distance), small interactions on the level, etc.
To convert a file to mono, you can override the Default Conversion Settings preset by navigating to the Conversion tab of the sound or its parent, checking the 'Override parent' option and selecting the appropriate ShareSet preset.
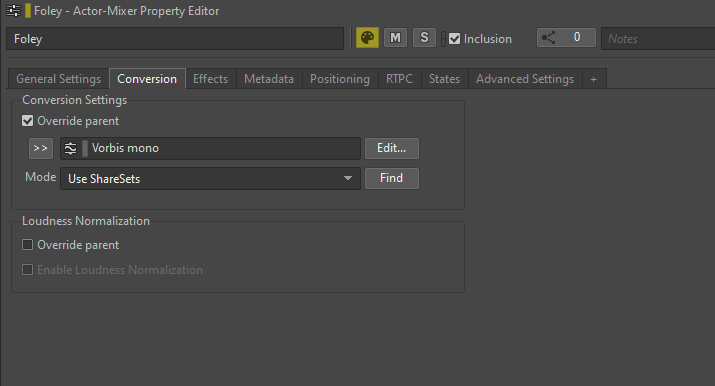
Picture 9: Overriding a Conversion Settings preset
To get an overview of all the objects that are configured to be converted to mono, you can check the list of references to the Conversion Settings ShareSet preset:
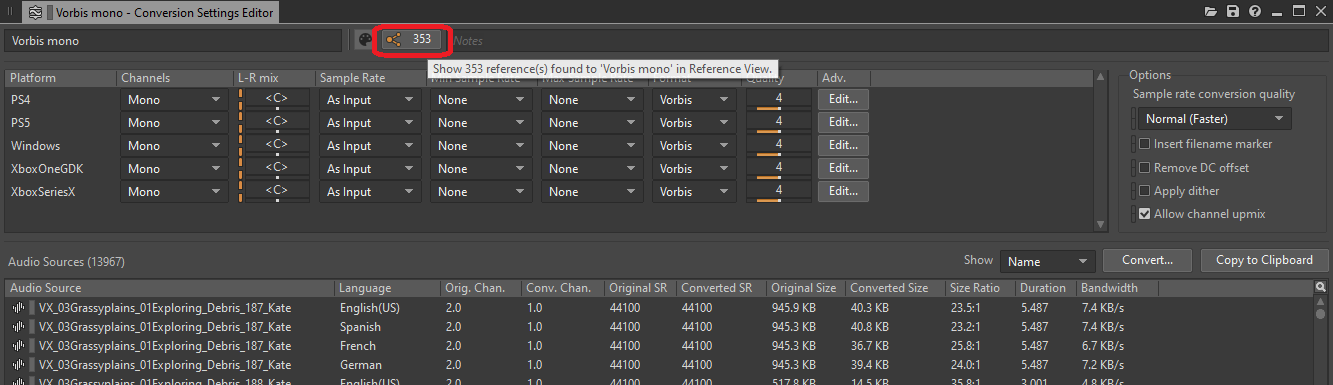
Picture 10: Reference button of the Conversion Settings ShareSet preset editor
Clicking the button opens a Reference View window listing all the references to that ShareSet preset:
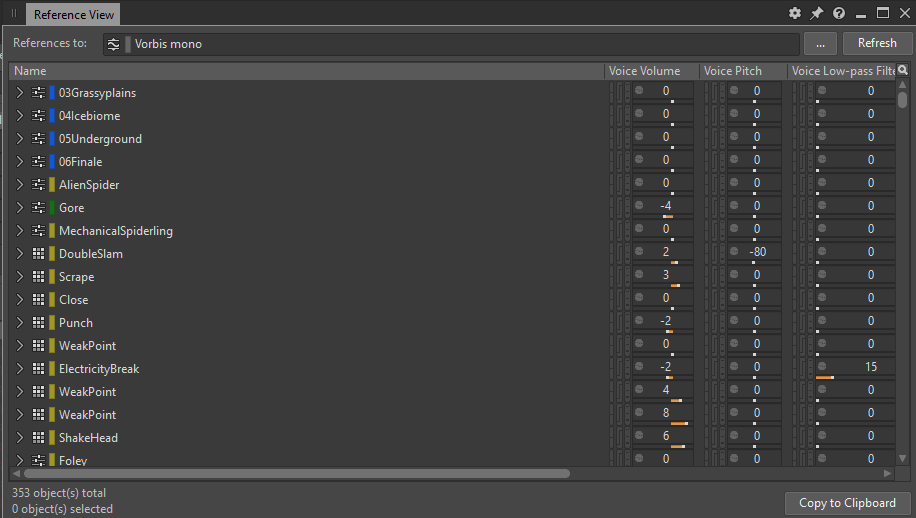
Picture 11: Reference View window showing all references to the 'Vorbis mono' preset
Gluing Blend Containers
One optimization practice that we adopted in our Wwise project is to consolidate (or glue) all Blend Containers. We adapted the term ‘gluing’ for the process of recording an output from a source, in this case a Blend Container, into a new audio file and replacing the source with the new file. As a result of this process, all Blend Containers are replaced with single SFX objects.
During the production phase of our game, we imported lots of sounds, and Blend Containers provided a convenient way to organize layers of sounds within a single container. This allowed us to easily test the container by triggering a single Play action within an event. Having layers in Wwise enabled us to further improve on the mix of these layers, while having them all under one parent gave us an option to easily trigger and process them in different ways.
However, using Blend Containers solely for organizing layers may seem like an overkill. The primary purpose of Blend Containers is to create Blend tracks, which allow us to define precise transitions between child objects within the container and allow control over those transitions using different game parameters.
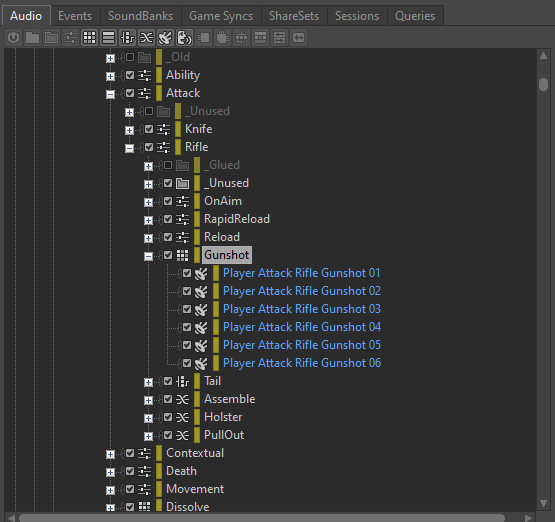
Since each Blend Container when triggered will have several children all playing at the same time, we must be aware of the CPU load associated with Blend Containers. For instance, if we have a Gunshot Blend Container with separate child containers for 'Impact', 'Tail', 'Foley' and 'Mechanics' layers, triggering the Blend Container will play all four sounds at the same time.
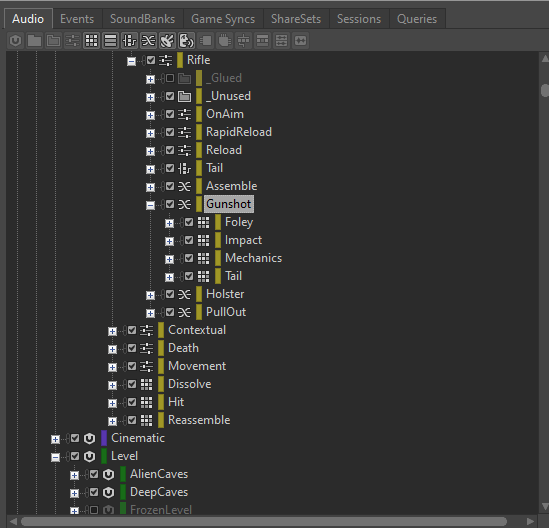
Picture 12: An example of a Blend Container with four children
Assuming that each layer within the Gunshot event is configured for stereo playback with two channels, triggering the Gunshot event would take up eight physical voices. If multiple Gunshot events are triggered rapidly, the voice count can quickly add up. Additionally, if there are any plug-ins inserted on the Blend Container, each Gunshot event will generate eight instances of each inserted plug-in.
Gluing that Blend Container would reduce the voice count from eight to two, resulting in a significant reduction in memory and CPU load.
If the child containers within the Blend Container are Random Containers, designed to generate different mixes of layers for each Gunshot event, we can glue the same Blend container as many times as needed, creating enough variations while maintaining fidelity and achieving an optimized Gunshot sound.
The best way to glue a Blend Container is to record the output from the Wwise Authoring Tool itself. By inserting a Wwise Recorder plug-in on the Master Audio Bus and configuring it appropriately, each triggering of the Blend Container can be recorded to a specific .wav file on the disk.
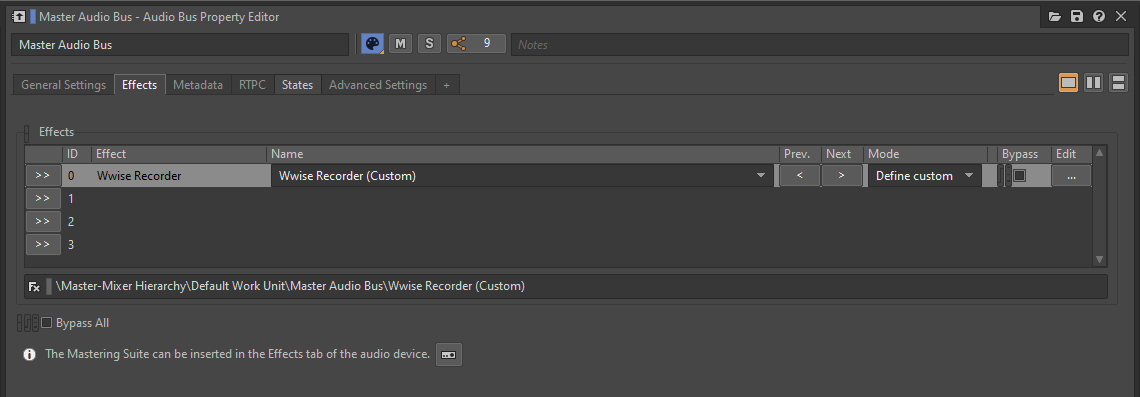
Picture 13: Wwise Recorder plug-in inserted on a Master Audio Bus
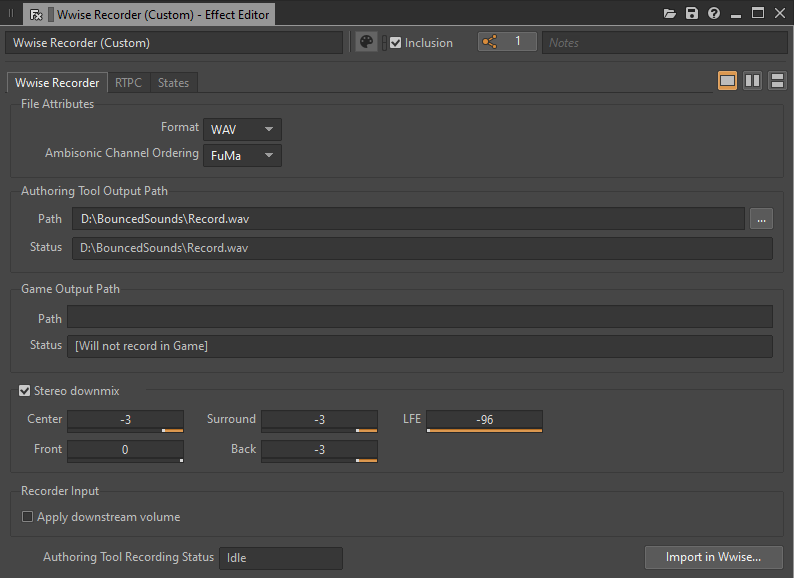
Picture 14: Wwise Recorder Effect Editor window
Once the Blend Container has finished playing, the corresponding .wav file is created. It is important to either move the recorded file to a different location or assign it a suitable name before proceeding with recording a new take. This ensures that each playback does not overwrite the previous recording.
After generating a sufficient number of variations, all the recorded files can be imported into a newly created Random Container. This Random Container can then be used to replace the Blend Container in the event. Don't forget to remove or bypass the Wwise Recorder plug-in from the Master Audio Bus once you've finished recording.
Picture 15: Random Container with generated Wwise Recorder variations
I found it useful to keep the now unused Blend Container in the project in case we would like to modify the mix and repeat the process in the future. I suggest putting it in a '_Glued' folder and excluding it. That way, in case we want to generate new variations, we are able to easily include it back, re-insert the Wwise Recorder plug-in, make the necessary changes and record new takes.
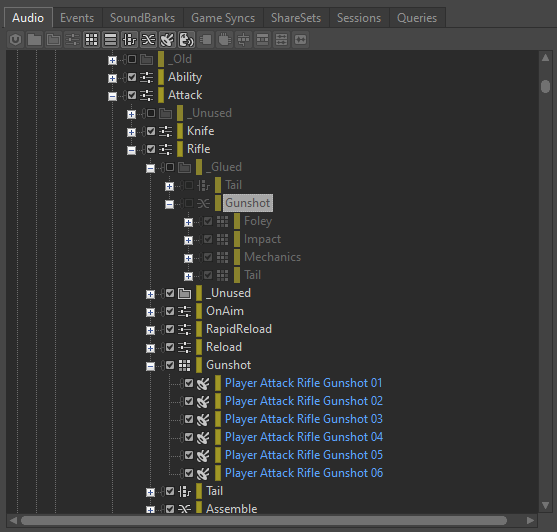
Picture 16: Excluded Blend Container
Optimizing effects processing
Processing sounds in Wwise using provided plug-in effects can take up significant CPU and even memory resources. However, there are several methods to optimize processing and improve performance within the Wwise environment. In the following sections, we will explore these optimization methods in detail.
- Rendering Effects
As mentioned earlier, each plug-in effect added to an audio object in Wwise will create an instance for each channel of the object and its children. The processing performed by these plug-ins is calculated in real-time during gameplay. However, if we have processing effects that do not need to be dynamically modified by a game parameter, we can choose to render them instead.
Enabling the 'Render' option will effectively bake the effect into the sound before packaging it in a SoundBank. This approach saves processing power during runtime. But as stated before, we will be unable to use game parameters (RTPCs) to modify or bypass the effect once it has been rendered.
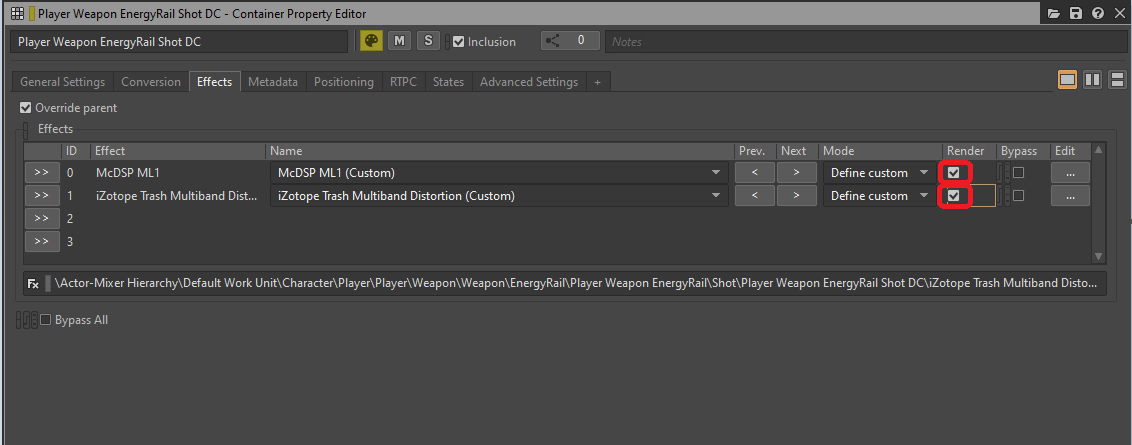
Picture 17: Render option selected in the Effects tab of the Container Property Editor
There's an easy way to get a list of all inserted effects that can be rendered. If we generate an Integrity Report (the default shortcut to its window is [Shift + G]), all instances of effects that can be optimized using rendering will be listed for each platform, with the following message:
'The effect could be rendered to save CPU, since no parameter will change in game.'
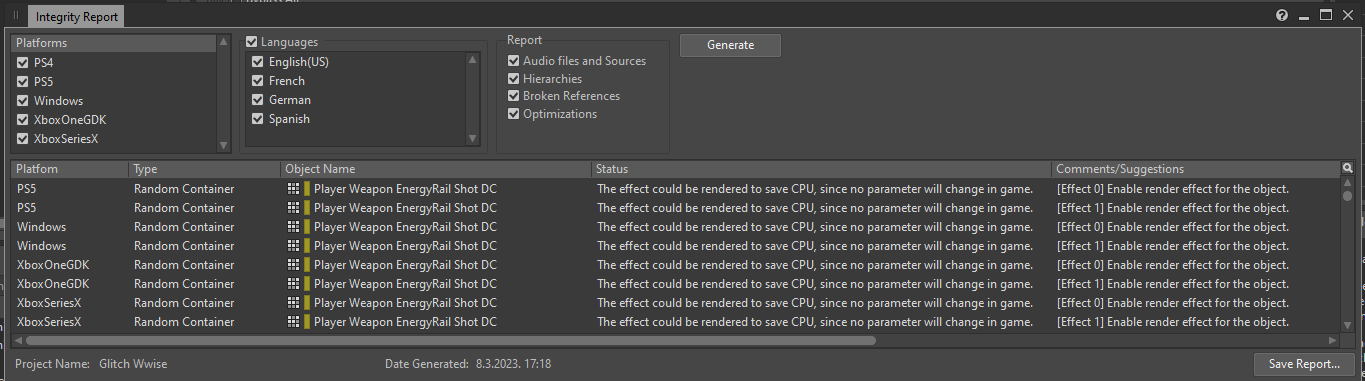
Picture 18: The Integrity Report window
From there, you can open the Property Editor of an object that contains the effect and enable the 'Render' option. Once you've done this, those effects should no longer be listed in the Integrity Report (for these specific issues related to rendering).
- Inserting Effects on Busses
In general, the best practice when using effects that cannot be rendered is to insert them into busses rather than objects within the Actor-Mixer or Interactive Music hierarchies. This is because busses have a fixed number of channels, and inserting an effect on a bus will instantiate the effect as many times as there are channels on the bus. On the other hand, inserting an effect on an Actor-Mixer object will instantiate the effect for each channel of each child of that object. Both approaches should ultimately sound the same, but the former will create fewer instances of the effect.
However, there is an exception to this rule when the bus has more channels than the objects being sent to it. In such cases, the bus will create additional instances of the effect compared to SFX objects, so it may be preferable to insert the effect on the SFX object instead. There are exceptions to this rule too – reverbs have a negligible performance cost per channel and are often best used on Auxiliary Busses.
- Moving processing from General Settings to Effects
To further save on resources, we can consider certain parameters of a bus or an object as effects that consume processing power during runtime. Parameters like Bus or Voice Volume, Pitch, Low-pass filter, or High-pass filter that are present in the General Settings tab still take up CPU resources during gameplay, and if not modified by a game parameter, can be replaced with dedicated effect plug-ins and then rendered.

Picture 19: Processing parameters of the General Settings tab
Both a Low-pass filter and a High-pass filter can be replaced by a single instance of Wwise Parametric EQ, while Pitch can be replaced by an instance of a Wwise Pitch Shifter or a Wwise Time Stretch plug-in. Volume or Make-Up gain can be replaced by a Wwise Gain plug-in effect.
GIF 1: Wwise plug-ins inserted instead of General Settings parameters
Here's a link to a table from the Audiokinetic documentation referencing LPF and HPF values to their Cutoff Frequencies:
Wwise LPF and HPF Value Cutoff Frequencies
Optimizing how assets are played
In this section, I will explain how sound assets are played and stopped, the concepts of voices and AkComponents, and the steps we can take to optimize the playback and triggering of sounds.
Voices
Each discrete sound that is playing in the game occupies one voice. When an event is triggered, an audio source associated with that event becomes a 'voice' during runtime. These voices require calculations to enable their existence and apply various behaviors. Those calculations mainly depend on the amount of processing being done to that voice. By minimizing calculations and running them only when necessary, we can save significant CPU resources.
To view a list of all the voices currently playing in the game, you can connect to the game in the Wwise Profiler and navigate to the 'Voices' tab:
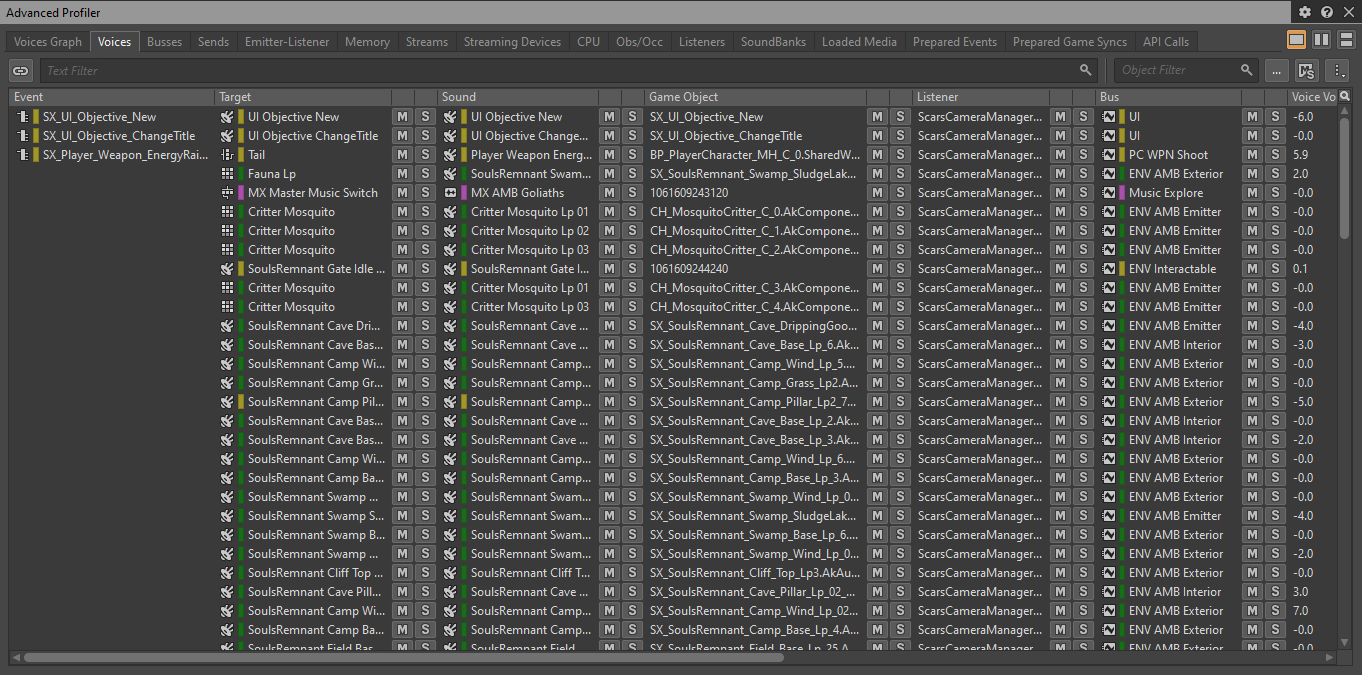
Picture 20: Voices tab of the Advanced Profiler
- Virtual Voices
When a voice is active and producing sound, it is referred to as a 'Physical Voice'. Each Physical Voice undergoes following computations on each frame:
- Decoding of the audio file;
- Resampling of the sound (also applying Pitch Shift if used);
- Effects and filter processing;
- Volume computation.
In cases where a Physical Voice is not audible, such as when the associated actor is too far away, it can be set as a 'Virtual Voice'. Virtual Voices skip all computations except for Volume computation, which is needed to determine the volume at which the sound should be played when it becomes audible again. Setting Physical Voices to Virtual saves a lot of CPU resources, so making sure that no inaudible sounds remain active is an important step in optimizing our game.
Virtual Voice Behavior can be defined for each sound asset in the 'Advanced Settings' tab of the Property Editor:
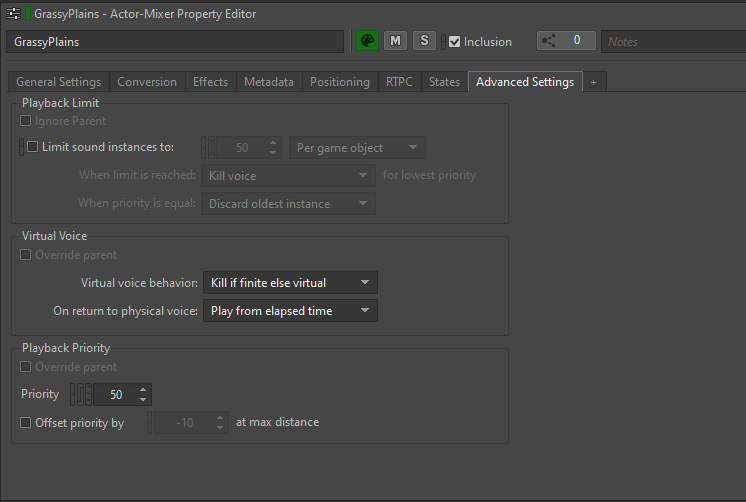
Picture 21: Advanced Settings tab of the Property Editor
Virtual voice behavior options determine what happens to a voice when its volume gets below the Volume Threshold.
There are several options available:
- Continue to play: The voice remains active and continues playing normally;
- Kill voice: The voice is stopped completely and no longer plays;
- Send to virtual voice: The voice becomes a Virtual Voice, skipping most computations except for volume computation;
- Kill if finite else virtual: If the sound is finite (non-looping), it is stopped completely when sent to virtual. If the sound is looping, it becomes a Virtual Voice.
We generally tend to set the default value to 'Kill if finite else virtual' for most assets. This covers almost all cases where the sound needs to be handled when its volume falls below a certain threshold. Finite sounds are killed since we won't hear the rest of the sound if we move far away, while looping sounds are sent to virtual.
When returning to Physical Voice state, we have chosen to set all virtual voices to 'Play from elapsed time'. This means that in addition to volume computation, Wwise keeps track of the time the voice was in a virtual state. When the voice becomes active again, it continues playback from the elapsed time, keeping a seamless perception of time flow in the game.
- Volume Threshold and Max Voice Instances
In order for Wwise to determine when to send a Physical Voice to a Virtual state, we need to specify the Volume Threshold. The Volume Threshold represents the minimum volume level below which the sounds are considered low enough to be safely converted to Virtual Voices.
This is defined in the Project Settings' General tab, for each platform:
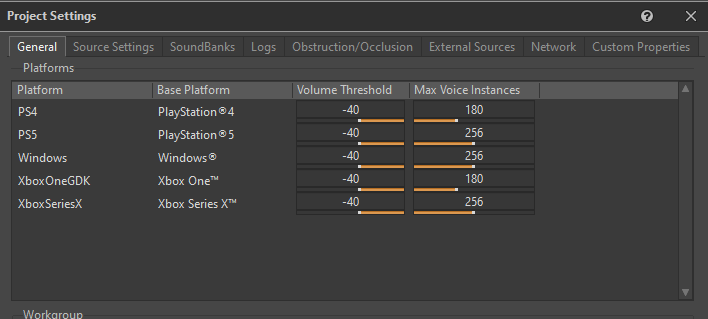
Picture 22: General tab of the Project Settings window
We determined that a Volume Threshold of -40 is suitable for the Virtual Voice behavior.
The Max Voice Instances is a parameter that defines the maximum number of Physical Voices allowed per platform. If the number of Physical Voices exceeds this limit, based on their priorities, any additional voices will be immediately sent to virtual. We set relatively generous values for this parameter, as we wanted to have better control over the number of voices in the game.
When profiling voices, it's important to monitor two parameters: 'Number of Voices (Physical)' and 'Number of Voices (Total)'. 'Number of Voices (Physical)' shows the number of all concurrent Physical Voices actively playing in the game, while 'Number of Voices (Total)' shows the combined count of registered Physical and Virtual Voices.
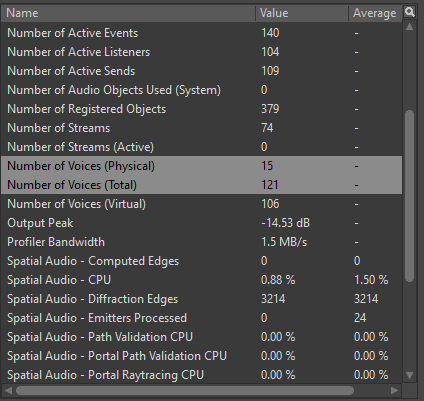
Picture 23: 'Number of Voices' parameters in the Wwise Profiler
We set a general rule for each platform regarding the maximum number of Physical and Total Voices allowed, as outlined in the table below:
|
|
Physical Voices (Max) |
Total Voices (Max) |
|
Gen 8 |
30 |
500 |
|
Gen 9 |
40 |
600 |
|
PC |
40 |
600 |
Table 3: Maximum number of voices per platform
While Virtual Voices have much lower computational requirements compared to Physical Voices, it's still important to avoid excessive usage of Virtual Voices in the game. Although they are less resource-intensive, Virtual Voices still require Volume and Elapsed time calculations. More importantly, Virtual Voices are still considered as Emitters, and if sent to Spatial Audio, they will contribute to Diffraction path calculations.
- Playback Limiting
In situations where a sound can potentially be triggered an unpredictable number of times or when there are excessive instances of the same sound playing simultaneously, we can apply a Playback Limit to that sound in Wwise.
The Playback Limit option can be found in the Advanced Settings tab of the Property Editor, where we can set 'Limit sound instances to' a certain number. We have the flexibility to choose the scope of the limit. Deciding between a Game Object and Global gives us the ability to limit the sound per actor or globally across the entire game.
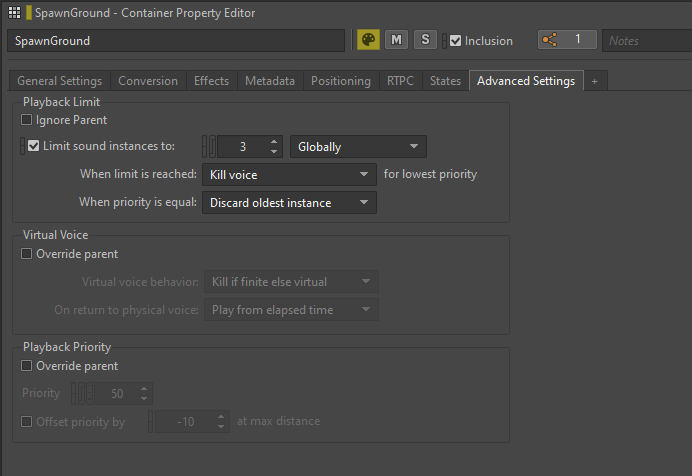
Picture 24: Limiting sound instances of a Random Container
We primarily used sound instance limiting for Enemy sounds, especially during intense combat scenarios where multiple spawns of the same enemy type could trigger numerous similar sounds at the same time. By applying playback limits, we not only optimized our game's performance but also improved the overall mix by reducing excessive sound overlaps.
AkComponents
An AkComponent serves as a representation of an active Wwise Event in Unreal Engine and is derived from the USceneComponent.
From the perspective of a Sound Designer, we can view AkComponents as sources of sounds or speakers within the game. When present in the game, these speakers can emit sounds, be attached to actors, and even move along with them.
Effectively managing AkComponents in our game is a crucial step in optimizing audio performance. Each active AkComponent requires various calculations to be performed on every frame, making an excessive number of registered AkComponents very CPU-intensive.
To optimize sound posting, we should utilize existing AkComponents whenever possible instead of spawning new components for each event. By keeping track of all AkComponents in the game and posting sounds on existing ones as needed, we can reduce the overall CPU load.
Ideal candidates for AkComponents are actors that are consistently present and moving in the game, such as the Player Character, NPCs, Enemies, Projectiles, and so on. Some actors, like AkAmbientSounds, may already have an AkComponent attached by default.
- Using Post Event at Location instead on an AkComponent
The 'Post Event at Location' function in Wwise allows for posting events without the need for an AkComponent. This function takes an event and transforms data as input, registers a temporary Wwise Game Object with an assigned ID number, and posts the event at the location and orientation of the transform.
Compared to creating an AkComponent and posting events through it, using the 'Post Event at Location' function is a much cheaper approach. Wwise Game Objects generally carry very little information with them but still behave similarly to sounds posted on an AkComponent. The main difference is that the events posted on Wwise Game Objects cannot change their transform after posting, cannot be attached to another actor, cannot take advantage of Wwise Switches, States or Callbacks, and cannot be modified by game parameters with a Game Object scope.
Despite these limitations, posting events at location remains highly useful for many different types of sounds. It is usually used for posting positioned fire-and-forget one shots or loops. Non-positioned 2D sounds that are not tied to any actor or a location can also be posted using this function; those sounds will ignore the transform data.
In Scars Above, we extensively used the 'Post Event at Location' for UI sounds, Music tracks, interactions within the game world, Impact events (including certain Hit sounds on enemies), static actors emitting looping sounds, and more. Utility events with global scope, such as those setting global states, making global mix changes, or pausing/unpausing busses, are also good candidates for using the 'Post Event at Location' function.
When using the 'Post Event at Location', there are a few considerations to keep in mind:
1. To obtain a desirable location for the sound, you can search for a component or actor that provides the location. Use functions such as 'Get World Location' or 'Get Actor Location' to retrieve the location data;
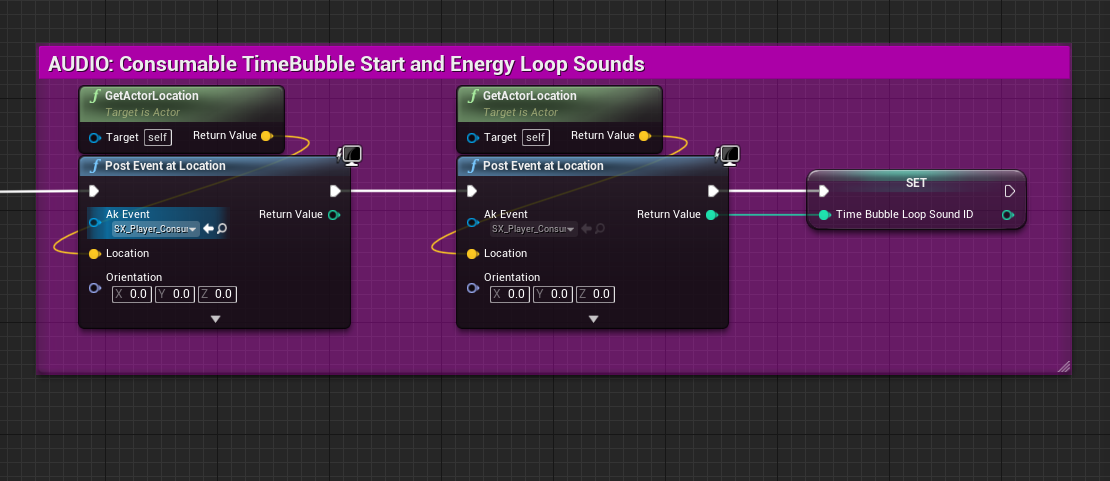
Picture 25: Posting a positioned sound using the actors location
2. If you are posting a sound at BeginPlay, make sure that your Spatial Audio actors are loaded before posting the event. This ensures that the sound is correctly positioned within the Spatial Audio network. Unlike AkComponents, events posted on a Game Object do not update their location with respect to Spatial Audio when Spatial Audio actors are loaded.
3. When posting looped sounds on a Game Object instead of an AkComponent, you also need to handle the stopping of such looped sounds. Destroying an AkComponent (such as when the parent actor is unloaded) will stop all sounds routed through it. However, temporary Game Objects created for the 'Post Event at Location' function are not tied to any such game logic. To stop the sounds, you could either unregister the appropriate Game Object or manually stop the event. The simplest way to stop a Game Object event is by calling the 'Execute Action on Playing ID' function with the Game Object ID as the input.

Picture 26: Posting and stopping a non-positioned UI sound
Animation notifies
Posting events directly in animations is a common method we used to trigger sounds in the game. Even though most sounds were posted on the same AkComponent, there were instances where a large number of concurrent notifies triggered sounds to be played simultaneously, resulting in a high number of Physical Voices being generated.
Dividing sounds into smaller chunks or multiple layers can offer higher fidelity and better control over synchronization with movement. However, posting these sounds in quick succession can lead to an excessive number of events being triggered, resulting in numerous calls to Wwise, especially if several similar animations are being played at the same time.
Blend spaces can further exacerbate the issue, as blending two animations with a significant number of notifies can potentially trigger an even higher number of events.
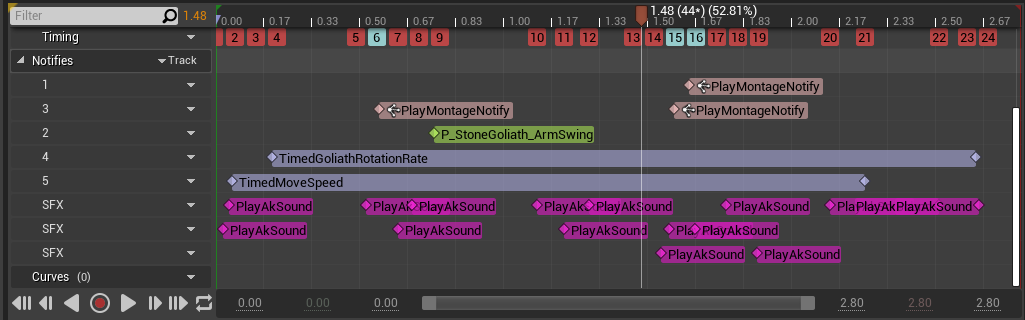
Picture 27: An Animation Montage with a large number of sound notifies
In such cases, we should ask ourselves if the high number of notifies per animation is really necessary and consider the possibility that a smaller number of audio events could achieve a similar or equivalent level of quality. By having fewer concurrent sounds in animations, we can decrease the number of active voices and lighten the load on the CPU.
Organizing assets for optimization
Organizing our assets is crucial for improving both the performance and general workflow of our project. By placing assets into appropriate SoundBanks and sublevels, we gain control over when to load and unload these assets. This allows us to manage resource usage more efficiently, ensuring that only the necessary assets are loaded into memory at any given time.
It is also important to keep our projects clean and free from redundant assets. Removing unnecessary assets not only reduces clutter but also helps us minimize memory and CPU consumption.
SoundBanks
Grouping sounds into SoundBanks is a great way to manage audio memory in the game. In most cases, there is no need to have all sounds loaded at all times, so grouping sounds and having them loaded only when they are needed is one of the best ways to reduce memory load, while keeping a clear overview of when and how the sounds are getting loaded and played.
In order to be able to properly load different types of sounds, we decided to group them into following categories:
- Main: Contains events that will be used throughout the whole game;
- Player: Contains all Player events;
- Enemies: One bank per Enemy type, containing all events for that Enemy;
- CharactersCommon: Contains all shared Character events;
- Levels: One bank per Level/Sublevel, containing all events for that Level/Sublevel;
- LevelsCommon: Contains all shared Level events;
- Music: Contains all Music events;
- Voice: Contains all Dialogue events;
- EmotionalResponses: Contains all Player Emotional Responses events;
- Cinematic: Contains all Cinematic events;
- HapticFeedback: Contains all Haptic Feedback events.
- Auto-loaded SoundBanks
Banks that are set to auto-load are loaded automatically when an event belonging to that bank is referenced in the game. SoundBanks such as Main, Player, and Music are constantly referenced and are kept in memory throughout the duration of the game. For Enemies SoundBanks, we kept track over when and where each enemy type got referenced, and relied on the auto-load system to dynamically load and unload SoundBanks specific to each Enemy type.
In our project, all SoundBanks except for Levels SoundBanks are set to auto-load. For Levels, we wanted to have strict control over when and where actors and events are loaded. We tied the loading of Levels SoundBanks to the World Composition level streaming system, which allows us to load and unload specific levels as needed (I'll be covering Level streaming later in this section).
- Common SoundBanks
We created Common SoundBanks to store events that are shared between different Characters or Levels, and set them to auto-load. The advantage of having Common SoundBanks is that the shared media is loaded only once instead of being duplicated in multiple SoundBanks, which should lessen the memory load. On the other hand, since Common SoundBanks are not tied to specific Characters or Levels, they remain loaded for a longer duration compared to auto-loading or streaming.
The alternative to Common SoundBanks when using shared events is to have duplicated media in different SoundBanks. While this may result in periods of time where the same events are loaded in multiple banks, if those banks are properly handled, the amount of time can be much shorter compared to Common SoundBanks.
Using Common SoundBanks is optimal if we use them to store events that we know will be referenced by several different characters or levels at the same time. For example, if we encounter different groups of enemies in the same area that share some sounds. The other approach is more suitable when we know that reused events will not be loaded in multiple banks at the same time, as is usually the case with Level SoundBanks. It's on the Sound Designer to decide when and how to load common and specific SoundBanks based on the project's needs and specific situations.
- Event-Based Packaging / Auto-Defined SoundBanks
Scars Above was developed using the now legacy SoundBank system, but it is our plan to switch to the improved Auto-Defined SoundBanks on all future projects. Auto-Defined SoundBanks, introduced in Wwise version 2022.1, build upon the concept of Event-Based Packaging and aim to replace the legacy system. The main principle behind Auto-Defined SoundBanks is to treat each event as a self contained miniature SoundBank that will be loaded only when that event gets referenced and unloaded after it's finished playing.
During the production of Scars Above, there was an attempt to switch to Event-Based Packaging, but we encountered many issues while implementing the feature. Although very promising in theory, in practice the Event-Based Packaging feature was not sufficiently polished, so we decided to stick to the legacy SoundBanks system for Scars Above.
Level Streaming
By using Level Streaming, we can make sure that only the actors on the level that are actually needed are loaded into memory. This reduces the number of actors loaded simultaneously, resulting in fewer Emitters and Game Objects that are using precious audio thread time.
For each emitter on the level that is being sent to Spatial Audio, calculations for diffraction paths need to be made whenever the Listener moves. This happens on every frame, and having hundreds of emitters loaded can cause a lot of Spatial Audio CPU spikes (see Picture 3).
We can profile the number of currently active emitters at any time in the Wwise Profiler. Based on my analysis, it is recommended to keep the number of emitters ('Spatial Audio - Emitters Processed' value in the Profiler) below 150 on Gen 8 platforms and 200 on Gen 9 and PC platforms.
The best way to reduce the number of emitters would be to divide the map into smaller sublevels and have them loaded only when needed. Grouping our actors into specific Sound sublevels gives us control over areas where the actors belonging to that level will be loaded. When the Player enters a designated area, the actors belonging to that sublevel are loaded, and when the Player exits the area, the actors are unloaded. The system for loading and unloading levels based on their level bounds that we used on Scars Above is called World Composition.
- World Composition
World Composition is a system for managing large maps, where the map is divided into smaller sublevels that are organized into Stream Layers. Each sublevel has its own Level Bounds box, and depending on the Stream Layer, is assigned a streaming distance value in Unreal units. This distance determines the range around the Level Bounds box within which the sublevel will be loaded. For example, if a Level Bounds box has a streaming distance of 1500 units, the level will be loaded anytime the Player is within the 1500 units of the bounds (or inside the box).
This system effectively divides the map into manageable chunks, allowing us to load only the actors we need in a given area. While sending sounds to the Virtual Voice system can release some of the CPU processing, the actor itself is still loaded, and its game object is registered for Volume and Spatial Audio computation. Having too many of these objects in memory can also cause CPU spikes.
- How we divided the levels
When dividing a level into smaller sublevels, the most intuitive thing would be to group the actors by specific areas or zones of our map to which they belong. Zones represent parts of the level which are acoustically and visually distinct enough that they may be treated as separate areas when it comes to asset organization and naming.
Each zone would have a dedicated Sound Sublevel. Depending on the complexity and size of zones, it may be beneficial to divide the zones even further into smaller levels.
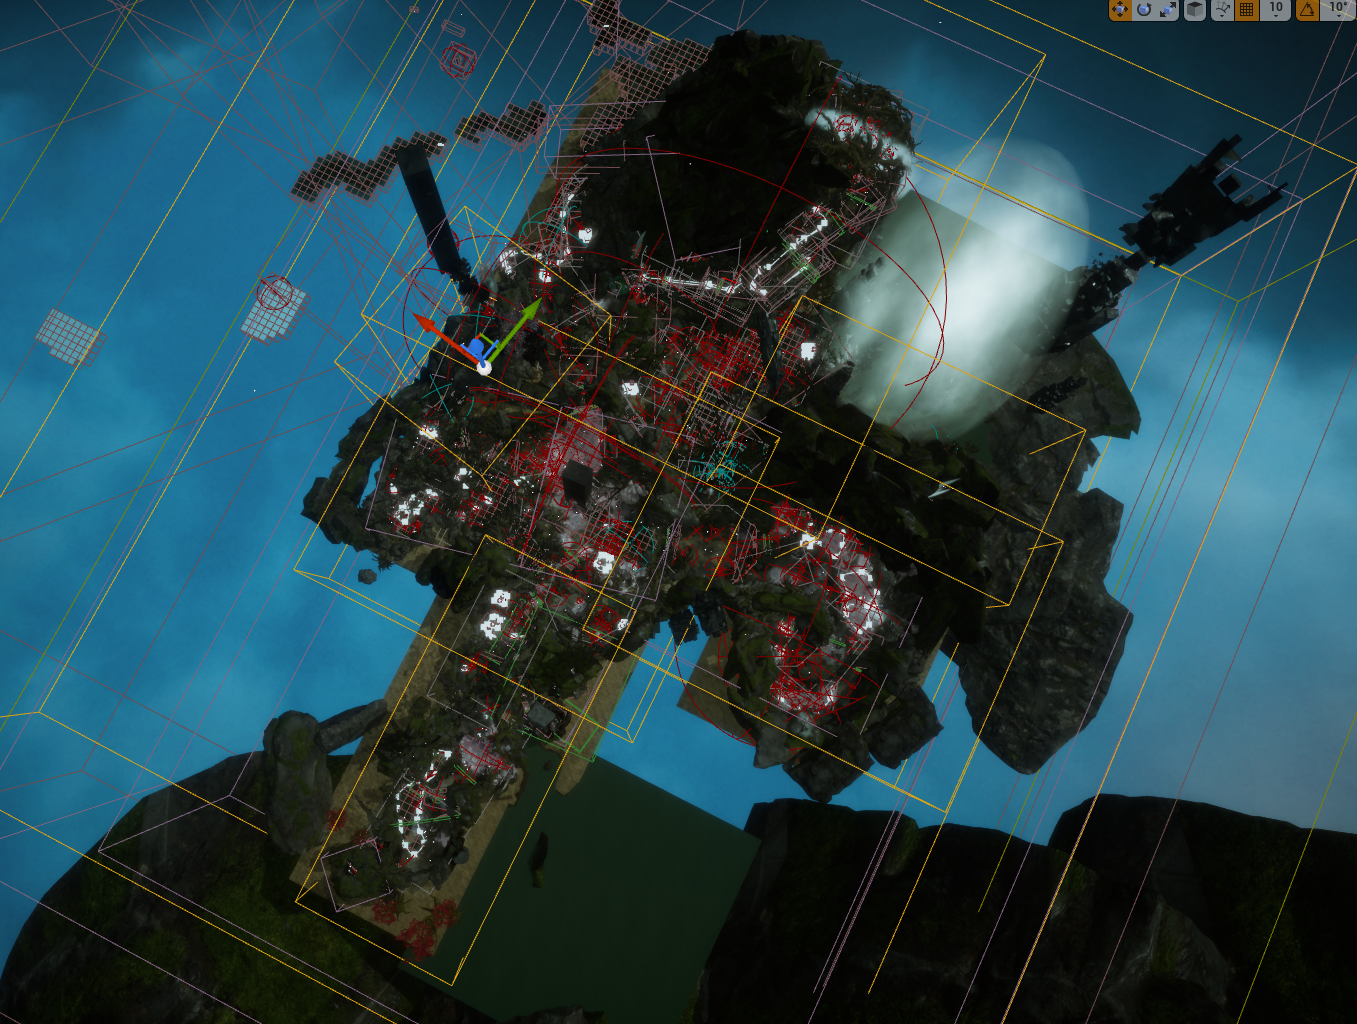
Picture 28: Swamp biome in Scars Above with Sound Sublevels boundaries
- Level Bounds
After enabling World Composition, we can define each sublevel's Level Bounds that we will use for level streaming. An instance of Level Bounds actor for that level can be found in World Outliner. These actors are represented by transparent boxes (we are limited to using a box, a basic shape that can not be changed) and will determine the zone covered by each sublevel. When setting the boundaries, it's important to consider whether the Level Bounds box encompasses all the sounds and actors that belong to that sublevel.
The best way to determine the boundaries would be to select all our actors in the level and observe the area they cover. Usually, we will be looking at the Attenuation radiuses of our AkAmbientSound actors, since they tend to cover the largest areas on the level.
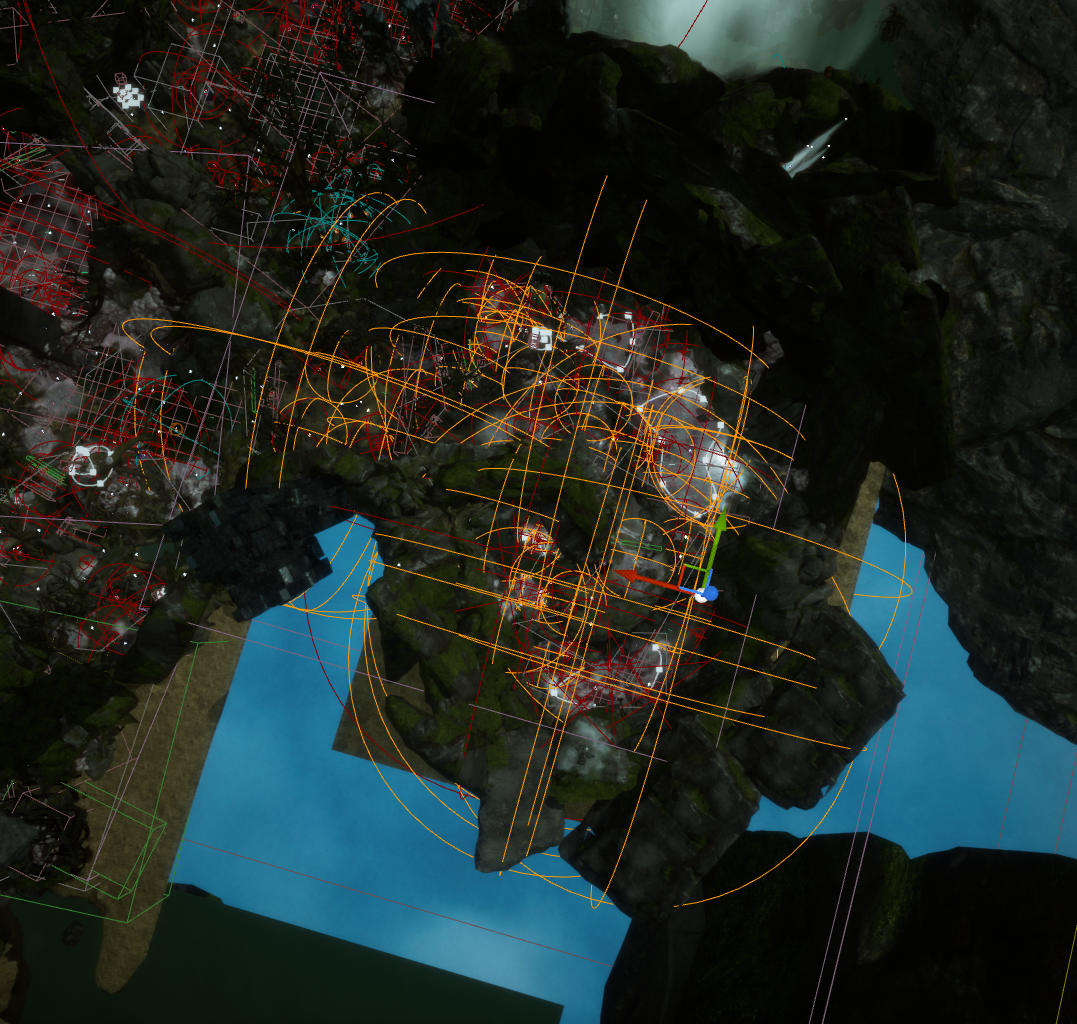
Picture 29: All audio actors selected on a sublevel
The Level Bounds should then be adjusted to encompass the selected actors, taking account of their attenuation radius spheres.

Picture 30: Level Bounds box encompassing all audio actors on a sublevel
- Stream Layers
In order for a sublevel to be properly streamed, we need to assign it to a Stream Layer. This is done by selecting the sublevel in the Levels window and choosing the appropriate Stream Layer.
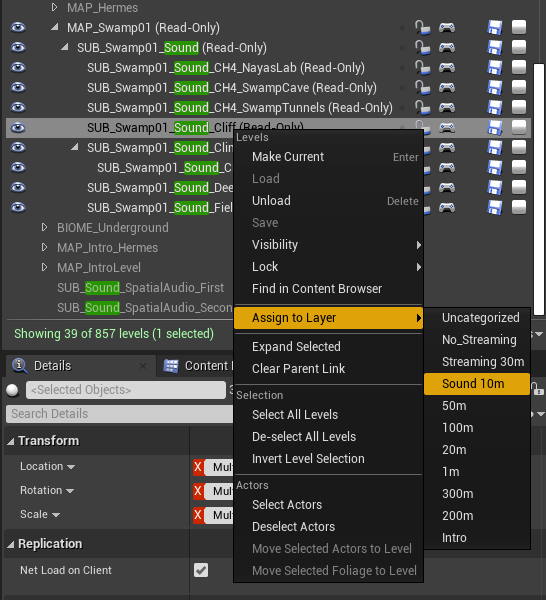
Picture 31: Assigning a Sound Sublevel to the appropriate Stream Layer
In the World Composition window, selecting a Stream Layer allows us to view the bounds of all levels assigned to that layer from a top perspective.
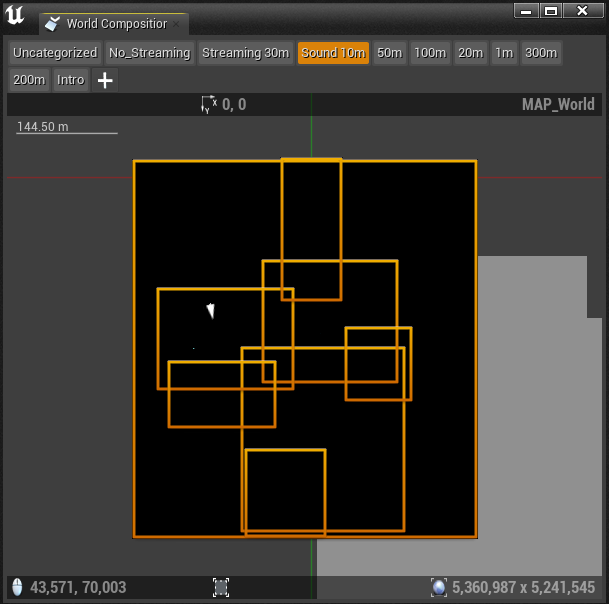
Picture 32: World Composition window showing sublevels assigned to the 'Sound 10m' Stream Layer
- AntiLevelStreaming
By now you might have figured out that using simple box shapes to cover an area of actors to be loaded might not be the best way to optimize sublevel loading and unloading. Being restricted to a very simple shape such as a box, we are unable to precisely define the boundaries of our sublevel. This gives birth to issues where we might have areas on the map where several levels overlap and are being loaded at the same time, just because we were unable to exclude levels from that area due to the box shape of the Level Bounds actor.
In densely populated areas with many actors, even with proper Level Bounds placement, we might still end up with areas on the map where we have too many actors loaded at the same time.
To address these issues, our programming team implemented a custom solution called AntiLevelStreaming, which complements World Composition.
By adding AntiLevelStreaming actor instances on the map, we can create bounding boxes very similar to Level Bounds and assign specific sublevels that we would instead like to exclude from level streaming (i.e. unload) when we enter these boxes. By using this system in juxtaposition with World Composition, we successfully resolved level streaming issues in areas where excessive sublevels were loaded into memory.
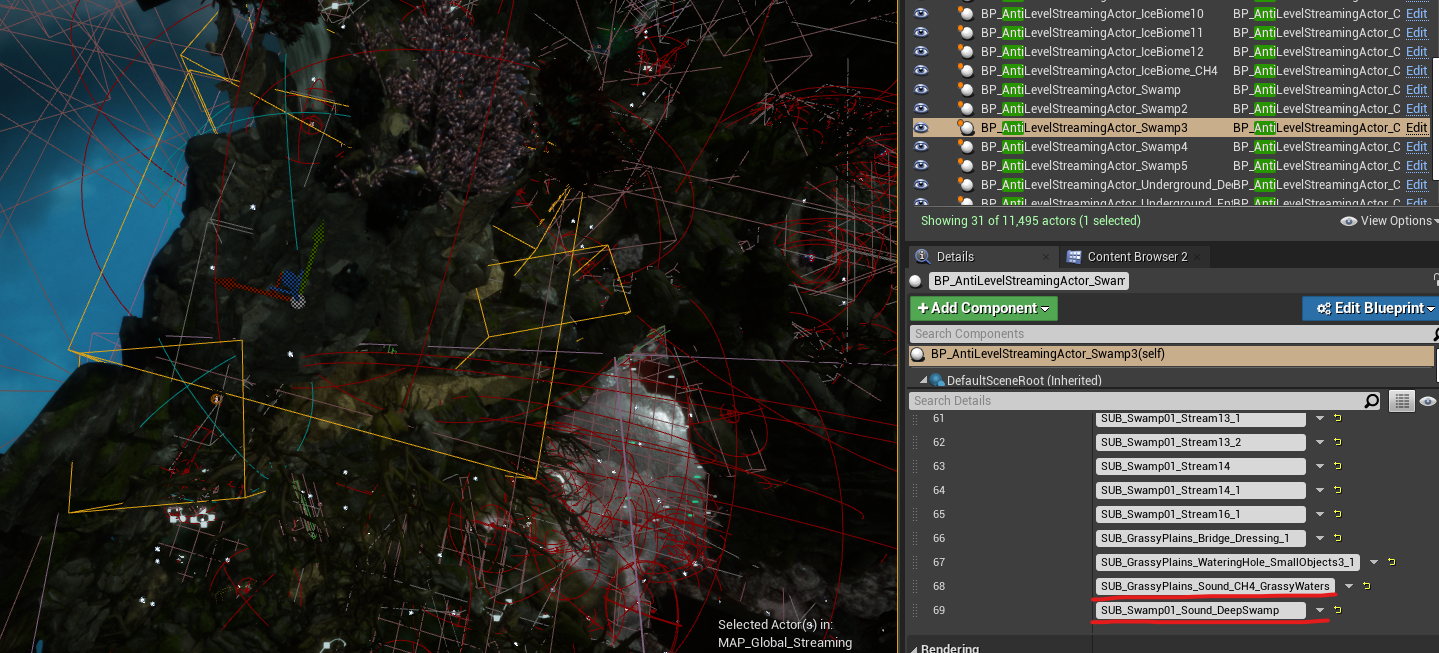
Picture 33: AntiLevelStreamingActor with added Sound sublevels
- Streaming of Spatial Audio
Unfortunately, streaming of Spatial Audio actors was not an option. We determined by testing that loading and unloading of Spatial Audio volumes and specifically AkAcousticPortals caused a lot of recalculating to be done, which took a huge toll on the CPU.
During our testing, we discovered that dynamically loading and unloading Spatial Audio volumes and AkAcousticPortals at runtime had a significant impact on CPU performance. For each Spatial Audio actor that got streamed in or out, diffraction paths needed to be recalculated for all active actors. This made it impractical to stream Spatial Audio actors along with other audio assets.
To address this issue, we made the decision to create a persistent Spatial Audio sublevel that contained all Spatial Audio actors. This sublevel remained loaded at all times, independent of level streaming.
This in turn caused some issues at the end of production due to the excessive Spatial Audio geometry (at one point we had several thousand of Spatial Audio actors in one persistent sublevel). We were able to divide this sublevel into two smaller sublevels and have them loaded only during the transition between far away zones of the game. Since the transition was being handled by a loading screen, we had time to properly load and unload needed Spatial Audio sublevels without impacting player's experience.
Removing unused assets
In any long-term project, features will become obsolete or drastically changed, going through several iterations before the team settles on a solution that works. Sounds tailored for these features might no longer be useful and new sounds will need to be created.
When many people are working on the same project, keeping track of all changes and versions of sounds is not always viable, and some sounds may become redundant without the Sound Designer's knowledge. To optimize memory resources, it is important to identify and remove unused events.
The easiest way to check if an AkEvent .uasset is not being used is to check its references. If the event has only one reference, which is to its SoundBank, it is likely either implemented incorrectly or no longer needed. In such cases, I recommend removing the unused event from the SoundBank and moving it to an 'Unused' folder, both in the Unreal Editor and Wwise. This ensures that the unused event does not consume memory in the game, but it remains accessible for future use if the need arises.
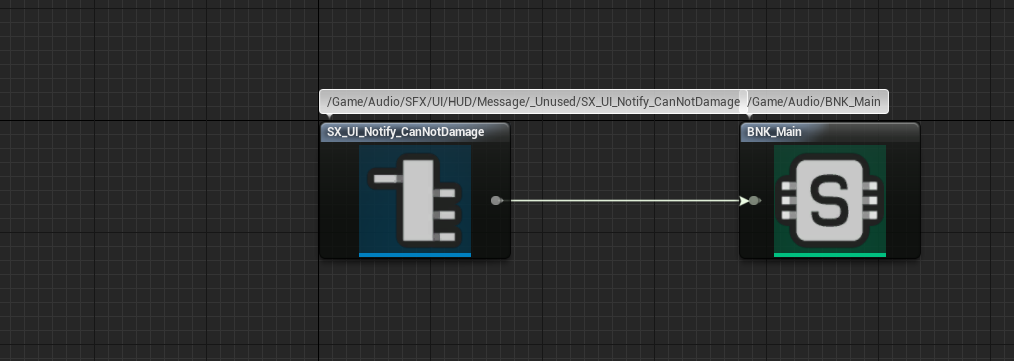
Picture 34: An AkEvent referencing only its SoundBank
SpatialAudio
Spatial Audio is a huge topic that I won't delve into in this document. However, I covered Spatial Audio in detail in my previous article, including best Spatial Audio optimization practices.
The link to the Optimization section of the article:
Spatial Audio Optimization
In this section, you will find all the necessary details to achieve fully optimized Spatial Audio.
In summary, the key steps for optimizing Spatial Audio include:
- Have as simple geometry as possible by keeping an eye on the total number of triangles;
- Minimize the number of volumes, and particularly AkAcousticPortals;
- Disable Surface Reflectors on all convex volumes;
- Pay attention to the total number of emitters processed in each frame;
- Adjust Spatial Audio initialization settings per platform.
If you are interested to learn more about Spatial Audio, I recommend going through the document and referring to the official Audiokinetic documentation on the subject.
Minor tweaks (after exhausting other solutions)
If the previous solutions did not resolve your issues, there are a few additional steps to consider in order to achieve the desired state for the game.
Replace Stop events with Execute Action on Event/ID
For certain types of sounds, there is a need to create and implement a dedicated Stop event.
However, there is an option to utilize existing Blueprint functions called 'Execute Action on Event'/'Execute Action on Playing ID'. These functions provide actions such as Stop or Pause, which can be used to replace some of the events responsible for stopping or pausing sounds. By using these UE functions instead of dedicated events, we can completely remove those events from the SoundBanks. This helps reduce the memory load of the project, even if the impact may be relatively small. Nonetheless, it contributes to further optimizing our game.
Replace actor-mixers with folders where possible
In situations where actor-mixers are used in the Wwise project solely for organizing sounds, but no actual changes or modifications are made on those actor-mixers, we can achieve the same outcome by replacing them with simple folders. This reduces the number of calculations needed for those sounds since there would be one less level of hierarchy to go through.
Similar to replacing Stop events, this approach may not yield significant improvements compared to other optimization techniques, but in some cases every bit of optimization helps.
Reduce the number of variations inside a Random Container
If we're hitting the limit on a specific platform, we have the option to reduce the memory load for that platform by excluding certain assets. This can be easily applied to Random Containers, where we can choose to have fewer variations of one sound specifically for that platform while keeping the original number of variations for other, less burdened platforms.
To exclude variations from Random Containers, we can unlink the 'Inclusion' option for a specific variation and exclude that sound from the platform we wish to optimize. By doing so, we can reduce the memory usage on that particular platform while still maintaining the original variety of sounds on other platforms.
Conclusion
Thank you for reading this document. Optimizing audio in a game is indeed a crucial step in achieving good performance and efficient memory usage. By implementing the various optimization techniques discussed here, we can hopefully achieve our goal of enhancing players' overall satisfaction and enable them to fully immerse themselves in gameplay while enjoying a smooth and seamless visual and auditory experience.
My biggest thank you goes to Dimitrije, Teodora, Selena, Marko and Petar, my fellow sound designers at Mad Head Games, and Nikola from EA Dice for the support and the feedback. A huge thanks to Artem, our Audio Programmer, and Olja, Lazar, Stefan and Borislav from the Mad Head Games QA team. A big thank you to Julie, Masha and Maximilien, and Damian from Audiokinetic for the feedback and the opportunity to publish my findings in the form of this blog.
Useful links
Wwise-251 certification course:
https://www.audiokinetic.com/en/courses/wwise251/
Official Profiling documentation:
https://www.audiokinetic.com/en/library/edge/?source=Help&id=profiling
A short description of Wwise Profiler parameters:
https://www.audiokinetic.com/en/library/edge/?source=Help&id=performance_monitor_settings#profiler_counters
Documentation on voice starvation:
https://www.audiokinetic.com/fr/library/edge/?source=Help&id=ErrorCode_VoiceStarving
A short document on source starvation troubleshooting:
https://www.audiokinetic.com/fr/library/edge/?source=SDK&id=streamingmanager_tips.html#streamingmanager_tips_troubleshooting_sourcestarvation
Wwise CPU Optimizations General Guidelines:
https://blog.audiokinetic.com/en/wwise-cpu-optimizations-general-guidelines/
Optimizing CPU usage:
https://www.audiokinetic.com/en/library/edge/?source=SDK&id=goingfurther_eventmgrthread.html
Conversion Tips and Best Practices:
https://www.audiokinetic.com/en/library/edge/?source=Help&id=versions_tips_and_best_practices
Spatial Audio Optimization section of my article:
https://blog.audiokinetic.com/en/wwise-spatial-audio-implementation-workflow-in-scars-above/#optimization
Comments