
Games need to deliver an exceptional auditory experience across diverse setups, whether it's through 3D Audio on headphones, stereo TV speakers, or expansive 7.1.4 Atmos systems. This diversity poses a challenge when trying to ensure a consistent, high-quality audio experience for all players.
A few years ago, Audiokinetic and SIE introduced the Mastering Suite, a plug-in now widely embraced by numerous games for its free availability and features. This suite empowers developers with EQ, multiband compression, volume adjustment, and limiting for the final output, which is especially advantageous for PS5 games, where it’s hardware-accelerated and acts after all the 3D audio processing.
Ideally, the game audio is already mixed well, different output configurations have been accounted for, and the Mastering Suite is only used to apply occasional peak limiting, mainly when unforeseen events occur in-game. However, reality often presents challenges stemming from the diversity of acoustic environments such as different kinds of headphones, different mixing rooms during development, or the inability to test across multiple devices during the mixing stage.
Consequently, mastering becomes crucial at the project's end, where post-mixing can be used to rectify any inconsistencies or issues.
In this two-part series, we will cover how to approach mastering your game and how to set up presets for different situations.

Approaching Audio Mastering in Your Game
Loudness Target
The first step in mastering is to ensure your title is hitting a predefined loudness target without any unwanted distortion.
The loudness specifications depend on your end platform (console, PC, or mobile) and your own decision-making. We recommend you follow platform content delivery standards to ensure a consistent gaming experience for the players.
As of February 2024, PlayStation recommendations are:
- A 30-minute minimum capture time (explained further below)
- Target Loudness for Console: -24 LUFS Integrated Loudness (+-2LU)
- Target Loudness for Mobile/Portable Device: -18 LUFS Integrated Loudness (+-2LU)
- Max Peak: -1 dBTP
- Max Loudness Range: 20 LRA
(Note: The most up-to-date information can be found on DevNet)
If there is no standard available for your platform, it is probably necessary to run investigations to define what would be an appropriate target for your title. This might mean reviewing many reference titles and getting an understanding of their average loudness statistics so you can ensure your title will land within the general expectations for the platform and game genre.
Measuring Loudness
In order to hit your loudness specs, you first need to measure your game’s audio output.
This can be done in multiple ways.
Wwise offers loudness metering, but it might not be able to catch your actual master output signal on all platforms. This is because your master summing might be generated after the middleware output busses.
It is strongly recommended to measure the actual output of your device.
Measuring the final output of your mix, as it is delivered from the hardware device and heard by the players, ensures that you capture the results of the entire audio pipeline. One way to accomplish this is by sending the digital audio output of the device to an input of your audio interface. Once routed, the output can be monitored in a Digital Audio Workstation (DAW), ensuring that there is no gain offset in the signal chain.
If you are mastering on PlayStation, you can use the internally available Sulpha toolset to record and measure the game master output, available as part of the PS5 SDK. You can also use the recording from Sulpha in your DAW.
Both of these methods enable you to analyze loudness while also allowing for spectral and waveform visualization.
Loudness capture: minimum time and gameplay considerations
According to the recommendation from PlayStation, the loudness measurement should be representative of a variety of gameplay scenarios and measured for a minimum of 30 minutes.
It should capture a representative balance of the gameplay distribution in your title, so there is no “capture bias” in your integrated loudness value.
For example, if you were only in the exploration phase, your game would usually be measured quiet, or if you were only in combat, it would be measured very loud.
Various games have longer or shorter gameplay loops.
More on Loudness is covered in these articles:
- Loudness Processing Best Practices, Chapter 1 : Loudness Measurement (PART 1) | Audiokinetic Blog
- Loudness Processing Best Practices, Chapter 1 : Loudness Measurement (PART 2) | Audiokinetic Blog
Using the Mastering Suite to master your game
It is a good idea to set up the Mastering Suite as early as you can in your project, as it will ensure the suite is working and ready for future use. At the end of the game development cycle, when you actually need to use it, you might not have a lot of time to deal with any setup problems.
As a safe starting point, aim to catch peaks at -1 or -2 dBFS with the limiter (note, it is not a True Peak limiter), with EQ and Compressor bypassed, and all gains set to zero/default.
This “safety limiting” to prevent occasional clipping might be the only mastering process that you eventually need for your title.
If you are not experienced with mastering, remember that you do not need to do anything other than the above safety settings unless your game would sound objectively better on different outputs by leveraging other aspects of the Mastering Suite.
Gain
The gain section of the Mastering Suite allows you to adjust the volume of each speaker output, either individually or together, using Link Mode.
One of the first steps you might take is to adjust the master gain of your mix in order to hit your loudness target. That being said, we strongly recommend that your main mix (the one you spend most time working on) hits the determined target without the need for any mastering adjustment. This is to ensure that you are mixing at the same level and sound pressure level (SPL) as the final mastered product.
Gain staging - compensating for processing
As you master your game, you might need to use the gain section to compensate for any processing being applied. For example, an EQ boost might make the game slightly louder, allowing for a reduction in gain to compensate.
Surround/Atmos considerations
Disclaimer: Please treat the below as a suggestion. Make sure that if you apply it, it is with the full understanding and in agreement with what it is doing to your game’s audio output. A/B constantly in a well-calibrated studio to make your own informed decisions.
In surround/Atmos formats, the surround side and rear speakers often feel louder, compared to the front speakers, when playing the same content. This is partly due to a phenomenon in psychoacoustics associated with survival instinct. Taking this into account, a compensation can be made either in the mix (more control over each sound) or at the mastering stage. It can be quite common to want to reduce the side and rear speakers by around 1.5 dB. If this is part of the action you take, any specific sounds that are still too loud or too quiet become a mix problem that the Mastering Suite cannot solve.
Similarly, if you want a consistent presence from above, you might consider turning up the ceiling speakers by around 1.5 db. This is less about our perception of loudness and more about the fact that these speakers are usually not fed as much content. A slight increase in volume helps to bring extra presence in the height channels.
Muting channels
In some very specific cases, you might want to use the gain control to mute specific channels, such as muting the LFE channel for a “Night Mode” preset.
EQ
Tonal balance and neutral target
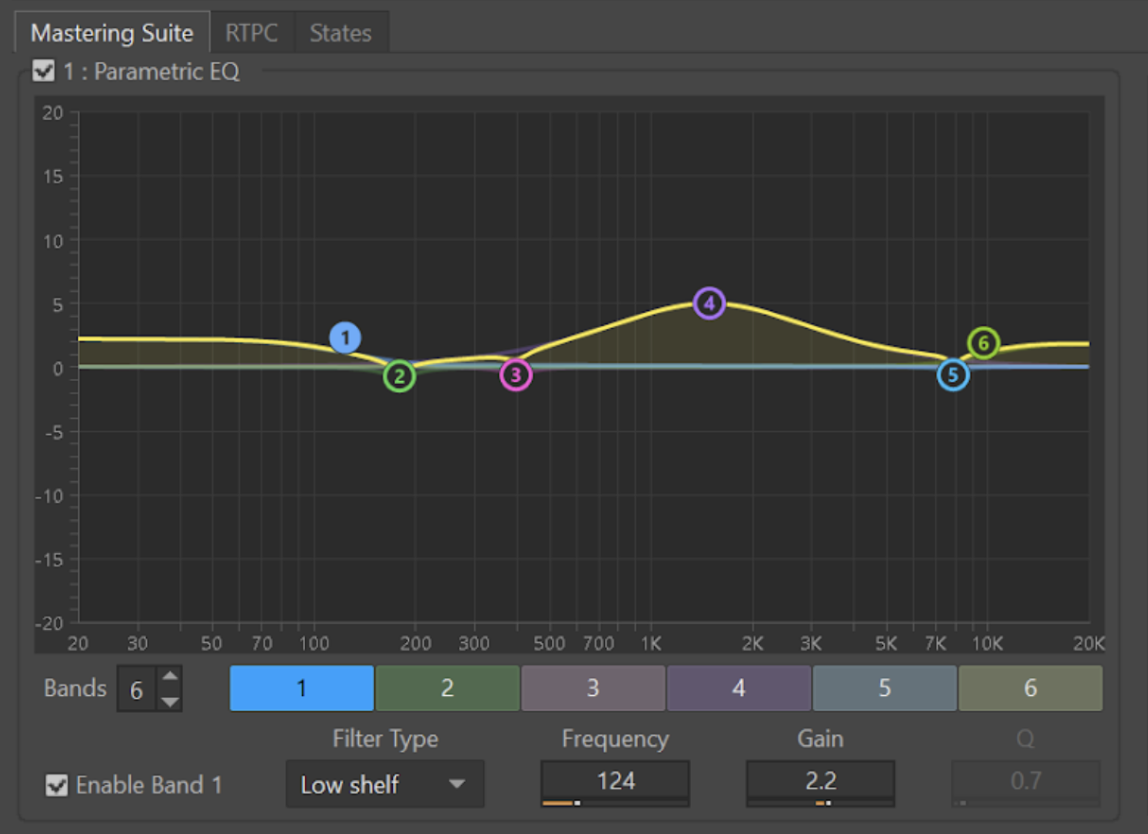
The primary goal of EQ at the mastering stage is to adapt the tonal balance of your mix to the desired goal. Typically, a mix should aim for a neutral tonal balance, as this guarantees the best translation across the greatest number of playback systems.
Equalizing the final mix usually involves wide-band EQ shapes with small gain offsets, often with a maximum of 3 dB up or down. If you need to offset more than this, there is potentially an issue better addressed earlier in the mix.
If the game was mixed in an uncalibrated room or using headphones, it is very likely that some slight adjustments could improve the sound of your title, bringing it to a more neutral response.
It could be useful to investigate which headphone models were used or the room response where the game was mixed. You could then use this information to create a mastering EQ curve that could reverse the inconsistencies of an uncalibrated environment.
It is important to make these decisions in the best-sounding and most precisely-calibrated studio environment you can access. If you don’t feel comfortable with the task, you could hire a trusted engineer to assist or advise you. They know their job but might not know your game, which is one reason why you should be driving and making decisions, considering their advice.
Address persistent issues, not specific ones
Keep in mind that any decision and processing at the mastering stage will affect every single asset of your game. Any settings applied at the mastering stage must be relevant across the entire game because the processes will be active all the time at the final output, which usually includes gameplay and cinematics.
On large titles, this means applying an EQ to hundreds of thousands of assets, so be sure it’s the right decision before committing.
Output devices and audio options
EQ can also be used to shape the tone of the various options and listening modes proposed within your game.
Before making any big decision, such as raising the frequency of a high-pass filter for the TV preset, consider that many players might be in that mode even if they actually use full-range speakers. Users often don’t set up their system as you might expect.
Heavy-handed processing applied in an attempt to deal with consumer hardware is a high risk.
EQ at the mastering stage should be used to deliver a final mix with the desired tonal balance, neutrality, and intentional coloring across all of the listening modes offered, but not as an attempt to fix unknown hardware or environments, precisely because they are unknown.
Your game will translate and sound consistent with other games and media if you aim for a neutral target.
Compressor
Compression to deliver lower dynamic range mixes
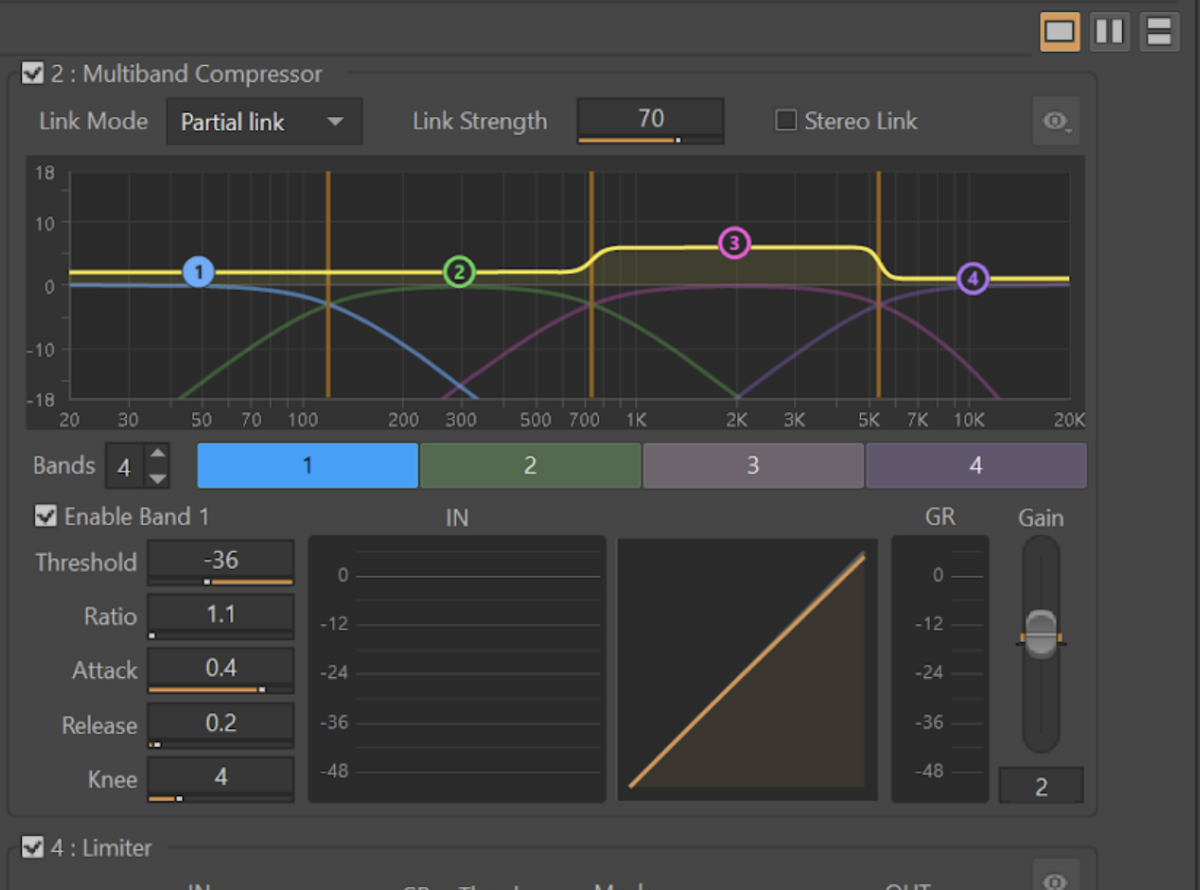
The most obvious use of the compressor stage is to reduce the dynamic range of your mix by applying compression. A multiband compressor can be used to avoid noticeable pumping effects (an audible increase and decrease in volume) by focusing on specific frequency bands instead of the entire frequency range. Therefore, it sounds more transparent.
As with any multiband processing, keep an ear out for phase shifting introduced by the crossovers (A/B with and without). In some specific cases, it might do more harm than good, depending on the work you need to do.
Compression for a pleasant ‘density effect’
Used subtly, compression at the mastering stage can help a mix feel more consistent and “glue” the various elements together through common, unified sonic behavior.
This is something to experiment with as it could yield interesting results. However, it does not work for all types of content and can easily make things worse.
Games are usually so dynamic that it can be difficult to get any real benefit from compression at the mastering stage. It is easier to find opportunities for compression earlier in the mixing pipeline rather than during mastering, so we recommend you only do this if you have sufficient time to experiment.
Tonal balance adjustments (multiband usage)
The relative gain of each frequency band offers very effective control over the tonal balance of your master, with a different shape and behavior from the EQ.
Surround/Atmos considerations
In surround configurations, the link feature can be used to preserve intelligibility for compressed mixes.
In such a situation, the dynamic separation between the quietest and loudest sounds is significantly reduced.
For a listener in a room with multiple speakers, if the channel linking is turned off, it might feel like the action is difficult to distinguish from ambient background playing on all the other speakers.
Using the link feature will help guarantee that when sound is hitting the threshold on any channel, all the other speakers will also be turned down. This ensures that the dynamic scaling of your mix is preserved across all channels.
While this might result in pumping, it may be necessary to help preserve intelligibility.
Limiter
Limiting for clipping protection
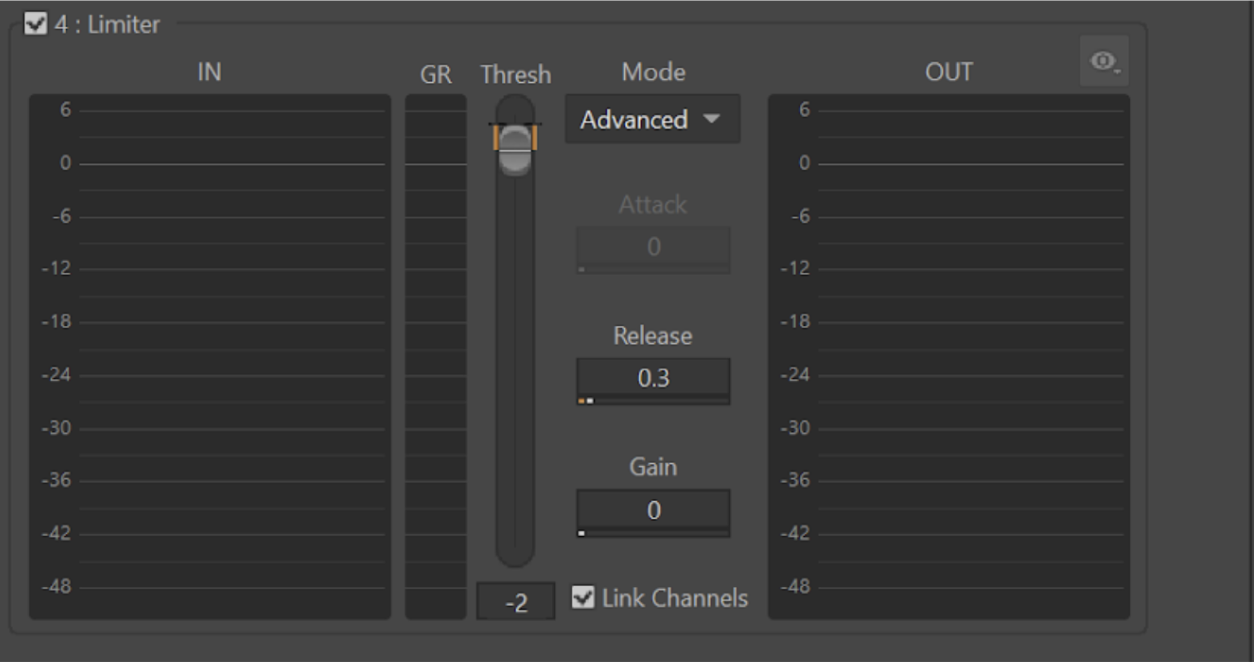
The main intended use of the limiter is to catch occasional peaks that might occur in very busy and loud situations. It prevents clipping the consumer output device.
With the adoption of loudness standards dictating an integrated loudness of -24 LUFS and -18 LUFS, the limiter should not have to work hard to protect the output.
Limiting for transient control
In some cases, for example in “Night Mode”, you might want to use the limiter to catch transients occurring when applying heavy compression.
It may sound better to allow the compressor to have a slow attack and use the limiter to catch the fast, short transients rather than having a fast attack compressor that may add quite a bit of pumping because of these transients.
Bringing it all together
The different effects in the Mastering Suite work together as a whole, and approach the process as an enhancement on the totality of your game’s audio output.
Always remember, Mastering is meant to be subtle, use it to address any persistent issues and not specifics, it will affect audio throughout the game, in all game states, levels and cutscenes.
The Mastering Suite is available for free and is easy to install and use in your Wwise projects.
In part 2 of this series, we dive into the mastering presets that are provided in Wwise and discuss how and when to use them.
Get the Mastering Suite for Free

Comments