
Dead by Daylight is a live game with a tight production timeline and regularly scheduled live updates. To be able to anticipate and support future features without risking unannounced information from releasing in live Wwise SoundBank updates, we developed the following system of Wwise session progression.
In our development process, each new release cycle has its own stream tracked with UGS and P4, and each new stream has its own version of the active Wwise project.
The Intent
- Keeping all future R&D in a Wwise project version that never releases to the public.
- Being able to easily move any new work from the R&D “Temp” Wwise session make into the main Wwise session when it’s time.
The Process
- Plan the main Wwise session to function with dedicated Work Units per DLC feature – such as maps, levels, content, or in our case, characters.
- When it’s time to start supporting a future stream with audio and new integration work, create a “Temp” Wwise project from the main Wwise project.
- In the new Temp Wwise project, only work on dedicated Work Units for new features – everything else is frozen. Any work done in shared or legacy parts of the Wwise project will have to be manually re-done in the main Wwise project later.
- Merge the new R&D temp Wwise project’s Work Units back into a new version of the main stream Wwise project after releases for the current stream are complete.
- Repeat for next upcoming stream.
Building a Wwise Session for Live Development
- The key to designing a Wwise session structure that supports this method is that all future development must be as self-contained as possible. For example, on Dead by Daylight, each map, killer, and survivor has their own set of dedicated Work Units:
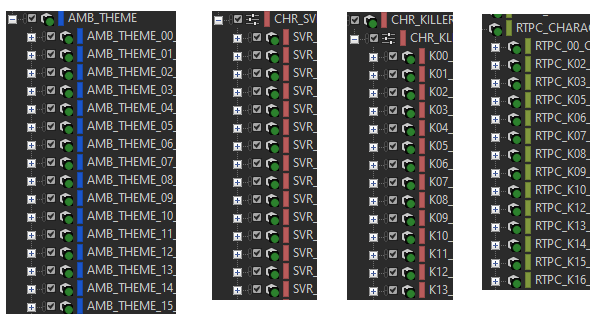
This includes dedicated Work Units in all the relevant Wwise folders: Game Parameters, States, Switches, Attenuations, Effects, and so on. Anywhere that supports Work Units except for the Music Hierarchy and the Master-Mixer Hierarchy.
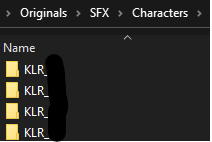
The other thing to keep in mind is that you want to have an organized Originals folder, with all the sound effects for a given feature in its own Originals sub-folder:
Creating the Temp Future Stream Wwise Project
1. When we are ready to begin development on new features in an upcoming stream, we duplicate the current Main Wwise project. We do this by creating a new project folder with the new stream name followed by _Temp, and then copying everything inside the current Wwise project into it, with a few exceptions.
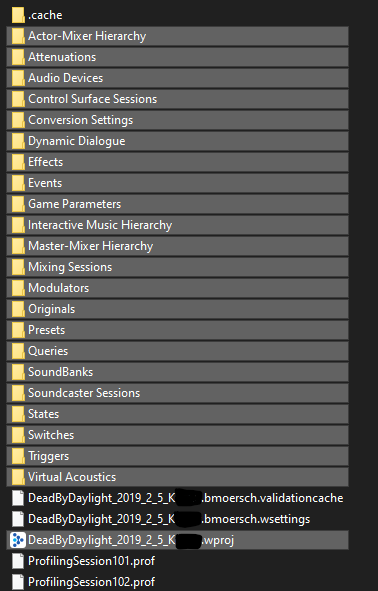
DO NOT copy the .cache, .validationcache, .wsettings, or any .prof files.
We also don’t copy the GeneratedSoundbanks folder, though this often doesn’t exist in our hierarchy as we only generate to the Unreal stream directly.
2. Give the New Temp Wwise .wproj file a Unique Name
When the Wwise project is done copying, don’t open it yet – it’s important to give the .wproj a unique name, both in the file name directly, and in its metadata.
Right-click on the new .wproj project file and uncheck “read-only”. Then open it with a basic text editor, ideally Notepad++. Give the project the name of the future stream with _Temp appended to the end, and don’t forget to change the name of the .wproj filename itself as well.

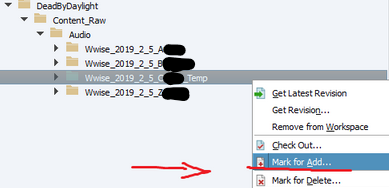
3. Add the whole Wwise folder to Versioning Software BEFORE opening the Wwise project
The reason you want to mark your Wwise project for add before opening it, is because in its current state you can now mark the entire new Temp Wwise project for add. Once you open Wwise, lots of extra files like your personal settings file will be generated, and one generally doesn’t want to add these to version control.
Note that the first time you generate SoundBanks with the new Wwise project, all cache files will have to be regenerated, and it will take significantly longer than usual.
Merging the Temp Wwise Project Back into the Main Stream
After the current stream has gone through its release cycle, it is now safe to merge the Temp R&D Wwise sessions’s work back into the main stream. This is done manually, as follows:
1. Create a new Main Wwise Project for the new Stream
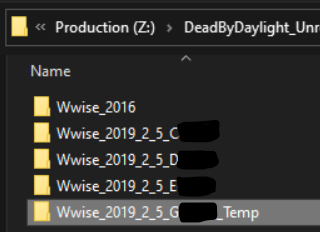
Each release gets a new, alphabetically incremented stream name, for example, moving from Gorilla to Horse. When we created the “Temp” Wwise project in the section above, we gave it the upcoming stream’s name appended by “_Temp”.
Now, we will duplicate the same main stream Wwise session again, at its latest revision, following the same procedure as described above when creating the Temp project. Be sure to follow all the same steps, such as renaming the new .wproj file inside Notepad++, and marking it for add before opening the newly created project.
Example:
Main Stream Wwise Session: DeadByDaylight_2019_2_5_Gorilla.wproj
Future Stream Support Temp Session: DeadByDaylight_2019_2_5_Horse_Temp.wproj
New Main Stream Wwise Session: DeadByDaylight_2019_2_5_Horse.wproj
2. Manually Move the New Work Units from the Temp Project into the New Main Project
If your mixer routing has not drastically changed between the creation of the Temp project and the creation of the new Main project, all will be intact and does not need to be reconnected.
Music integration cannot be moved and needs to be redone from the Temp to the Main project, as does any custom routing inside of static structures such as sending a new character’s power sfx through a sub-aux in the master hierarchy dedicated to that killer specifically.
Moving The Work Units
1. Create new Work Units in the new Main Wwise session matching the names and locations of any new Work Units that were created in the Temp session during R&D.
2. Close any open Wwise sessions.
3. Create a new temporary explorer folder to the side, and copy each of the Temp Wwise session’s newly developed Work Units into it. If the Work Unit’s name does not obviously show where in the Wwise folder structure it lives, either place it inside an aptly named folder inside the temporary explorer folder, or do the following steps one Work Unit at a time. You don’t want to mix them up.
4. Now replace the Work Unit IDs of the Temp Wwise session Work Units with the respective IDs of the New empty Work Units in the new main Wwise session. Do this by right-clicking the Work Unit in explorer to turn off “Read-Only”, and then right-clicking again and opening it in a plain text editor such as Notepad++.
Here you can see lots of plain text information about a given Work Unit. Make sure you don’t accidentally replace the Wwise Document ID at the top! You want the Work Unit ID, which is a little further down.

5. Once you have replaced a given Temp Work Unit’s ID with that of its empty matching Main Work Unit ID, you can copy and paste that Temp Work Unit into its correct location in the new Main Wwise project’s explorer folder structure.
You will be asked if you want to overwrite the Work Unit – say yes!
If you are not asked this, you should go back to the previous step and make sure you correctly created all the specific Work Units with their new IDs in the new Wwise project.
6. Once all the new Work Units have been copied over, you’ll want to copy over the related Originals folders as well. You don’t need to change any IDs for the Originals folder, but don’t forget to add them to the main Wwise project!
7. Now you can open the new main Wwise project.
If you didn’t replace an ID correctly, you may get an error that the Work Unit has no known parent. Not a worry, you will just have to manually move it back to its correct location from the top level of its structure, such as the Actor Mixer.
Limitations
- Any work done in common / shared Work Units such as master bussing, UI, etc, must be manually redone in the main Wwise stream.
- This process does not work with the Music Hierarchy
- Any work done supporting past streams in older Wwise sessions after a new main Wwise project has been created will need to manually re-done in the new main Wwise session.
The Quick and Dirty Version
Because moving a new Work Unit into a Wwise session that isn’t recognized only causes the Work Unit to lose its correct location in the Wwise structure, you can copy Work Units the quick and dirty way if you just want to move a random piece of logic structure from one Wwise session to another.
Inside the source Wwise project, create a new temporary Work Unit, copy and paste all the Wwise logic you need into it, and then, in explorer, add a copy of that Work Unit to the destination project’s correct sub-folder. Then in the new project you can grab it and move the logic where you want it to go.

Comments