
Dialogue with voiceovers is one of the staples of modern video games, allowing the player to not only connect a character with a specific voice, but also to have a better understanding of the character’s feelings through their general vocal inflections. This is further enhanced with complex dialogue systems that change what a character says, or how they say it, based on the player’s words or actions.
A character may react kindlier if the player did a favor for them in the past, or a character might act more aggressively if the player did something that was severely against their moral compass. This is what’s known as dynamic dialogue.
For this demonstration, we’re going to focus on dialogue centered around narration and implement our dialogue using Wwise and Unreal Engine. Wwise has functionality to implement dynamic dialogue into video games, but for now, we’ll be using alternative Wwise systems in order to drive our dialogue systems. The 3 main areas we’ll be taking a look at in this post are:
1. Basic narration using sequence containers that does not change based on decisions made by the player.
2. Wwise’s localization system for those of you who are designing for games with multiple languages.
3. Dynamic narration using switch containers that changes based on variables that are affected by the player.
Not only will you learn about Wwise’s sequence and switch containers in these demonstrations, but you’ll also learn additional Unreal Engine blueprinting in regards to Wwise, such as: event posting, delays, and switch and state changes.
Last week, I wrote about doing all of this in Wwise and Unity. If you'd like to give that a read, you can do so here.
Wwise – Narration with Sequence Containers & Localization
In this first demonstration, we are going to design a voiceover for a commanding officer giving instructions to the player. These instructions are going to be split into 5 different voiceovers that we are going to program to play one right after the other:
1. “Hello? Hello? Can you hear me?”
2. “Oh good. Listen, I need you to do something very, very important for me.”
3. “In front of you are these little... obstacles that I need you to overcome.”
4. “I just need you to jump over the hurdle, go under the archway, and to the green path. Not the red one. That would be bad.”
5. “If you could do that for me, that would greatly help us over here in corporate. Over and out.”
No matter what, this narration will play exactly the same at the beginning of the game without any chance of alteration, so we can use Sequence Containers to make each audio track come out one after the other with no change. In addition, we will look at Wwise’s localization system in order to play the audio in either English or Spanish depending on the player’s preferences.
First, we’re going to start in the Audio tab. Under the Actor-Mixer Hierarchy, make a new Sequence Container (Ctrl + Shift + Alt + Q) named MissionBriefing. Next, upload your audio files underneath your new Sequence Container. You can do this by either right-clicking the Sequence Container and selecting “Import Audio Files...” (Shift + i) or by dragging your audio files from your system into the Sequence Container.
In the Audio File Importer, switch the ‘Import as:’ field from ‘Sound SFX’ to ‘Sound Voice’. Then hit ‘Import’
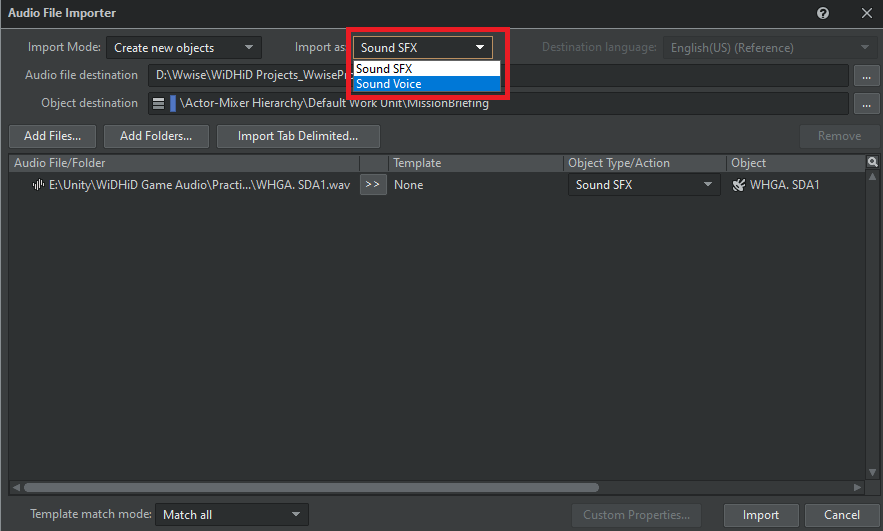
Sound Voices are the same as Sound SFX, except that they allow multiple audio files to be imported into them for every language that is used in your Wwise project. When language settings are changed, all Sound Voices will swap to the audio file of the respective language.
Now that we have imported all of our English sound files, we are going to make it possible to add additional languages to our Wwise project. To do this, go to Project in the top bar, then select Languages (or press Shift + J). From the Language Manager, you can add, remove, and rename languages, and even change the Gain on all Sound Voices in their respective language. For now, let’s hit the Add button and type in Spanish in the box that pops up. Hit ‘Okay’ and confirm your changes in the warning prompt that follows.
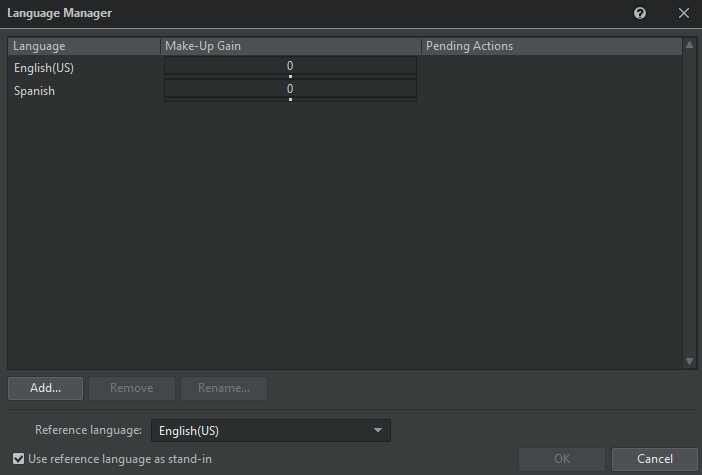
If you select any of your new Sound Voices, you’ll see in the Contents Editor that there are now sections for both English and Spanish. We already have our English audio files in place, so let’s import our Spanish audio files as well by dragging each one into the Spanish field of the Contents Editor. I am going to do this for all 5 of my narration sounds.

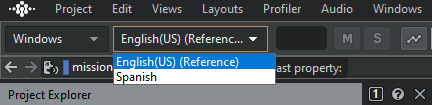
Whenever you play any of these Sound Voices, you are going to hear them in your default language. However, if you go to the top-left corner of Wwise, switch your default language to Spanish, and play your sound again, then you will hear the sound that you put in the Spanish field. This is how a developer can easily change from one language to another with just the flip of a single switch.
Let’s now check out our Sequence Container. After selecting the container, look at the Contents Editor and the Playlist section directly to the right of it. By default, Sequence Containers will not inherently play all of the sound objects that are inside of them; they will only play the sound objects that are in their Playlist. Drag the Sound Voices from the Contents Editor to the Playlist in the exact order you would like them to be played in sequence.
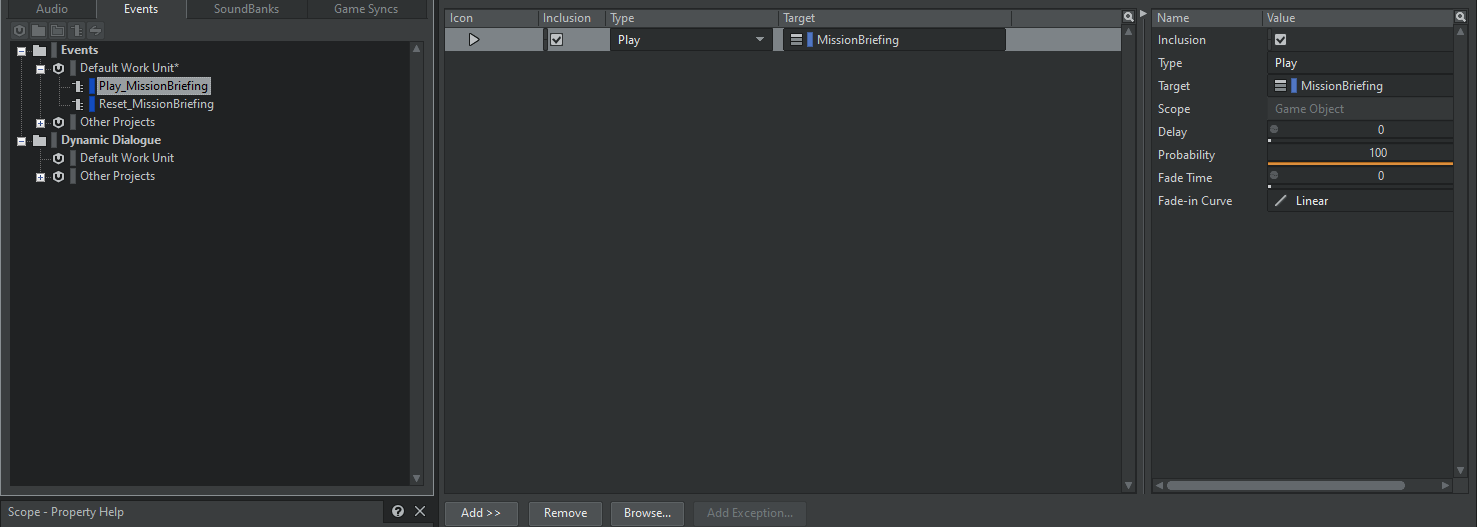
Unless you would like to edit your sounds, that is all that needs to be done for now. We are going to go into the Events tab and make 2 new events in the Default Work Unit:
1. An event with a ‘Play’ action that is going to play our Sequence Container, named Play_MissionBriefing.
2. An event with a ‘Reset Playlist’ action that is going to reset our Sequence Container’s playlist back to the first Sound Object, named Reset_MissionBriefing.
Note: While we are working on dynamic dialogue systems in these demonstrations, we are NOT using the Dynamic Dialogue section of the Events tab.
The purpose of the second event is to ensure that we always play from the first sound of our Sequence Container whenever we play our Narration. It mostly serves as a safety net.
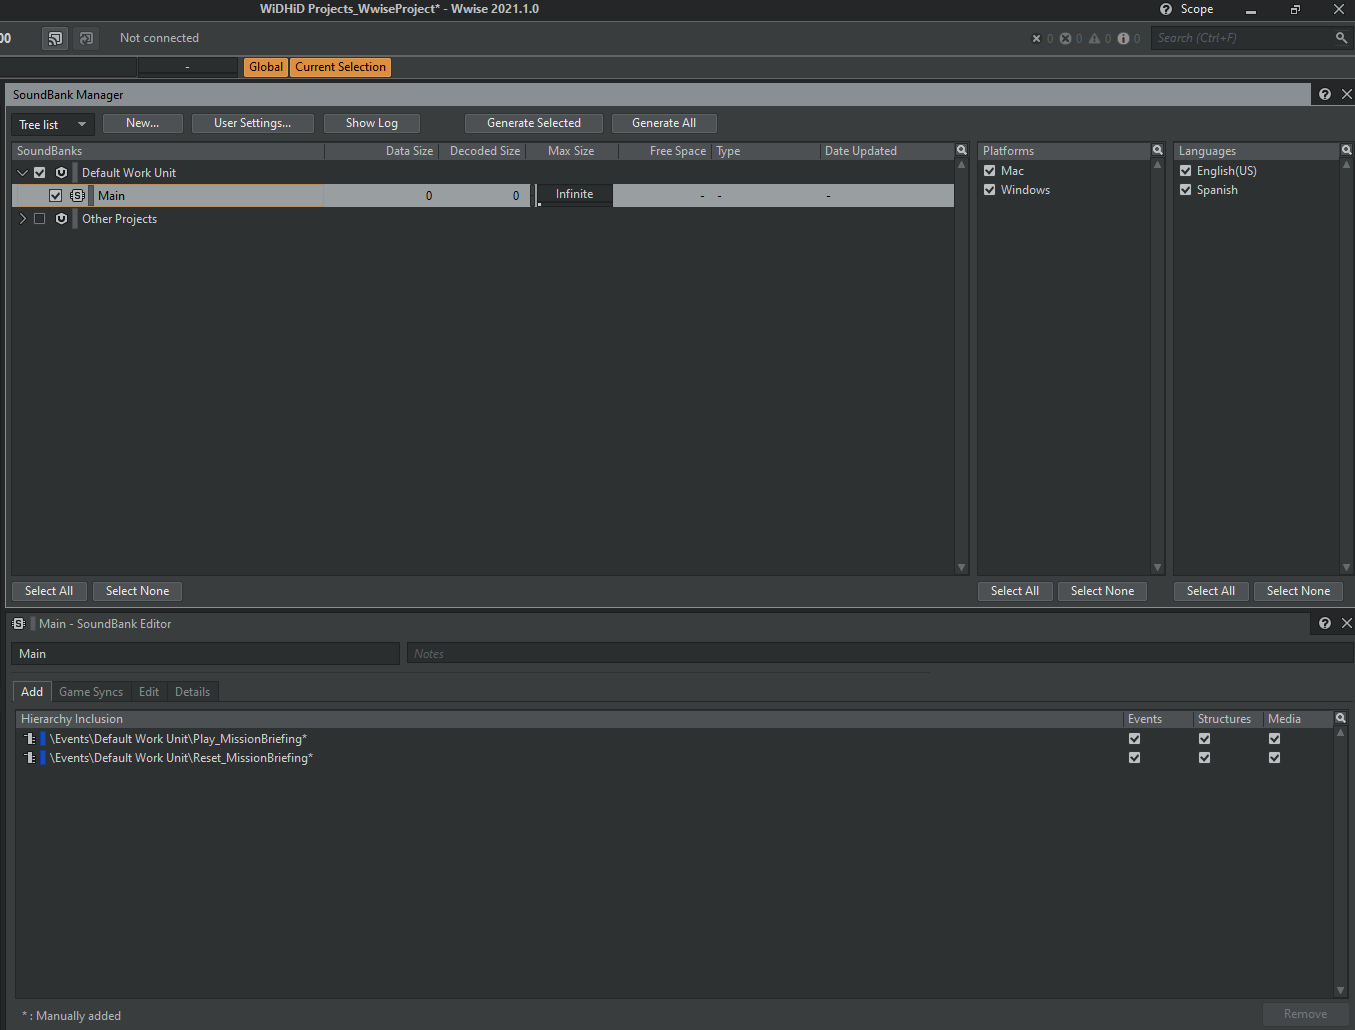
All that is left to do is make a soundbank and include our 2 new events. In the top bar, go under ‘Layouts’ and select the Soundbank layout, or simply hit F7. In the Soundbank Manager, select New and make a new Soundbank. I’m going to call mine Main.
Select your new Soundbank in the Soundbank Manager, then drag both the Play_MissionBriefing and Reset_MissionBriefing events from the Event Viewer to the Soundbank Editor.
From the Soundbank Manager, check the checkboxes for your new soundbank, your platform (Windows, Mac, etc.) and the languages that you made for your project. Finally, hit the ‘Generate Selected’ button.
Wwise – Dynamic Dialogue
After the player is given their mission by their commanding officer, they will be given some time to complete their mission. Depending on how the player completes their mission, the commanding officer will give a different response. Before we begin, let’s map out the variables that will determine what the commanding officer says to the player. First, let’s look at the 3 objectives that the player is given:
1. Go over the hurdle.
2. Go under the archway.
3. Go onto the green path, not the red path.
There are multiple ways for this particular mission to end. 5, to be exact:
1. The player does nothing. (Fail, Fail, Fail)
2. The player only goes over the hurdle. (Pass, Fail, Fail)
3. The player goes over the hurdle AND under the archway. (Pass, Pass, Fail)
4. The player goes over the hurdle, under the archway, then onto the Red path (Pass, Pass, Red)
5. The player goes over the hurdle, under the archway, then onto the Green path (Pass, Pass, Green)
That is three variables for us to track: the hurdle, the archway, and the path. That’s where switches and states come in.
If you are still on the Soundbank layout, return to the Designer layout by selecting ‘Layouts -> Designer’ or pressing F5.
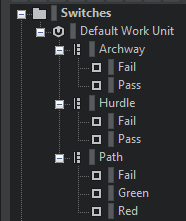
We are going to go into the Game Syncs tab in the Project Explorer and make 3 new Switch Groups in the Default Work Unit of the Switch section: Hurdle, Archway, and Path. For both the Hurdle and Archway switch groups, we’re going to make 2 new switches: Fail and Pass. Then for the Path switch group, we are going to make 3 new switches: Fail, Red, and Green.
Return to the Audio tab. In the Actor-Mixer Hierarchy, make a new Switch Container under the Default Work Unit (Ctrl + Shift + Alt + W). I will name mine MissionResult.
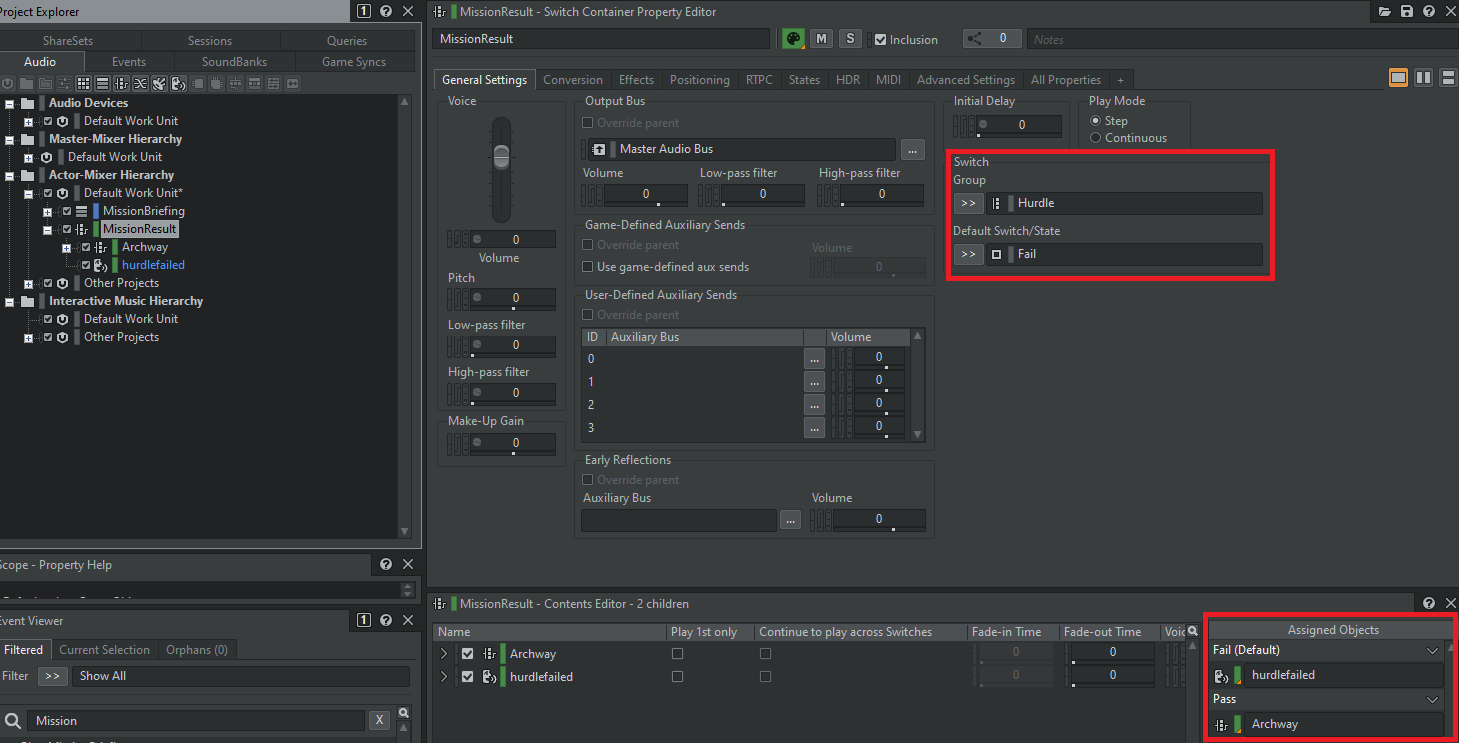
Select our new Switch Container and look at the ‘Switch’ settings on the right side of the Property Editor. The first thing we are going to do with this container is check to see if the player passed or failed the Hurdle test. If they failed, they will hear an audio of their officer being disappointed. If they passed, they will move on to the Archway test.
To do this, first set the Switch Group to the Hurdle group, and set the Default Switch/State to Fail. This will populate the Assigned Objects section below with our two switches: Pass and Fail. We’ll need the appropriate “objects” to fill these with.
First, import a new audio file of the “Hurdle Failed” condition into our MissionResult switch container. Then we’re going to make a new Switch Container within the MissionResult container, which I am going to call Archway.
Now all we have to do is move both of these from the Contents Editor to their respective Assigned Objects: “Hurdle Failed” to “Fail”, “Archway” container to “Pass”.
Now we are going to repeat this process inside of the Archway switch container. Set the Switch Group to the Archway switch group and set the Default Switch/State to Fail. Import an “Archway Failed” audio into the Archway container and make yet another switch container named Path. Then just slot them into the Assigned Objects just like before: “Archway Failed” to “Fail”, “Path” container to “Pass”.
We’re going to repeat this process one last time, though now we have 3 switches instead of 2. Inside of the Path switch container, set the Switch Group to the Path switch group and, once again, set the Default Switch/State to Fail.
Now all we have to do is import the final 3 audio files: Path Failed, Path Red, and Path Green. Slot all 3 into their respective Assigned Objects.
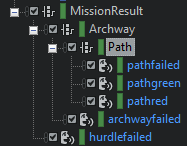
Let’s briefly go over what we just did. If you fail the Hurdle test, you will not see the rest of the switch containers; you will simply play the fail message. If you pass, you will move on to the Archway test. Fail this one and you won’t see the Path switch container, you’ll play the Archway fail message. Pass the Archway test and you move on to the final Path switch container, which will check to see if you went onto the red or green path, or if you went on no path at all. All 3 of these conditions will pass you to a specific audio file.
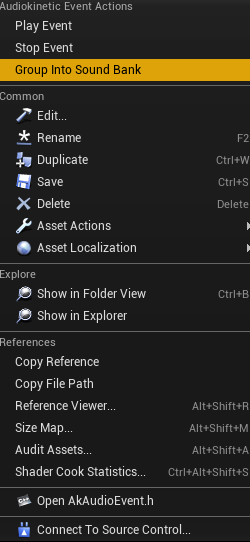
With all that done, making the event for this is simple. Instead of going to the Event tab, we’re going to make an event from the Audio tab. Simply right-click the MissionResult switch container, go under New Event, and select Play. This will automatically make a new Play event with the name Play_MissionResult.
Go back to the Soundbank layout by pressing F7 and drag your new Play_MissionResult event from the Event Viewer to the Soundbank Editor. Generate the Soundbank just like before and make sure to save your Wwise project.
Unreal Engine – Integrating Sequence Narration
We are now going to integrate the narration we made in our Sequence Container. Normally, this would be a simple feat; we would play the narration audio 5 times one after the other. But how do we know when one audio ends so we can begin playing the next one? What if we wanted to have a slight delay between each audio? One of the ways we can accomplish both of these is with event callbacks and coroutines.
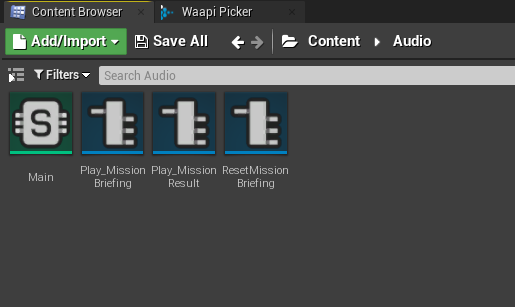
To start, we need to load our bank. Right-click in the Content Browser and select ‘Audiokinetic -> Audiokinetic Bank’. Name your new Bank the same name you gave your Soundbank in Wwise (mine was Main).
Next, make sure you have the Wwise Picker window available. If it is not, go to the top bar and select ‘Window -> Wwise Picker’. From here, you will be able to see all of your Wwise components. If you do not, make sure to generate your Soundbank in Wwise again, save your Wwise project, and/or click the ‘Populate’ button in the Wwise Picker window in Unreal Engine.
Go into the Event folder and drag your 3 events into the Content Browser. To keep them organized, it may be useful to store them in a folder in the Content Browser. Select all of your events, right-click, and select ‘Group into Soundbank’. Search for the bank that you just made, click on it, then hit Select.
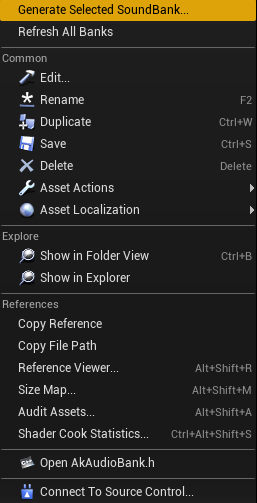
Finally, right-click on your Bank, hit Generate Selected Soundbank, then hit Generate.
 |
 |
Now we are ready to start scripting. Above the viewport, go under the Blueprints tab and select ‘Open Level Blueprint’. In the Event graph, you’ll notice multiple boxes with red headings. We will only be using ‘Event BeginPlay’, so you can ignore the rest.
Click and drag from the white arrow “Exec Pin” to the right of the Event BeginPlay. You can either select ‘Audiokinetic -> Actor -> Post Event’, or you can simply search for ‘Post Event’ in the Search bar.
Once the node is placed, we need to associate 2 values with it: the Ak Event that we are going to post, and the Actor that we are going to post the Event to. The event is easy – simply go into the ‘Select Asset’ dropdown list and select the ‘Reset_MissionBriefing’ event we made earlier.
Next, we will add the Actor, which is going to be the player in every case for this demonstration. To get the player, all you have to do is click-and-drag from the blue ‘Actor’ pin and search for ‘Get Player Character’.
Now we’re going to do the same thing again, but with one small difference. Drag from the Exec pin from our Post Event and search for and select ‘Post and Wait for End of Event’. This handy function will post our event and wait until the event is finished before continuing on with the rest of our script.
For the AkEvent, select the ‘Play_MissionBriefing’ event, and you can use the same ‘Get Player Character’ node from earlier to connect to this function’s Actor as well.
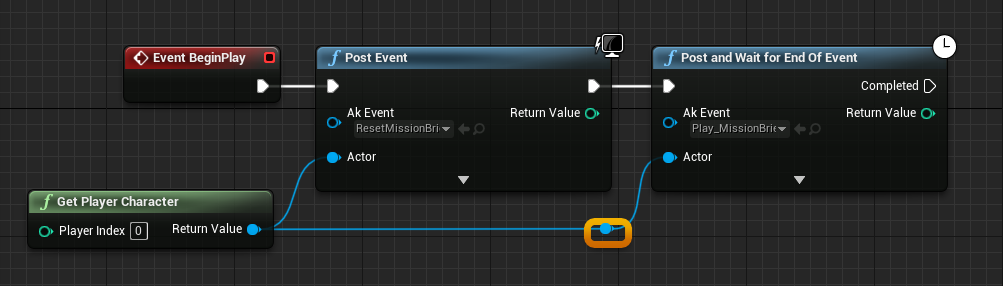
So far, we are resetting our Sequence Container’s playlist, then we are playing the first narration audio in that container. Now we need to play this event 4 more times and ONLY 4 more times. In addition, it would be nice to have a short delay between each narration – let's start with that.
From the ‘Post and Wait For End of Event’s’ Exec pin, search for and select the Delay function. This simple function will delay the rest of the script by its Duration, which I am going to set as 1, but you can set it however you like.
Now we need to make a new variable, which is going to be an integer. The purpose of this variable is to count how many times we have played our event. Once we have played the event five times, we need to make sure that the event is not played again.
To make a new variable, go to the Variables tab in the My Blueprint window and click on the + symbol. I am going to name this variable NarrationCount. Whenever you make a new variable, it is always a good practice to immediately press the ‘Compile’ button on your Blueprint before doing anything else. Compiling new variables allows you to edit more of the variable’s values.
Then in the Details window on the right side, we are going to change the Variable Type. Go into the dropdown list for the Variable Type and select Integer. That is all we need to do for this variable.
From the Variables tab, drag your new variable into your Event Graph and place it underneath your Delay node. You’ll get the option to either Get or Set this variable.
1. GET the current value of the variable (which in this case for us is 0).
2. SET the variable to a NEW value (we can set the value to 1526434568).
For now, we are going to Get Narration Count. Now we are going to increment this value by one to signify that we have played this event one more time. To do this, drag from the Narration Count’s pin and search for and select ‘Increment Integer’. You’ll get a node that simply shows ++ on it. This simply means ‘Current Value + 1’.
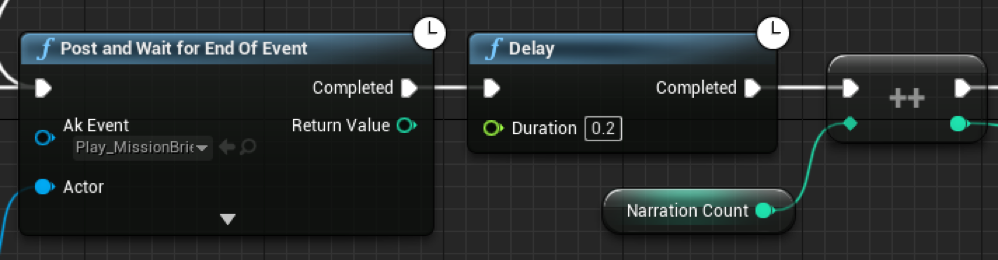
We’re almost there. Now we need to check whether or not we have played the event 5 times. We do this by first dragging from the ++ pin and searching for and selecting ‘Integer < Integer’. In the empty pin of the < function, simply put in a value of 5.
From the red pin of the < function, search for and select a ‘Branch’ macro. The purpose of a branch is to basically check to see if a statement is either true or false. In our case, we are checking to see if Narration Count is or is not less than 5. If it is less than 5, we want to loop back and play our event again. If it is not less than 5, then we want the narration to end.
To accomplish this, drag the Branch’s True Exec pin ALL the way back to the leftmost Exec pin on our ‘Post and Wait for End of Event’ function.
Note: Doing this will create a white line that drags through all of your nodes which might not look visually pleasant. Try double-clicking on the white line to create a Reroute Node, which will allow you to move around all of your nodes instead of through them.
That’s all we have to do! Here’s how the whole blueprint should look:

Make sure to compile your blueprint and save your work before returning to the main editor. Go ahead and press Play and check your work to ensure everything is working properly. Also feel free to adjust the Duration of your Delay function if you feel that the delay between each narration audio is too long or too short.
Unreal Engine – Integrating Mission Result
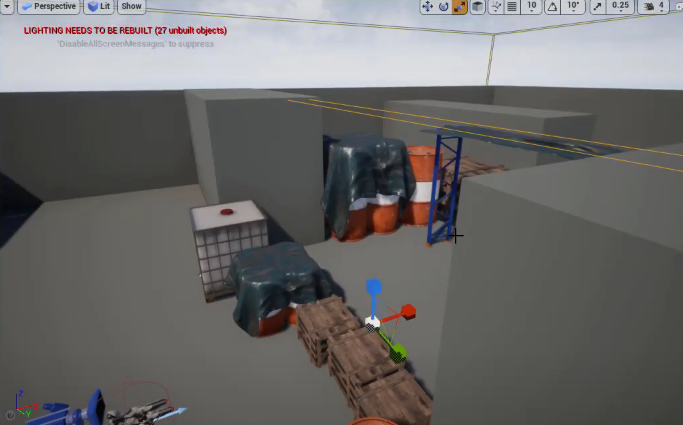
Now that the player has been given their mission briefing, they need to go on their mission. The game needs to figure out if the player has actually gone over the hurdle, went under the archway, and journeyed onto the green or red pathway. In order to achieve this, we are going to make box triggers for the hurdle, archway, and both of the paths.
In the Basic tab of the ‘Place Actors’ window, scroll to the bottom and select the Box Trigger actor and drag it into the viewport. The goal is to place the Box Trigger in a way where a player MUST collide with it. Feel free to adjust the box to your liking by using the Translate (w), Rotate (e), or Scale (r) tool.
For the Hurdle box trigger, go into the Details window and select the blue ‘Blueprint/Add Script’ button. In the screen that pops up, name your Blueprint however you like, but I’m going to name mine BP_SetSwitch. Hit Select and your Blueprint will come up.
Once it does, go to the Event Graph tab. The goal here is to set our Wwise Switch for the Hurdle to Pass to show that the player actually went over the hurdle. The only Event we will be using in this case is Event ActorBeginOverlap, which activates whenever an appropriate object enters into the Box Trigger. From here, we’re going to check to see if it is the player hitting the trigger.
From the Exec pin, search for and select ‘Cast to PlayerController’. We will also connect the Other Actor pin to the ‘Cast to PlayerController’s’ Object pin.
Then from the Cast’s Exec pin, search for and select the ‘Set Switch’ function. Drag from the ‘As Player Controller’ pin to the ‘Actor’ pin.
Now, instead of selecting our Switch Value from the dropdown menu, we are going to set the Switch as a separate variable. This is because we are going to use this exact blueprint to set the switch for the Archway as well, so we are going to need to be able to set the switch to 2 different values.
In order to do this, drag from the Switch Value pin and select ‘Promote to Variable’. This will automatically name the variable and set the variable’s type to Ak Switch Variable. This is what we want. Now the only thing left to do is press the icon directly to the right of the variable to switch it on (you can also select the ‘Instance Editable’ checkbox in the Details window in order to accomplish the same effect).
Instance Editable (eyeball) sets the variable as Public. This does 2 things:
1. This variable can be received and edited by other blueprints.
2. If there are multiple instances of the blueprint in your current map, you can set a different value for this variable (in the editor) for every instance.
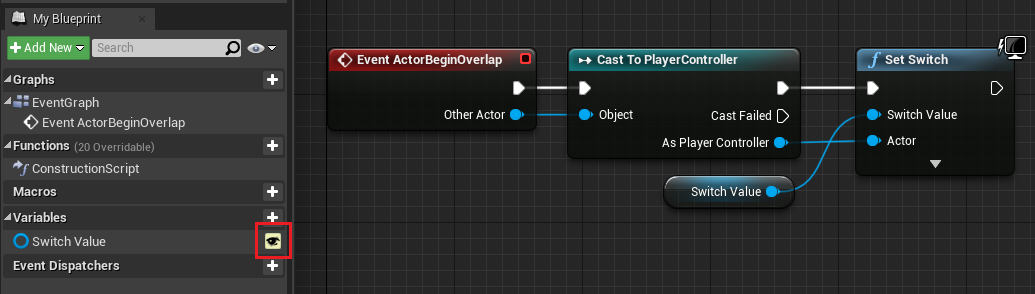
Make sure to compile and save your blueprint before heading back into the main editor. Select your BP_SetSwitch either from the Viewport or World Outliner and you may notice our Switch Value variable is now available in the Details window. From here, we can set the value to Hurdle-Pass.

We are going to do the same thing for the Archway. Drag BP_SetSwitch from the Content Browser into the Viewport and adjust it underneath the Archway in the same way that you did over the Hurdle. Then all we have to do is set the Switch Value to Archway-Pass.
Now we move onto the box triggers for both the red and green paths. We are going to do something different with these triggers. Instead of simply setting a switch on each of these paths, we are going to have the mission end immediately once the player steps onto one of these paths. That’s going to require us to make a new blueprint.
Drag in a box trigger and adjust it in a way so that it covers the entire upper area of one of the paths (I am going to do the red one) and is rising slightly above it. Then make a new blueprint from it using the same process that we did with BP_SetSwitch, except name it BP_Path.
Inside of the Event Graph, we need to make a couple of variables:
.png)
- Name them NarrationEnd and MissionComplete
- Both variables are Booleans.
- Both variables are public, so either press the eyeball icon or check the ‘Instance Editable’ checkbox in the Details panel.
The intent of these variables is right in the name. Has the narration ended? Has the mission already been completed? This first ensures that the mission does not end before the mission briefing has finished. Then this ensures that the mission does not get completed more than once.
Go ahead and compile and save your blueprint. We are actually going to return to our level blueprint, which can be accessed from the main editor by going into the Blueprints tab and selecting ‘Open Level Blueprint’.
In here, we are going to tell Unreal Engine that the narration has ended. However, the Narration End variable is in another blueprint, so we need a means of accessing that variable.
To do this, drag from the Branch’s False Exec pin and search for and select ‘Get All Actors Of Class’. In the Actor Class field, find the name of the blueprint you just made: BP_Path. Next, drag from the Out Actors pin and search for and select ‘Get (a copy of)’. Do this a second time, making another ‘Get (a copy of). The value of the first GET function should be 0 and the value of the second GET function should be 1.
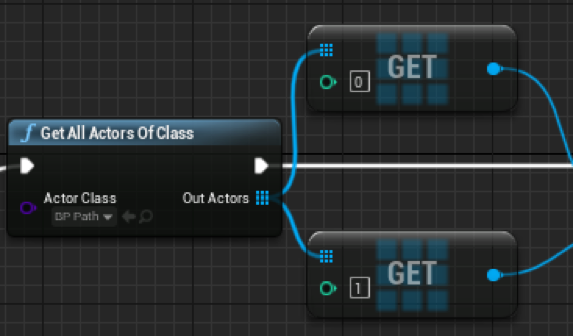
These two “GETS” will get the 2 BP_Path actors that we have in our game; the red path and the green path.
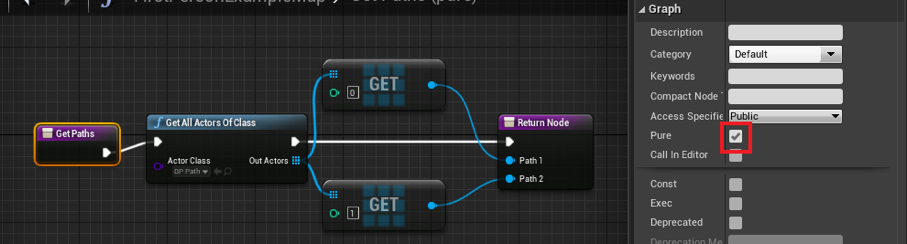
We are going to be getting the actors for these paths multiple times in this one blueprint, so it will be useful to make this into a function. Select the ‘Get All Actors of Class’ and both ‘GETS’ together, right-click, and select Collapse to Function. In the Functions tab list of the My Blueprint window, change the name of your new function to Get Paths. Double-click your Get Paths function to go inside its Event Graph.
We need to do a few edits to this function before we can use it. First we need a Return Node, otherwise we won’t be able to access the results of our two GET functions. Right-click anywhere in the Event Graph and search for and select Add Return Node. Connect the Exec pins of the Get All Actors of Class node and the Return node. Then finally, drag the blue nodes from the 2 Get functions towards the Return Node. That’ll create 2 new variable slots in the Return node. You can edit the name of these pins by selecting the Return Node and renaming the variables in the Outputs tab.
The last thing to do is select the ‘Get Paths’ node. In the Details window, check the ‘Pure’ checkbox.
Pure Functions promise not to modify the state or the members of the class in any way. Since we are only getting these Actor variables and not changing them, we are fulfilling that promise.
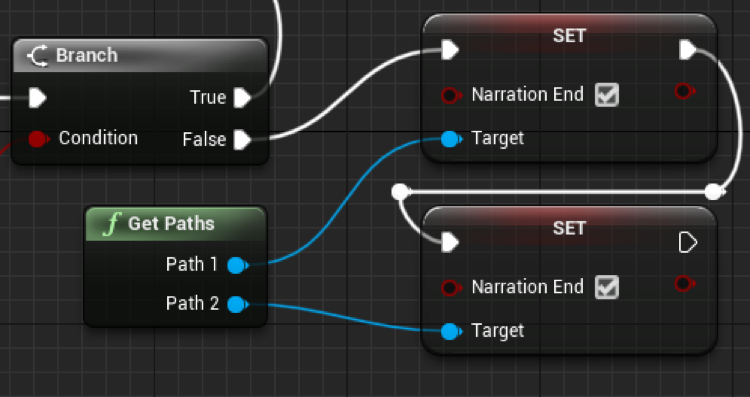
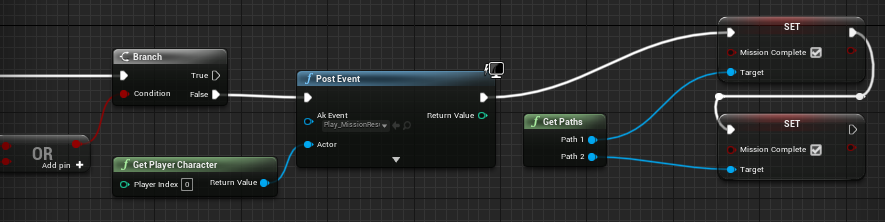
You can now close the ‘Get Paths’ blueprint and return to the Event Graph of our Level Blueprint. You should now see 2 blue Path pins from our Get Paths function. Dragging from the first one, make a ‘Set Narration End’ node. Then you’re going to do the exact same thing with the second path. After connecting all of the Exec pins, the final result should look like this:
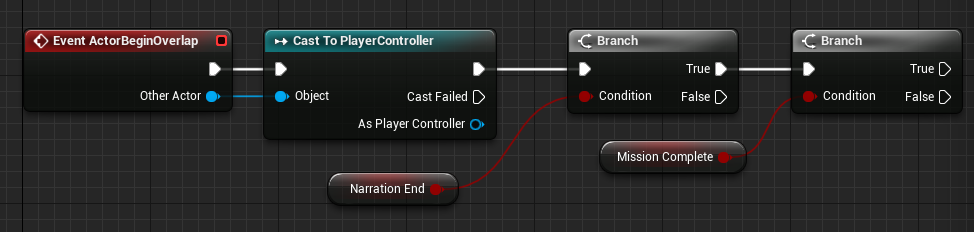
That’s all we have to do here. Compile and save this blueprint and return to your BP_Path blueprint. Just like with BP_SetSwitch, we are going to use Event ActorBeginOverlap. Drag the Exec pin from the event to a ‘Cast to PlayerController’ function, then drag the blue ‘Other Actor’ pin to the Cast’s object pin.
Now we’re going to check to see if the briefing has ended or not. Drag the NarrationEnd variable from the Variables tab to the Event Graph and select ‘Get NarrationEnd’. Then we’re going to drag the Exec pin from the ‘Cast to PlayerController’ function to a Branch function. Connect our NarrationEnd variable to the Branch’s condition.
We’re going to do the same thing again, except we’re going to check to see if the mission has already been completed:
Now that we have our branches set up, we need to set the MissionComplete variable to true, set the Switch value to whatever path the player walked on, then Post the ‘Play_MissionResult’ Event to the player.

Remember how to make a public variable from the Set Switch’s Switch Value? If not, review how you did it with BP_SetSwitch.
Make sure to compile and save your blueprint before returning to the main editor. The last thing we need to do is go to our Path and set the Switch to ‘Path-Red’. Then, duplicate this path (Ctrl + W) and adjust it to fit over the Green Path. Finally, set this Switch Value to ‘Path-Green’.
That’s it! Test it out, listen to the mission briefing, then go on the mission. Try out both the green and red path to ensure that you are hearing the appropriate Mission Result dialogue for either scenario.
So far, that is workable for our game. However, there is a problem. The only two endings that we can possibly get right now is either when the player goes on the red path or the green path. What about the other 3 endings we set up in Wwise?
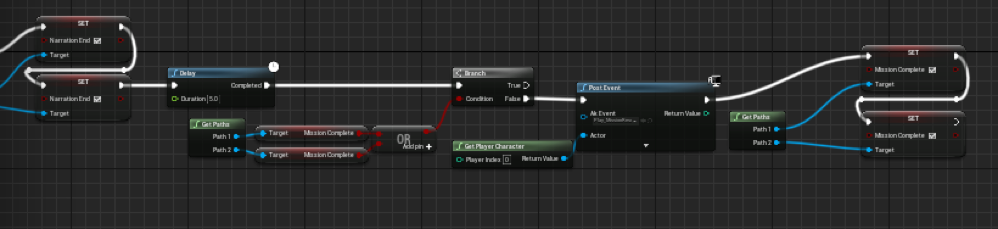
To fix this, I am going to make a 5-second timer after the initial narration ends. If that timer goes up before the mission ends, then we are going to post our mission result and set the Mission Complete variable to true so that the player cannot complete the mission again by going onto one of the paths.
First, return to your Level Blueprint. After we set the Narration End variable to true, we are going to start our timer with a Delay function. Connect the Exec pin of the 2nd ‘Set Narration End’ to a Delay function.
After that, we are going to check to see if the mission was already completed by going onto one of the paths. Drag in your GetPaths function from the Functions list. Then, drag from BOTH of your Path pins and ‘Get Mission Complete’.
If neither Mission Complete boolean is true, then we can post our Mission Result event. We do this by using an ‘OR boolean’ node and a Branch as demonstrated here:
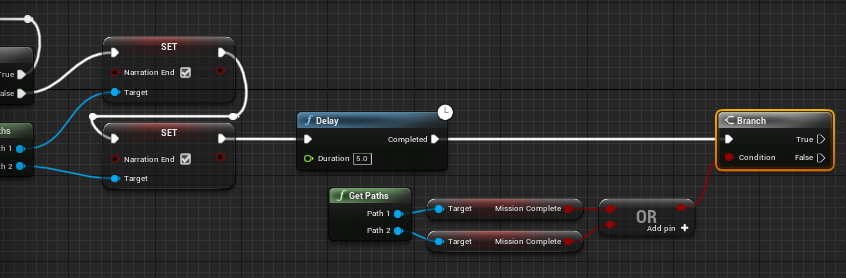
From the False Exec pin, we’re going to post our ‘Play_MissionResult’ on the Player. Just like before, we do this by connecting the Actor pin of the ‘Post Event’ function to a ‘Get Player Character’ function.
After we post the event, all we have to do is set the Mission Complete variable to true. We do this by utilizing our Get Paths function once more and SETTING Mission Complete instead of getting it.
The entire level blueprint should look like this:

Now save and test your work. Try out each of the 5 different scenarios and see if each is working properly. If not, then check back on your work to see if there was something you missed. If everything is working properly, then congratulations! You successfully created a functioning dynamic dialogue system.

Comments