
Dialogue with voiceovers is one of the staples of modern video games, allowing the player to not only connect a character with a specific voice, but also to have a better understanding of the character’s feelings through their general vocal inflections. This is further enhanced with complex dialogue systems that change what a character says, or how they say it, based on the player’s words or actions.
A character may act more friendly if the player did a favor for them in the past, or a character might act more aggressively if the player did something that was severely against their moral compass. This is what’s known as dynamic dialogue.
For this demonstration, we’re going to focus on dialogue centered around narration and implement our dialogue using Wwise and Unity. Wwise has functionality to implement dynamic dialogue into video games, but for now, we’ll be using alternative Wwise systems in order to drive our dialogue systems. The 3 main areas we’ll be taking a look at in this post are:
1. Basic narration using sequence containers that does not change based on decisions made by the player.
2. Wwise’s localization system for those of you who are designing for games with multiple languages.
3. Dynamic narration using switch containers that changes based on variables that are affected by the player.
Not only will you learn about Wwise’s sequence and switch containers in these demonstrations, but you’ll also learn additional Unity C# scripting in regards to Wwise, such as: event posting, event callbacks, and switch and state changes.
Wwise – Narration with Sequence Containers & Localization
In this first demonstration, we are going to design a voiceover for a commanding officer giving instructions to the player. These instructions are going to be split into 5 different voiceovers that we are going to program to play one right after the other:
1. “Hello? Hello? Can you hear me?”
2. “Oh good. Listen, I need you to do something very, very important for me.”
3. “In front of you are these little... obstacles that I need you to overcome.”
4. “I just need you to jump over the hurdle, go under the archway, and to the green path. Not the red one. That would be bad.”
5. “If you could do that for me, that would greatly help us over here in corporate. Over and out.”
No matter what, this narration will play exactly the same at the beginning of the game without any chance of alteration, so we can use Sequence Containers to make each audio track come out one after the other with no change. In addition, we will look at Wwise’s localization system in order to play the audio in either English or Spanish depending on the player’s preferences.
First, we’re going to start in the Audio tab. Under the Actor-Mixer Hierarchy, make a new Sequence Container (Ctrl + Shift + Alt + Q) named MissionBriefing. Next, upload your audio files underneath your new Sequence Container. You can do this by either right-clicking the Sequence Container and selecting “Import Audio Files...” (Shift + i) or by dragging your audio files from your system into the Sequence Container.
In the Audio File Importer, switch the ‘Import as:’ field from ‘Sound SFX’ to ‘Sound Voice’. Then hit ‘Import’
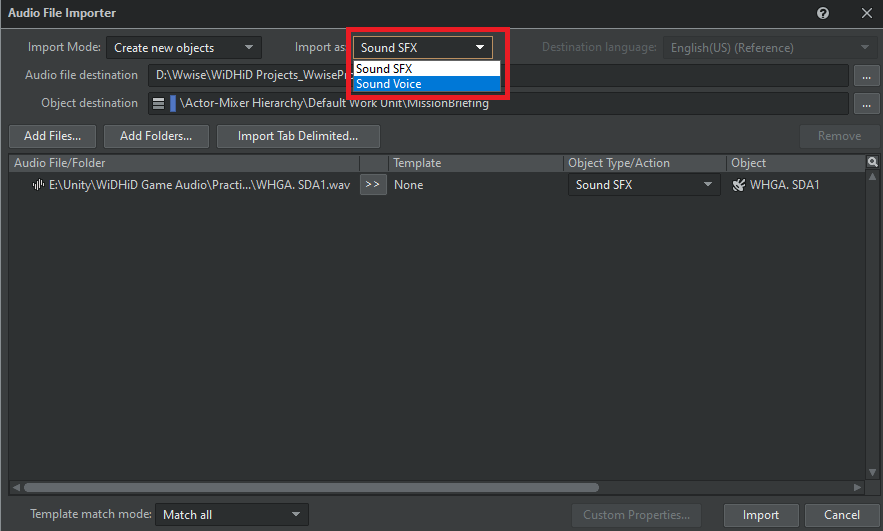
Sound Voices are the same as Sound SFX, except that they allow multiple audio files to be imported into them for every language that is used in your Wwise project. When language settings are changed, all Sound Voices will swap to the audio file of the respective language.
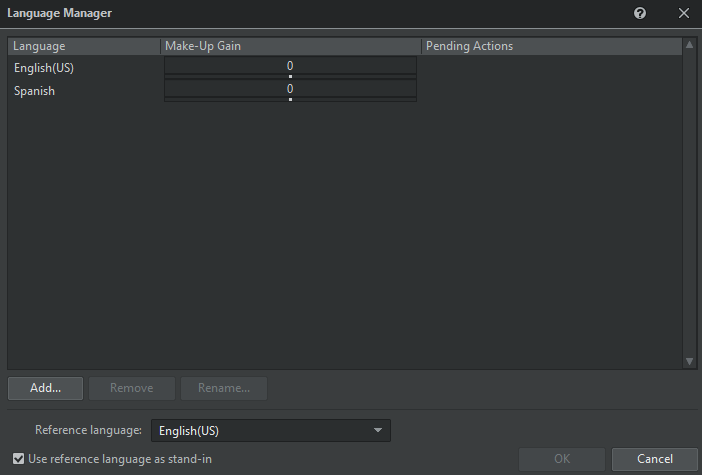
Now that we have imported all of our English sound files, we are going to make it possible to add additional languages to our Wwise project. To do this, go to Project in the top bar, then select Languages (or press Shift + J). From the Language Manager, you can add, remove, and rename languages, and even change the Gain on all Sound Voices in their respective language. For now, let’s hit the Add button and type in Spanish in the box that pops up. Hit ‘Okay’ and confirm your changes in the warning prompt that follows.
If you select any of your new Sound Voices, you’ll see in the Contents Editor that there are now sections for both English and Spanish. We already have our English audio files in place, so let’s import our Spanish audio files as well by dragging each one into the Spanish field of the Contents Editor. I am going to do this for all 5 of my narration sounds.

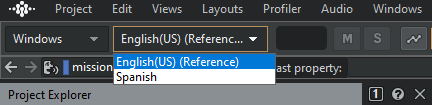
Whenever you play any of these Sound Voices, you are going to hear them in your default language. However, if you go to the top-left corner of Wwise, switch your default language to Spanish, and play your sound again, then you will hear the sound that you put in the Spanish field. This is how a developer can easily change from one language to another with just the flip of a single switch.
Now let’s check out our Sequence Container. After selecting the container, look at the Contents Editor and the Playlist section directly to the right of it. By default, Sequence Containers will not inherently play all of the sound objects that are inside of them; they will only play the sound objects that are in their Playlist. Drag the Sound Voices from the Contents Editor to the Playlist in the exact order you would like them to be played in sequence.
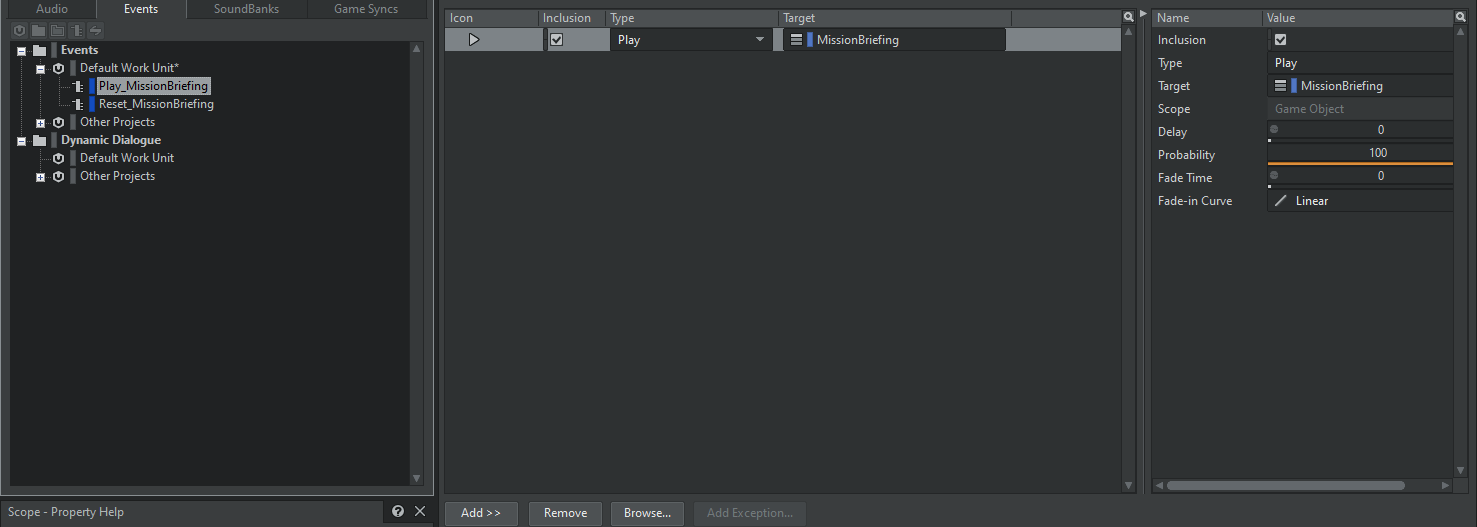
Unless you would like to edit your sounds, that is all that needs to be done for now. We are going to go into the Events tab and make 2 new events in the Default Work Unit:
1. An event with a ‘Play’ action that is going to play our Sequence Container, named Play_MissionBriefing.
2. An event with a ‘Reset Playlist’ action that is going to reset our Sequence Container’s playlist back to the first Sound Object, named Reset_MissionBriefing.
Note: While we are working on dynamic dialogue systems in these demonstrations, we are NOT using the Dynamic Dialogue section of the Events tab.
The purpose of the second event is to ensure that we always play from the first sound of our Sequence Container whenever we play our Narration. It mostly serves as a safety net.
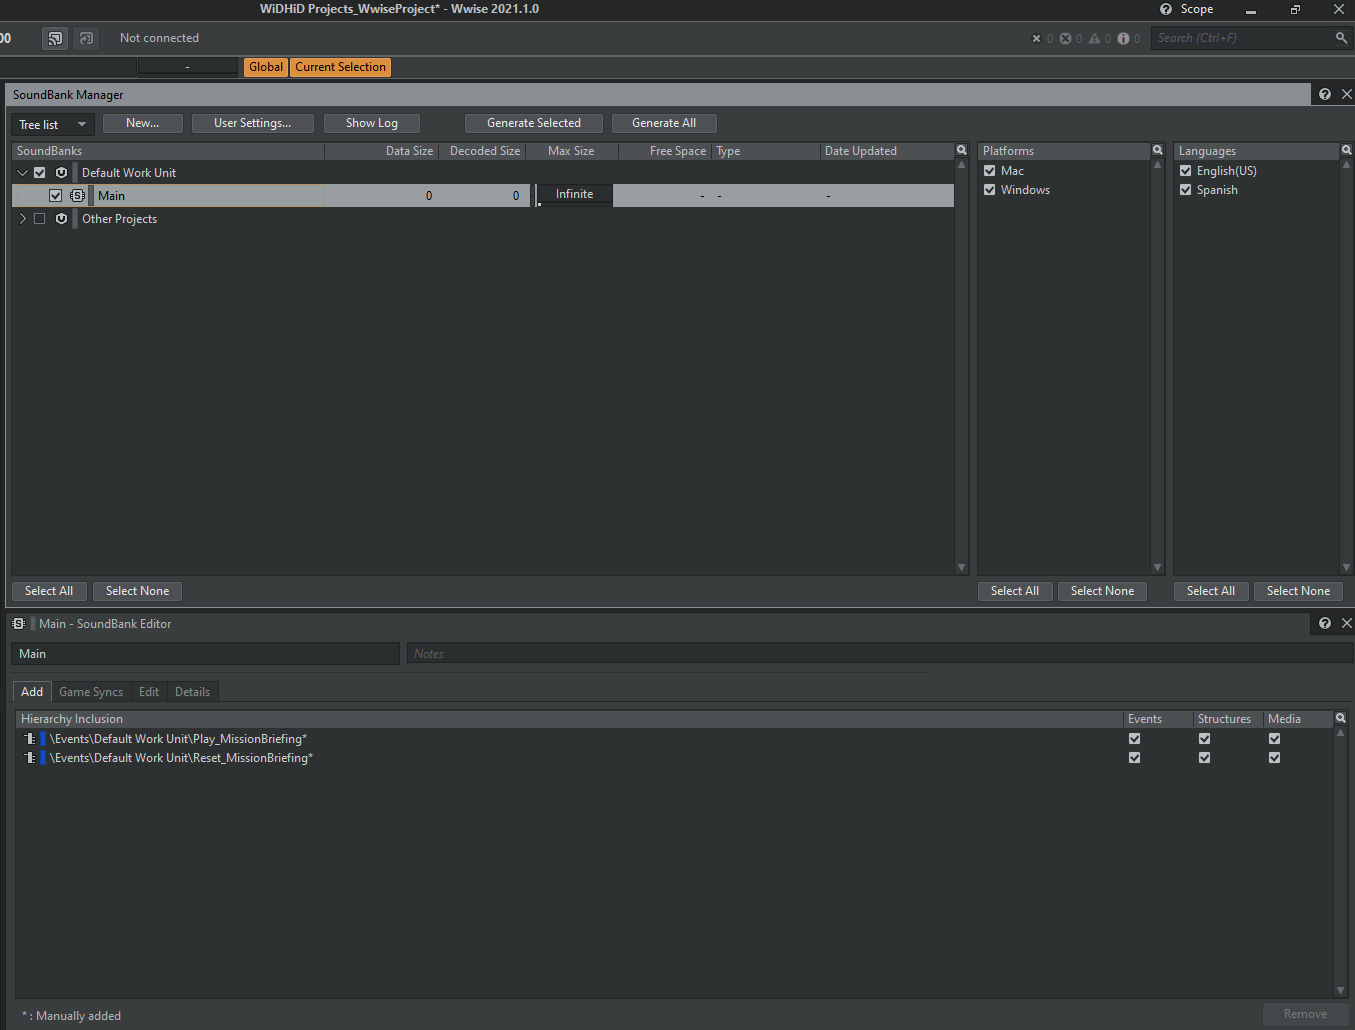
All that is left to do is make a soundbank and include our 2 new events. In the top bar, go under ‘Layouts’ and select the Soundbank layout, or simply hit F7. In the Soundbank Manager, select New and make a new Soundbank. I’m going to call mine Main.
Select your new Soundbank in the Soundbank Manager, then drag both the Play_MissionBriefing and Reset_MissionBriefing events from the Event Viewer to the Soundbank Editor.
From the Soundbank Manager, check the checkboxes for your new soundbank, your platform (Windows, Mac, etc.) and the languages that you made for your project. Finally, hit the ‘Generate Selected’ button.
Wwise – Dynamic Dialogue
After the player is given their mission by their commanding officer, they will be given some time to complete their mission. Depending on how the player completes their mission, the commanding officer will give a different response. Before we begin, let’s map out the variables that will determine what the commanding officer says to the player. First, let’s look at the 3 objectives that the player is given:
1. Go over the hurdle.
2. Go under the archway.
3. Go onto the green path, not the red path.
There are multiple ways for this particular mission to end. 5, to be exact:
1. The player does nothing. (Fail, Fail, Fail)
2. The player only goes over the hurdle. (Pass, Fail, Fail)
3. The player goes over the hurdle AND under the archway. (Pass, Pass, Fail)
4. The player goes over the hurdle, under the archway, then onto the Red path (Pass, Pass, Red)
5. The player goes over the hurdle, under the archway, then onto the Green path (Pass, Pass, Green)
That is three variables for us to track: the hurdle, the archway, and the path. That’s where switches and states come in.
If you are still on the Soundbank layout, return to the Designer layout by selecting ‘Layouts -> Designer’ or press F5.
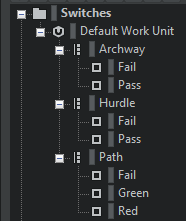
We are going to go into the Game Syncs tab in the Project Explorer and make 3 new Switch Groups in the Default Work Unit of the Switch section: Hurdle, Archway, and Path. For both the Hurdle and Archway switch groups, we’re going to make 2 new switches: Fail and Pass. Then for the Path switch group, we are going to make 3 new switches: Fail, Red, and Green.
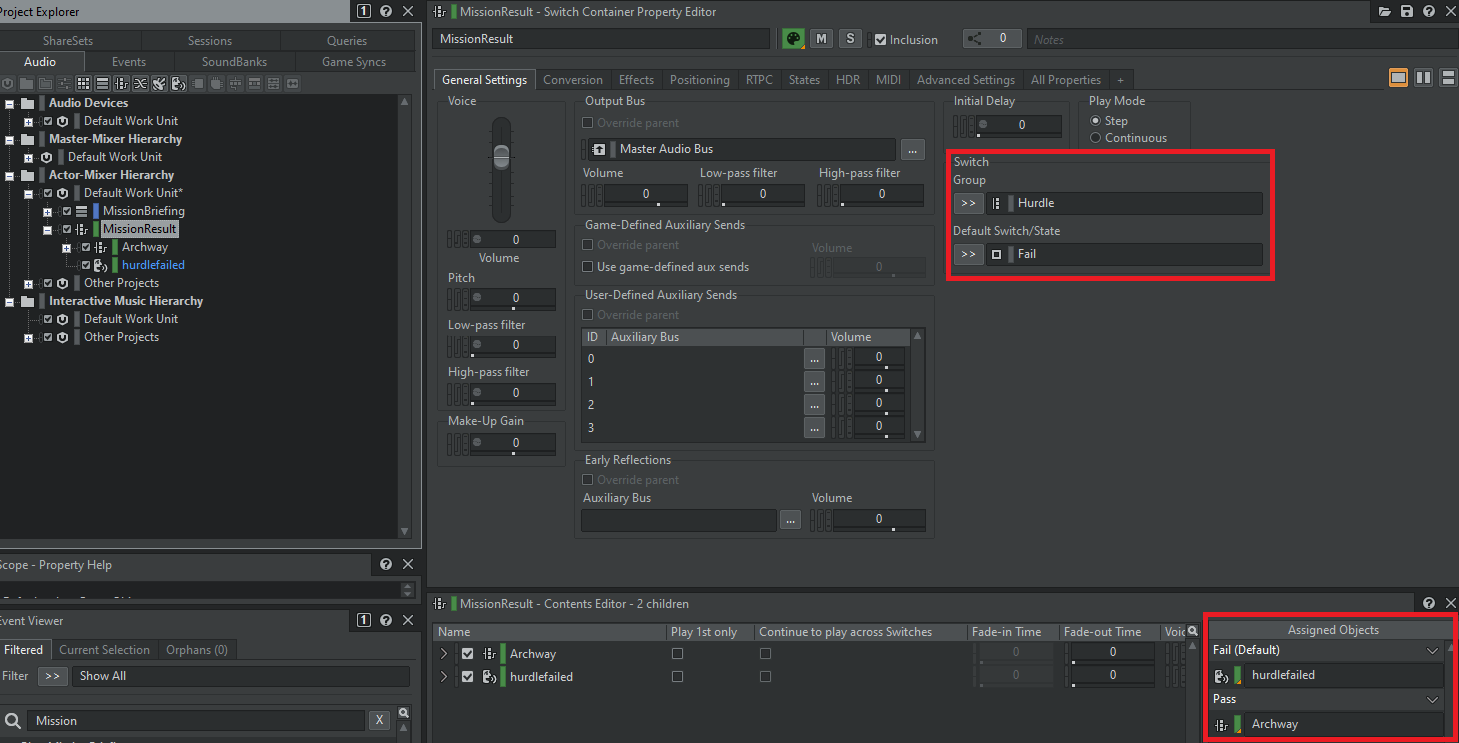
Return to the Audio tab. In the Actor-Mixer Hierarchy, make a new Switch Container under the Default Work Unit (Ctrl + Shift + Alt + W). I will name mine MissionResult.
Select our new Switch Container and look at the ‘Switch’ settings on the right side of the Property Editor. The first thing we are going to do with this container is check to see if the player passed or failed the Hurdle test. If they failed, they will hear an audio of their officer being disappointed. If they passed, they will move on to the Archway test.
To do this, first set the Switch Group to the Hurdle group, and set the Default Switch/State to Fail. This will populate the Assigned Objects section below with our two switches: Pass and Fail. We’ll need the appropriate “objects” to fill these with.
First, import a new audio file of the “Hurdle Failed” condition into our MissionResult switch container. Then we’re going to make a new Switch Container within the MissionResult container, which I am going to call Archway.
Now all we have to do is move both of these from the Contents Editor to their respective Assigned Objects: “Hurdle Failed” to “Fail”, “Archway” container to “Pass”.
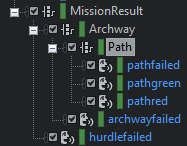
Now we are going to repeat this process inside of the Archway switch container. Set the Switch Group to the Archway switch group and set the Default Switch/State to Fail. Import an “Archway Failed” audio into the Archway container and make yet another switch container named Path. Then just slot them into the Assigned Objects just like before: “Archway Failed” to “Fail”, “Path” container to “Pass”.
We’re going to repeat this process one last time, though now we have 3 switches instead of 2. Inside of the Path switch container, set the Switch Group to the Path switch group and, once again, set the Default Switch/State to Fail.
Now all we have to do is import the final 3 audio files: Path Failed, Path Red, and Path Green. Slot all 3 into their respective Assigned Objects.
Let’s briefly go over what we just did. If you fail the Hurdle test, you will not see the rest of the switch containers; you will simply play the fail message. If you pass, you will move on to the Archway test. Fail this one and you won’t see the Path switch container, you’ll play the Archway fail message. Pass the Archway test and you move on to the final Path switch container, which will check to see if you went onto the red or green path, or if you went on no path at all. All 3 of these conditions will pass you to a specific audio file.
With all that done, making the event for this is simple. Instead of going to the Event tab, we’re going to make an event from the Audio tab. Simply right-click the MissionResult switch container, go under New Event, and select Play. This will automatically make a new Play event with the name Play_MissionResult.
Go back to the Soundbank layout by pressing F7 and drag your new Play_MissionResult event from the Event Viewer to the Soundbank Editor. Generate the Soundbank just like before and make sure to save your Wwise project.
Unity – Integrating Sequence Narration
We are now going to integrate the narration we made in our Sequence Container. Normally, this would be a simple feat; we would play the narration audio 5 times one after the other. But how do we know when one segment ends so we can begin playing the next one? What if we wanted to have a slight delay between each segment? One of the ways we can accomplish both of these is with event callbacks and coroutines.
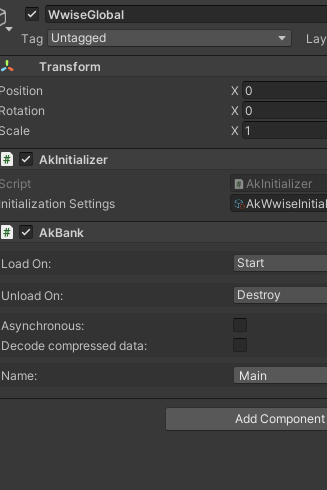
To start, we need to load our bank. First, select the WwiseGlobal object in the hierarchy. In the Inspector, select Add Component and search for AkBank. Once that is put into WwiseGlobal, select your Soundbank from the ‘Name:’ list.
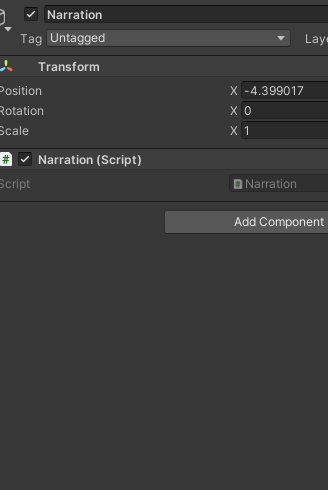
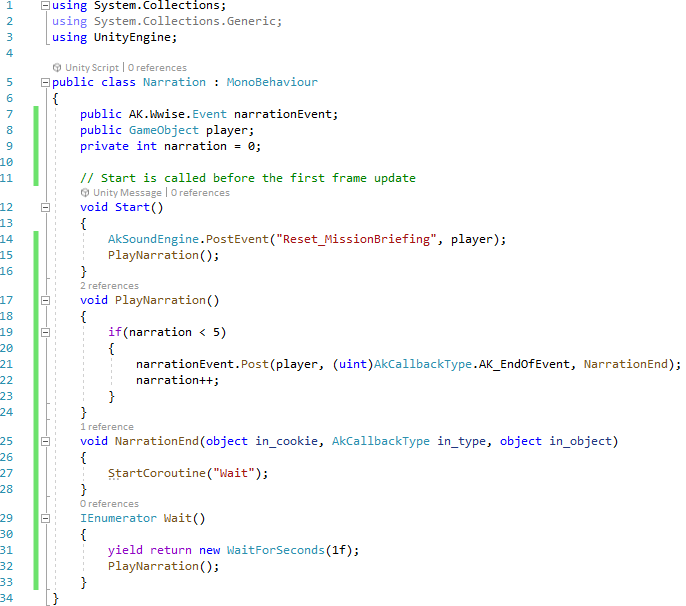
Now we need a new script to power our narration. In the Hierarchy, make a new Empty Object by right-clicking and selecting ‘Create Empty’. You can name your new object however you like, but I am going to name mine Narration. Hit ‘Add Component’ in the inspector again, type ‘Narration’ into the search field, select ‘New Script’, and finally select ‘Create and Add’. This will make a new script and add it into the main Assets folder. Select your new script from the ‘Project’ tab.
 |
 |
The primary goal of this script is for the 1st narration audio to play when the player enters the scene, then when that ends, the next audio will play after a short delay. This will repeat until we have gotten through all of the objects in our Sequence Container.
Let’s start with 3 member variables, which are placed directly above the Start function:
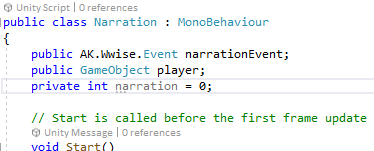
1. The Narration event is going to be the Play_MissionBriefing event that we made in Wwise. We make it public so we can set the event from the Inspector. We’ll do this after completing the script.
2. The Player game object will be used to inform Unity where the listener is. We make it public so we can set the Player game object from the Inspector. We’ll do this after completing the script.
3. The Narration integer will be used to tell the script how many audio files have been played. Once this number reaches 5, then the script will know not to play any more audio files.
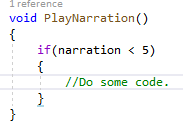
With those set, let’s clean up the script a little and make a new function. Delete the Update function; we will not need it. In its place, we’re going to make a new PlayNarration function.
Before we play our narration audio in this function, we need to check to see if the script has already played through all of the audio files in our sequence container. We do that with a simple ‘if’ statement. Only play this audio if we have previously played it less than 5 times. In coding terms, we will use our narration integer:
Inside of the if statement, we are going to finally post our event to play the narration audio. Start with the following: narrationEvent.Post(player)
Right now, we are posting this event to the player, which is fine on its own. However, remember that we wanted to post another event after this one finished? We do this by using event callbacks. Here is the remainder of this line of script.

The AkCallbackType represents what callback we are using with this event. There are multiple different callback types, most of which refer to music events, but for now, we want our callback to track the end of our event.
Note that the (uint) at the beginning of the AkCallbackType is “casting” the result of AkCallbackType from one value to a uint. This is simply to satisfy the requirements of the function; it’ll be used any time you make a Callback script.
The final part of the function (NarrationEnd) tells Unity, “After this event ends, I want you to play this function.” As of right now, you will get an error under NarrationEnd because the function does not exist. Let’s make it right now!

Note that all of the objects in the parentheses of NarrationEnd are necessary. This is because the Event Callback function is sending NarrationEnd some information, such as information about the event that was posted and the type of Callback that was used. We will not be using any of this information in this demonstration, but it is good to know that it is there and available if needed.
Before we move on with the NarrationEnd function, we need to make one last addition to the PlayNarration function. Add the following line directly after narrationEvent.Post:
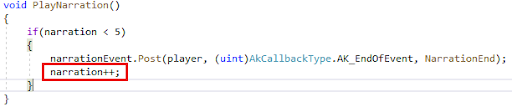
Any time you put a ++ after a number variable, you are “incrementing” that variable by 1.
We have now overcome one hurdle: we are now posting an event and waiting for the end of that event to do something. Now we need to add a delay after the event ends before posting the next narration event. We do that with a coroutine. Below the NarrationEnd function, let’s make a new function:
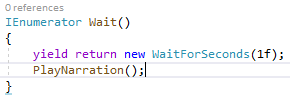
- IEnumerator functions, or coroutines, allow time to pass in the background before executing a function. It is perfect for delaying functions for a specific amount of time.
- Yield return new WaitForSeconds(1f) is how we tell Unity how long to wait until executing the code following the yield. In this case, we are telling Unity to wait 1 second.
- Finally, we loop back to the PlayNarration() function.
We will call this new coroutine inside of the Narration End function. This is achieved in a different manner than most function calls:
StartCoroutine(Wait());
When we get back to the PlayNarration function, Unity checks if we still have any narration left to play. If so, it will play the next narration and do the loop all over again. If not, then the loop stops and the narration officially ends.
Before we finalize this, we need to do a couple more things. Add the following to the Start function:
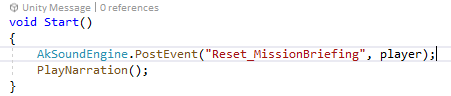
This will post our Reset event before starting our PlayNarration() loop.
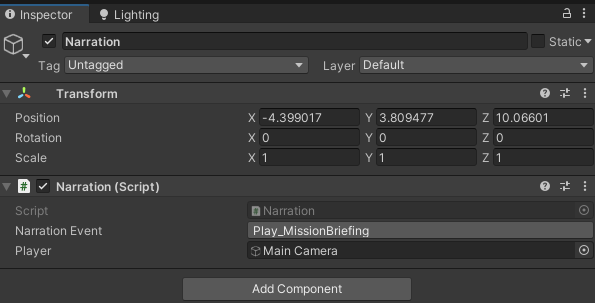
Finally, we need to go back into Unity and, in the inspector, make the following inclusions to the new Narration Event and Player fields of our Narration script.
Go ahead and save your progress before pressing Play and checking your work. If you do not get the expected result, feel free to compare your script to mine below:
Unity – Integrating Mission Briefing
Now that the player has been given their mission briefing, they need to go on their mission. The game needs to figure out if the player has actually gone over the hurdle, gone under the archway, and journeyed onto the green or red pathway. In order to achieve this, we are going to make box colliders for the hurdle, archway, and both of the paths.
This is done by making cube objects. In the hierarchy, make 4 new Cube objects by right-clicking and selecting ‘3D Object -> Cube’. Place one cube above your hurdle where the player is absolutely going to collide with it, then do the same thing underneath the archway. Finally place the last 2 cubes directly above the green and red paths. Feel free to adjust these cubes to your liking using the Move (w), Rotate (e), or Scale (r) tool.
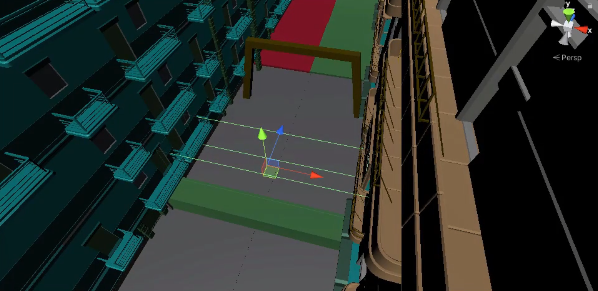
In each cube, make sure to disable the mesh renderer by unchecking the checkbox to the left of the Mesh Renderer component. This will make your cubes invisible. Next, go to the Box Collider component and check the ‘Is Trigger’ checkbox. This will allow the player to pass through the cube and “trigger” an event.
For the Hurdle and Archway cubes, hit Add Component in the Inspector, search for the AkSwitch script, and select it. Then we will do the same thing to add an AkTriggerEnter component to both cubes as well.
First, in the AkSwitches, change the TriggerOn to ‘AkTriggerEnter’ (and de-select Start). Next, check the ‘Use Other Object’ checkbox. With this enabled, we will be allowed to designate which object triggers the switch change - in this case, the ‘Trigger Object’ in our Ak Trigger Enter component becomes the triggering object. In the AkTriggerEnters, simply drag the player’s object from the Hierarchy into the Trigger Object field.
Finally, select the appropriate switch names for each object: “Hurdle / Pass” for the Hurdle object and “Archway / Pass” for Archway object.
The final result should look like this:
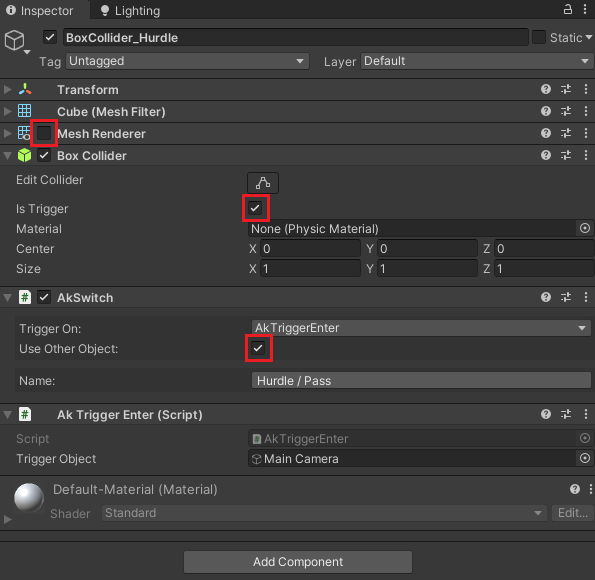
Any time the player enters into these cubes, they will “trigger” the appropriate AkSwitch to switch from Fail to Pass. This will ONLY occur if the player passes through these trigger objects, because we set the player as the sole triggering object in the AkTriggerEnter components.
Now we move onto the cubes for both the red and green paths. We’re going to do something different with these colliders. Instead of simply setting a switch on each of these paths, we’re going to have the mission end immediately once the player steps onto one of these paths. That’s going to require us to make a new script.
Go into the Inspector for one of the paths and make a new Component: type in a script name, like ‘MissionEnd’, select New Script, and select Create and Add. Make sure to add this script to the remaining path as well.
In this new script, we are going to add 2 new member variables:

- A bool is a variable that simply tracks whether something is true or false. In this case, we’re tracking whether or not the mission is complete.
- The Wwise Switch, which we will set in the Inspector after the script is completed, will set the Path switch group to either Red or Green, depending on which path the player goes on.
Next, let’s delete both the Start and Update functions. In their place, add a new function with the following execution:
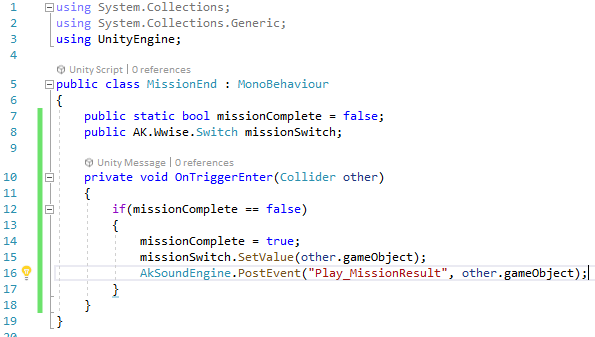
- OnTriggerEnter is a Unity-specific function that checks to see if something (with a collider) has passed into an object’s trigger zone. If it does, then the function will keep track of the triggering object with the “other” variable.
- Then we check to see if the mission is NOT complete. If it isn’t, then set the Mission Complete variable to true. This is to ensure that this script only gets played once.
- Then we set the value of our Switch to either Red or Green, depending on which path the player chose.
- Finally, we post our “Play_MissionResult” event to “other.gameObject”, which will be the player in this instance.
Return to Unity and head into the inspector for the colliders for the red and green path. Make sure to set the ‘Path / Red’ switch for the Red path and the ‘Path / Green’ switch for the Green path. Go ahead and test that out. Listen to the mission briefing, then complete the mission by going on either the red or green path.
So far, that is workable for our game. However, there is a problem. The only two endings that we can possibly get right now is either when the player goes on the red path or the green path. What about the other 3 endings we set up in Wwise?
To fix this, I’m going to make a 5-second timer after the initial narration ends. If the 5-second timer ends before the player gets to a path, then the mission automatically fails and a Mission Result narration will play depending on how much the player completed. We can accomplish this in the Narration script that we made in the first Unity section.
Open the Narration script and make a new coroutine:
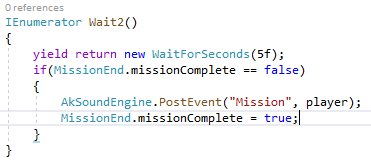
- Just like with the first coroutine, we’re going to pause this script’s function for a certain amount of time – this time we’re pausing for 5 seconds.
- Afterwards, we’re going to reference our MissionComplete variable in our MissionEnd script (this is only possible if the Mission Complete variable is a public static member variable). First, we’re checking to see if the mission hasn’t ended yet from the player going onto one of the two paths.
- If the player has NOT ended the mission yet, then we’re going to set the MissionComplete variable to true to signify that the mission has now ended. This makes it so that the player cannot finish the mission again by going onto the paths after the 5-second timer has finished.
- Finally, we play our MissionResult on the player.
The last thing left to do is add StartCoroutine(Wait2()) at the end of our PlayNarration() function. Now save and test your work. Try out each of the 5 different scenarios and see if each is working properly. If not, then check back on your work to see if there was something you missed. If so, then congratulations! You successfully created a functioning dynamic dialogue system.
Next week, I'll be writing about implementing our dialogue with Wwise and Unreal, so stayed tuned!

Comments