

This article covers some lesser-known Wwise features through a collection of tips targeting mostly advanced Wwise users. Please feel free to skip sections depending on your level of knowledge. Most sections can be referenced independently.
Customize the keyboard shortcuts
Wwise exposes a multitude of commands through keyboard shortcuts (press Ctrl+Shift+K for a list). Many of them already have key bindings. You will notice that most of the default shortcut assignations use the modifier keys (Ctrl, Shift, and Alt). This leaves the entire keyboard assignable to your functions of choice, without the need to hold a modifier key.
For example, you could assign the following shortcuts:
| Command | Key |
| Workgroup > Diff (Work unit) | D |
| Edit in External Editor 1 (Default) | E |
| Show Source Editor | S |
| View > Project Explorer > Create Random Container | R |
Feel free to assign your own most used commands to keys without any modifier for super fast access. Keyboard shortcuts are key to productivity.
Also, note that all of the shortcut assignations are saved to:
%appdata%\Audiokinetic\Wwise\KeyboardShortcuts.xml.
You can freely copy this file around, either to share with the rest of your team, or to serve several computers you work on.
Print your Wwise shortcut sheet
Now that you have customized your shortcuts, go back to the keyboard shortcut dialog (Ctrl+Shift+K).
- Click the command list (left side pane).
- Press Ctrl+A to select the whole list.
- Press Ctrl+C to copy the list to the clipboard.
Now, open Excel or another spreadsheet software, and paste the data. Keep in mind that Wwise automatically formats the contents of any table into tab delimited format, ready to be pasted on a spreadsheet.
Now, format the pasted content as you wish, and print. Leave the shortcut sheet on your desk.
Master the List View
The List View is the go-to view to manipulate data in your project. It is a generic table view, where columns can be customized according to your preferences. You can actually display and edit any of the hundreds of properties available in the different Wwise objects.
Press Ctrl+Shift+F to show the List View. You will notice that:
- When the focus is on a view where there are selected objects (such as the Project Explorer), pressing Ctrl+Shift+F will automatically bring the selected objects to the List View; and
- Pressing Ctrl+Shift+F also puts the focus on the text field of the List View, ready to search any object in the Wwise project.
To change the List View columns, you can:
- Right-click the header of the List View and select Configure Columns; or
- Click the View Settings button in the view’s title bar.
There are also a few tricks you may not know about the List View. In particular, the List View works well with multiple selections.
When multiple items are selected...
- Set a property value: When modifying a property (slider, combo, or check box), it will affect the whole selection and set the object's value to all other selected objects. Hold Shift while moving the slider to get more precision.
- Offset a property value: When holding the Alt key and dragging a slider, the selected objects’ values will be offset instead of being set to an absolute value.
- Offset a property by entering a value manually: Type the offset value, then append a ‘+’ to apply a positive offset, or a ‘-’ to apply a negative offset. For example: Type ‘6-’ to decrease the volume of all selected objects by 6 db.
Hack the MIDI Keymap Editor
The MIDI Keymap Editor was made to edit MIDI-related properties of any objects in Wwise, but at the heart of it resides a standard List View. Two things make this “List View” special:
- It is always bound to the children of the selection.
- It shows MIDI properties by default.
What is nice about the List View, is that you can customize the properties shown in it. The MIDI Keymap Editor is no exception. You can actually remove all MIDI properties and display your own. By doing that, the MIDI Keymap Editor becomes a generic property viewer, always displaying the children of the selection, in the same fashion as the Contents Editor.
Get to know custom properties
Custom properties allow you to store additional information in Wwise objects. The custom properties could be used for project management or to store game-used metadata. To define custom properties in your project, create an empty file called PROJECTNAME.wcustomproperties under your project folder (where PROJECTNAME is the name of your project).
In this example, we will add a custom property to store the URL to the bug database. Let’s say we use JIRA. Place this content in the wcustomproperties file:
<?xml version="1.0" encoding="UTF-8"?>
<!-- Copyright (C) Audiokinetic Inc. -->
<PluginModule>
<WwiseObject Name="Sound" CompanyID="1" PluginID="1">
<Properties>
<Property Name="Custom:JIRA" Type="string" DisplayName="JIRA URL">
<DefaultValue></DefaultValue>
</Property>
</Properties>
</WwiseObject>
</PluginModule>
Restart Wwise, and notice that the JIRA URL property will appear in the following locations when selecting a Sound SFX object:
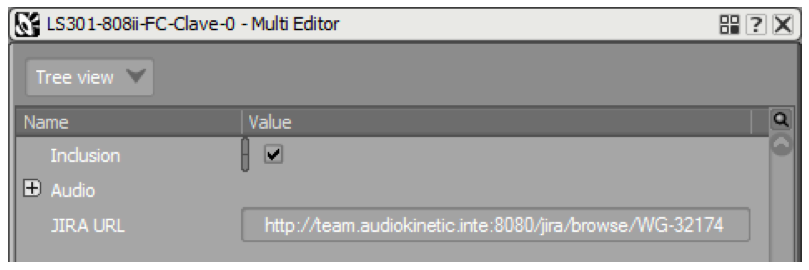
- Multi Editor
- List View (after customizing the columns)
- Reference View (after customizing the columns)
- Query View (after customizing the columns)
- All Properties tab of the Property Editor
Refer to the complete documentation for more information about custom properties:
https://www.audiokinetic.com/library/edge/?source=SDK&id=defining__custom__properties.html
Clickable URLs in properties and comments
When inserting a URL in a custom string property or in the Notes field, Wwise will show the URL in the List View as clickable:

For integration purposes, you could define your own protocol handler on the operating system and have other applications react to clicking the URL. For example, clicking the URL could make your game engine open the associated element. You could also make this point to documents on your intranet, a bug database, or even a web server running on your computer.
Hold the Shift Key and right-click
Wwise uses a standard contextual menu across views. Every time you right-click Wwise objects, such as Sound SFX objects, a Wwise object shortcut menu shows up. You should be familiar with this menu.
Now, hold the Shift key and right-click. Two additional options will appear:
- Copy path(s) to clipboard
- Copy GUID(s) to clipboard
These options can be useful for documentation or integration purposes.
Become the Music Segment Editor guru
The Music Segment Editor contains a few productivity features that you may not know. This section covers a few. Here is a random list.
- Double-click the empty area to create a new track.
- Shift+Click the ruler to create a new custom cue.
- Press the Insert key to create a new custom cue at the play cursor position.
- Hold Ctrl while dragging the entry cue to move the entry cue without moving the contents.
- With clips selected, hold Ctrl and use the arrow keys to move the selection.
- With clips selected, hold Shift and Ctrl and use the arrow keys to move the selection with more precision.
- Hold Ctrl while dragging the selection to create a copy of the selection.
- You can modify the clip trim on multiple selections.
- Press P to set the entry and exit cue to the clip selection.
- Press S to split the selected clips on the play cursor.
- Press the numeric pad ‘.’ to jump the play cursor to time zero.
- Press the numeric pad 0 to jump the play cursor to the entry cue.
- Press the numeric pad 1 to jump the play cursor to the exit cue.
- Press a digit between 2 and 9 on the numeric pad to jump to the corresponding custom cue.
- Press Q, W, or E to toggle on Bar/Beats, Cues, or Clips/Loops.
- Drag and drop WAV or MIDI files directly into the segment editor, from the operating system explorer.
The next items work in the Music Segment Editor, the Source Editor, and the different curve editors:
- Hold X and drag to pan.
- Hold Z and drag to zoom to rectangle.
- Hold Z and click to set zoom to see the entire workspace.
- Press the numeric pad + to zoom in.
- Press the numeric pad - to zoom out.
Achievement Unlocked
You’ve reached the end, you are the best! I hope you learned something today. Keep on dreaming, and don’t let technical details slow down your productivity.

Comments
Martin Bussy-Pâris
January 25, 2017 at 07:50 am
Nice one, Bernard! I didn't know about some of the music shortcuts, thank you :)