
If you have not read part 1, here it is!
The Audio Implementation |
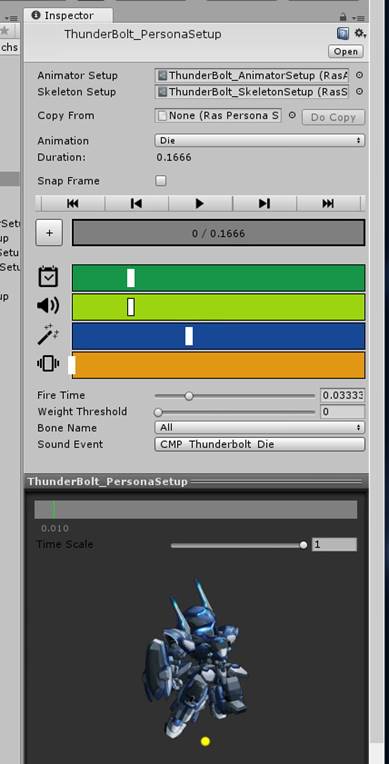
To test the audio design quickly, we made extensive use of Wwise-Type properties in the Unity components to configure all sound settings and most Game Syncs. See the image shown below for an example of how it looks like in the Unity editor.
Animation Editor and Sound Effects |
In the project, we used Spine to create animations and wrote the editor code in Unity to add visual effects, script events, screen shake, and gamepad vibrations. I also implemented the sound effects of animation events in Unity. I was able to tweak the timeline to get the audio in-sync with the game visuals to maximize the gameplay experience.
Not all animations were prepared in advance, some of them were mixed and generated afterward with several clips. As a result, the sound effects would be rendered in terms of weight and actual needs. When two clips are being mixed, only sounds with a higher weight are played.
Node Canvas and Sound Effects |
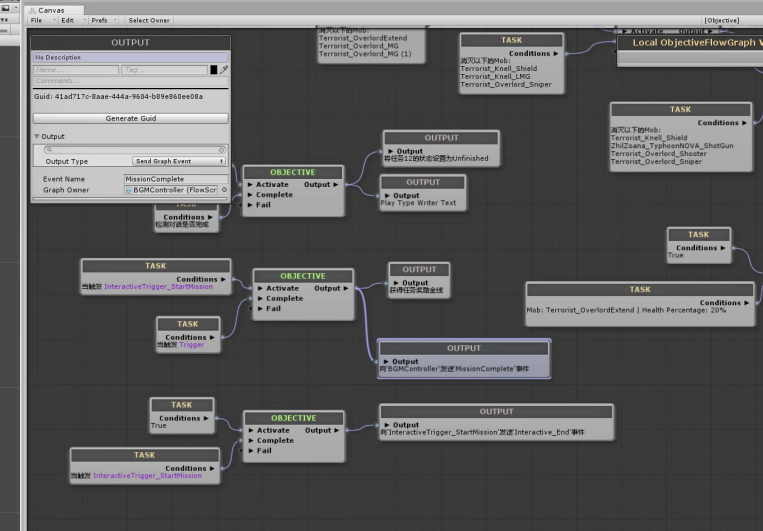
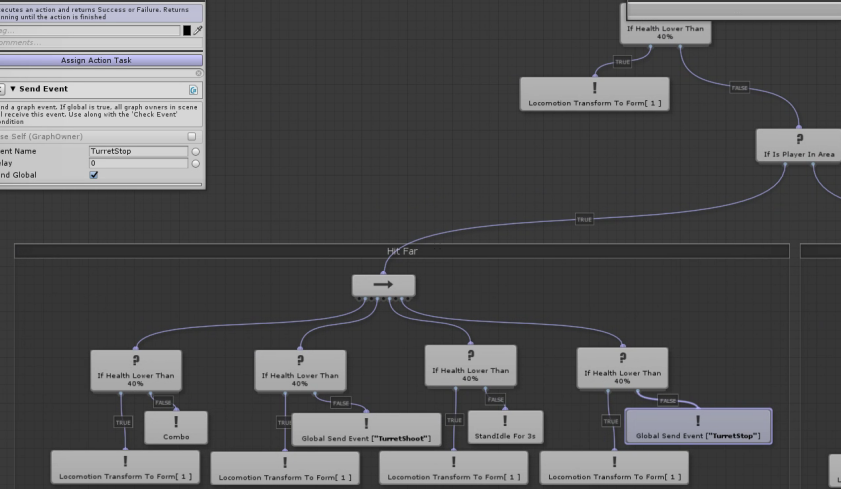
In the project, we used a Node Canvas component as a visual script editor to implement logic management, character action trees, and state machines. This enabled our game designers the ability to create advanced game logic, process, and animations.
I introduced the Wwise communication module into the state machine so that it could control the Wwise event playback and RTPC/Game Sync calls in real-time. This helped make complex sound design and conditional calls and ensured music segments would be switched dynamically during the actual gameplay. The sound designers found the communication between the visual editing components very useful in implementing continuous, nesting audio calls.
Cut-scene Editor and Sound Effects |
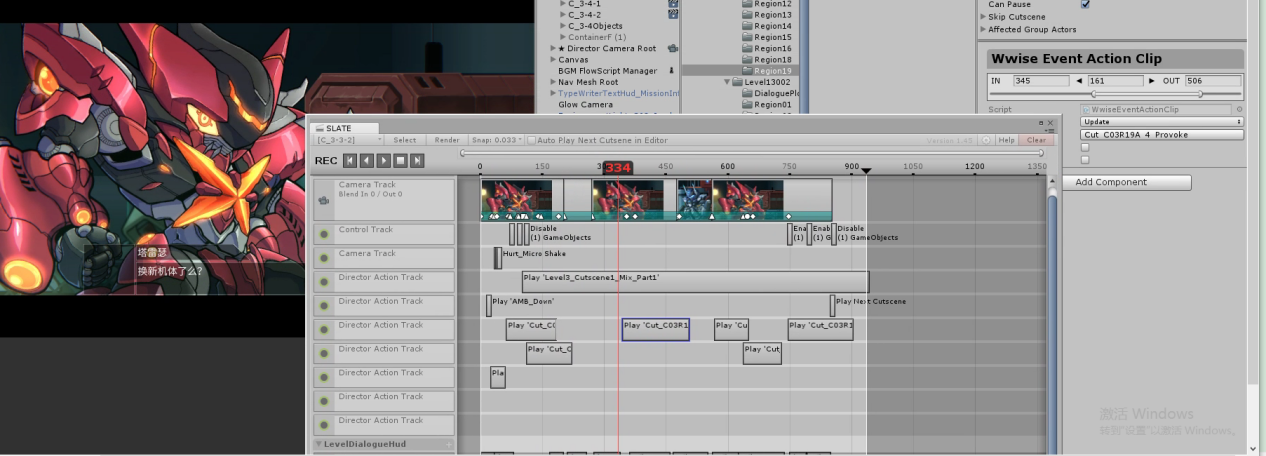
In Hardcore Mecha, there are a lot of 2D cut-scenes! They were created as animation clips in Spine, then implemented into the game. To add proper camera movement, screen shake, and gamepad vibrations to these cut-scenes, I first used Slate as a timeline editor and then integrated it in Spine. On this basis, I split most cut-scene sounds into layers during the prototyping phase and implemented them into the game in a DAW-like fashion. I did the same to cut-scene music and other real-time elements. Nevertheless, there were all kinds of challenges during the actual implementation. As our game focused on top-notch cut-scenes, keeping the audio in sync with game visuals was the top priority. However, unexpected crashes and temporal deviations would occur due to factors such as multi-thread asynchronous loading, back-end processing pressure, or diverse console performance. Once those issues occur, the player’s gameplay experience will be impaired dramatically.
In most cases, we would just investigate, analyze and then address the root cause. However, to ensure the audio was in sync with game visuals, we made some extra insurance measures. We recorded the relative timing of each Wwise event in the cut-scene, then used the Duration information logged in the Wwise Soundbank Info file to create equal-length action clips in Slate. All these clips would then be checked against the overall Slate timing per unit of time during actual playback. If the relative playback timing match, then the play sequence would continue, if not, it would be re-aligned with a Seek On Event call.
Also, we added some relevant audio features to the cut-scenes. For example, players are allowed to pause the game and skip the cut-scenes. In this case, the audio doesn’t have to be stopped, especially for the in-game music. We created a separate Skip event list for each cut-scene to let the music play on. Different Skip events could be triggered depending on whether that loop is before or after the cut-scene. Also, we created an interface to determine whether events or Skip events would be triggered when a cut-scene ended or an associated component was destroyed.
Implementing Sound Emitting Objects and Managing Persistent Objects
The Post action of Wwise events is on a per-object basis. The playback lifecycle of a sound always needs a game object to determine its action scope. How to define a game object becomes a key to make sure the audio system works properly. We cannot simply let the script post an event to any object with a component attached.
First, we defined the basic sound emitting objects as character objects.
- Most emitters attached to the player were independent, such as weapons, animations, and movements. Instead, to make sure the Game Syncs work properly, all of them were attached to the character. In this way, we could render most sounds emitted from the objects within the game visuals by managing the relationship between the animation system and the Wwise game object.
- The Bullet - Bullet sounds are usually spawned by characters, and their playback lifecycles are shorter than their duration. Therefore, we separated those sound-emitting objects and defined them as one-shot objects. In this case, we created a separate object for each of them to follow its position until the playback ends.
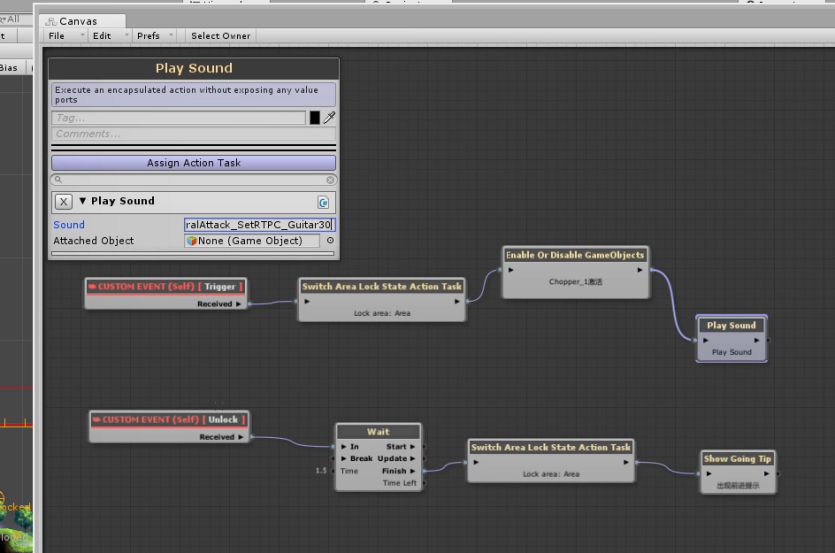
- For the sound-emitting objects that do not affect the audio events, we defined them as controller objects. Usually, we created them directly into the scenes, and coordinate them with other objects in the Flow script in Node Canvas via Send Events, and later managed the game syncs/audio elements.
As mentioned previously, the playback lifecycle of sounds could be shorter than their duration. For most cases, we added a Persistent Sound option. As opposed to one-shot objects, when the option is enabled, these sounds would be attached to a single object and persist without being affected by any scene at runtime. In other words, these sounds are controlled globally.
Multiplayer Sounds and Network Synchronization
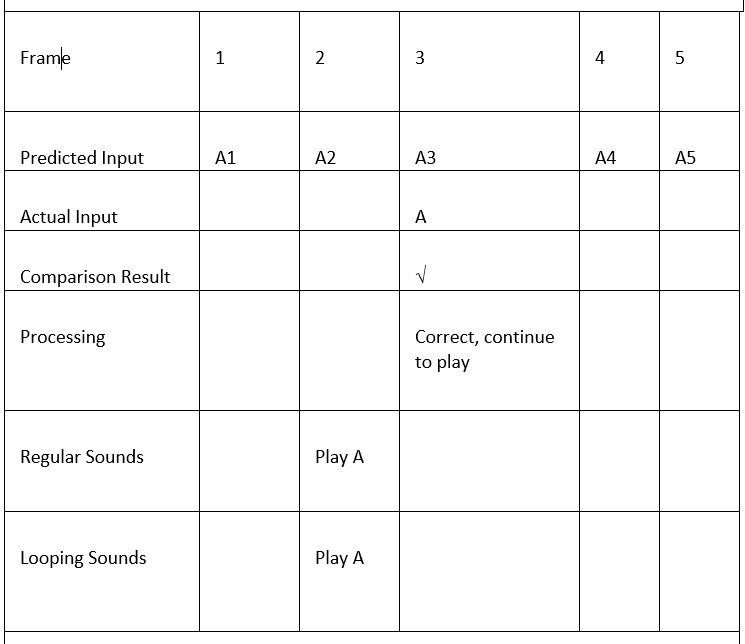
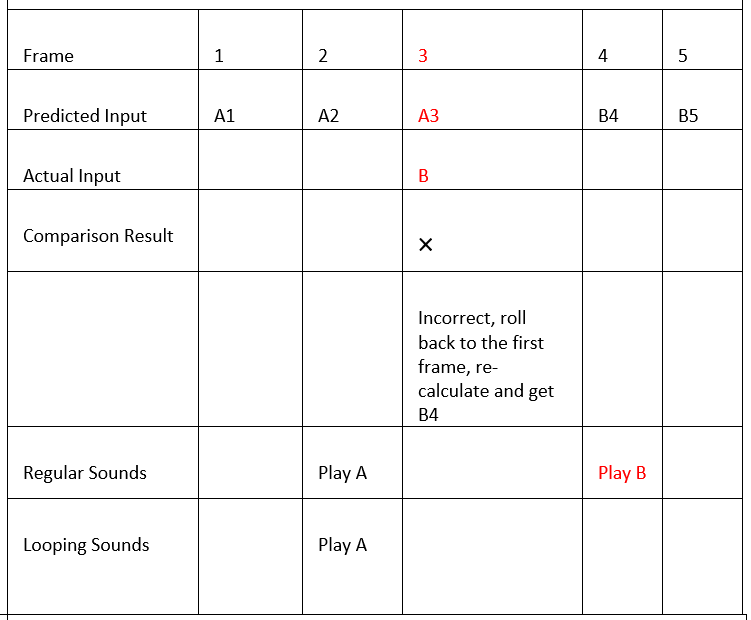
For multiplayer games, network synchronization is always a headache! Things like physical distance, network operators, low-level routers are all obstacles for synchronization between players. For different online games, various synchronization strategies can be used depending on the gameplay rules and details. Similar to other fighting games, Hardcore Mecha used a Point-to-Point Rollback Synchronization strategy which also affected the audio system.
Basically, how did this method work? Each player’s input would be sent to other players. And, there would be a delay. During this short period, the game predicts the in-game movement, then compares it with other player’s input. If they all match, it would proceed, if not, it would roll back to an unmatched frame, re-calculate, and decide the next sounds to be played based on most of the players’ input. In this way, we ensured that the correct sounds would be played. Players won’t even notice any discomfort in terms of listening experience. And, the server doesn’t have to process all these details in real-time. This relieved the pressure on the synchronization processing dramatically.
With the synchronization strategy, Wwise can play local sounds in real-time based on prediction. In this case, however, decisions have to be made if there is a rollback. In the end, we decided to process multiplayer sounds in the following three ways:
- 1. The music and ambiances will be played according to the initial logic without being affected by rollback.
- 2. Short sounds will be tracked. When there is a rollback, the correct sounds will be played immediately; unless they have been played already before.
- 3. Loop sounds will also be tracked. When there is a rollback, a Stop action will be triggered, then a new sound will play or not.
This ensured that players could get the smoothest listening experience even if their network was not optimal.
The Music Design |
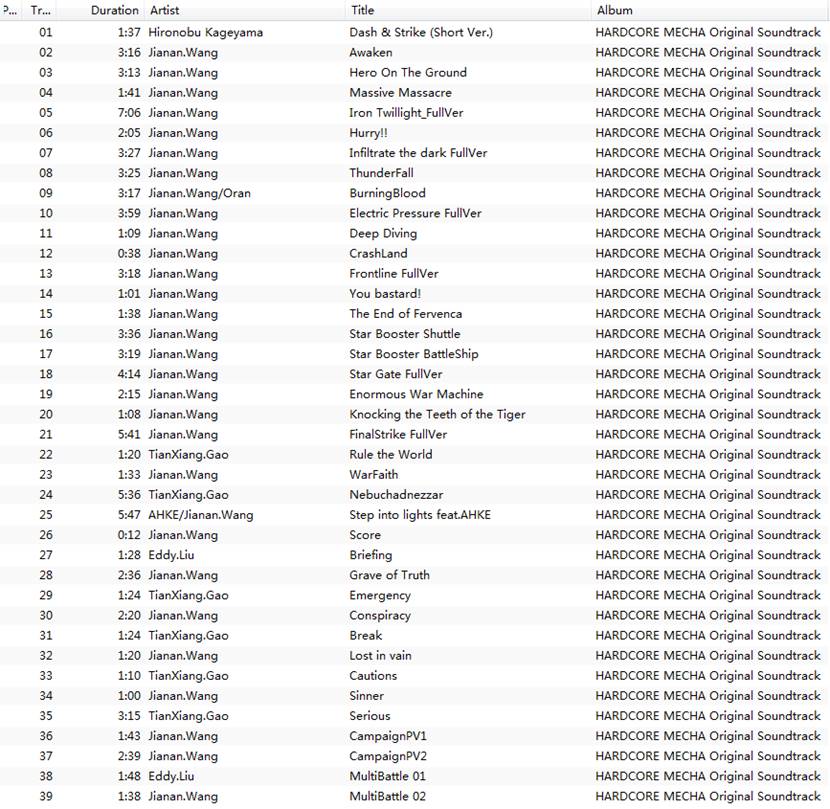
The music in Hardcore Mecha took a big part of our audio design. I, Tianxiang Gao, along with Eddy Liu created more than 60 pieces of original music with a total duration of nearly 3 hours. Also, we collected 39 sections of this work and made an original score album (available on Steam, you are welcome to pay a visit. ^_^)
Hardcore Mecha is featured with electronic orchestral music harmonized with Japanese-style melodies. We wanted to combine the orchestral sound with the electronic. However, there were contradictions! Modern games pursue dynamic music because repetitive songs could make players get bored. However, for a Japanese-style game, repeatedly reinforcing the melody is an essential part to portray a character and tell a story/motif. So we had to balance between these two aspects and create the music carefully.
First, we ensured that all songs were rich in content. Then, in the first half of the story, we used various short drums and less-melodic sounds to render the atmosphere. The second half was just the opposite! We made extensive use of two-part melodies to gradually intensify the battle theme and introduce a narrative with various details. On the other hand, as an advantage of being responsible for creating the music and the sound effects, I embedded a few in-game sounds in the drums and pads. Players probably won't notice them, but this could increase the harmony between the sound effects and the music substantially.
As the development progressed, there were various demands for the music including background music, diegetic music, character music, cut-scene music, dialogue music, interface music, and multiplayer battle music. Next, let’s see how we designed the music logic.
Dynamic Music Design and the Implementation in Levels |
The battle in-game evolves as the story develops. Even in the same scene, the music could either be intense or gentle. We had to coordinate the music with the game visuals. If there was only one looping music track, no matter how good it was, it would never meet the challenging demand. If there were lots of songs switching all the time, the narrative would be too confusing. In the end, I created dynamic music for each level and implemented them into each game part.
Take Chapter 3 for example, I divided the music structure into various parts including String (Woodwinds), Brass, Key (Piano), Guitar, Percussion/Drum, and Synth/ARP/Ambience, then composed them in several phases.
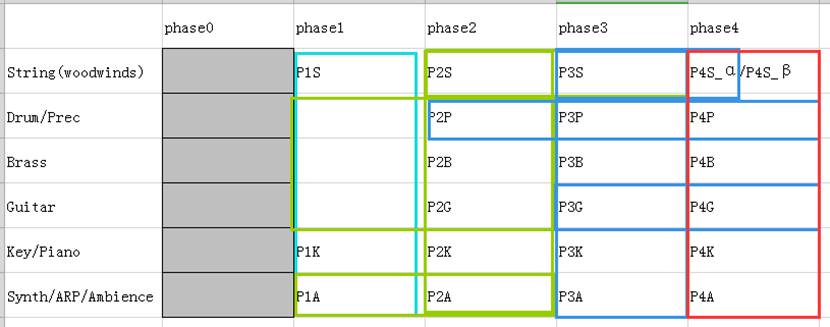
As shown in the image above, first I split the music into different phases and exported them as sub-tracks, then I set up the music structure in Wwise, and lastly copied and combined those layers that would work best as switch phrases. For example, the drum in phase3 can be combined with that of phase2 and phase4, while the string can be switched between phase3 and phase4 (P4S_α).
I also created some Bridge Tracks to be used as transition segments. For example, all phase1 is used for the underwater level, when players go to the above ground level, there is a short Stinger before the music transitions to the main theme.
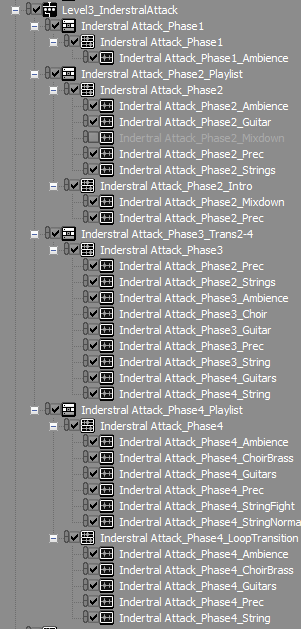
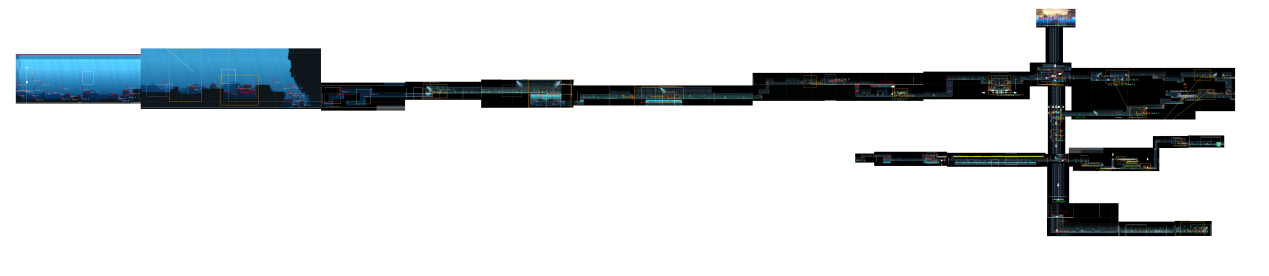
With the music structure created, the next step was to combine layers based on the level design. Usually, I would zoom out of the level chart to create a unified musical score, then make specific changes using the editors mentioned before. As the image is shown below, there are 26 areas in chapter 3. The music segments will be switched either between these areas or when a new storyline is triggered.
The Transition between Cut-scenes |
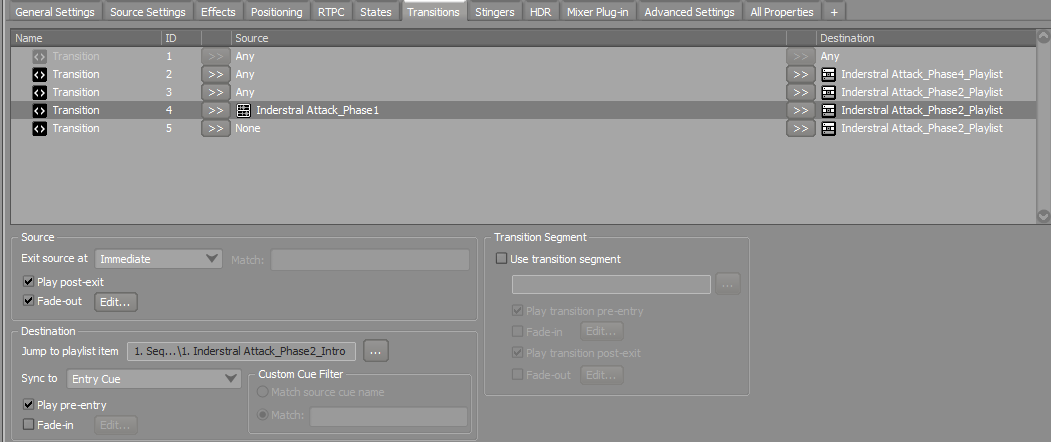
In Hardcore Mecha, there are stunning 2D cut-scenes everywhere in the game. Each cut-scene has a different triggering point. This brought some challenges to music composition. The transition between a cut-scene and a battle is seamless, so there is no way to stop the cut-scene music then play the battle music. We had to negotiate with the animation team to adjust the scene duration, and design separate intro segments to coordinate with the cut-scenes. In most cases, it would be unnatural to stop the music and play another one. And, it’s not a good idea to snap the switching point to the end of a cut-scene. Instead, to switch music seamlessly, we transitioned it to the next segment precisely over a beat drop. The Wwise Music Switch Container feature helped us to achieve this. Take the boss fight in Chapter 5, at first, there is an intro cut-scene, then the battle between Vulphaes and Tarethur begins, music segment A is played, the music switches to intense battle music, the player defeats the boss (hopefully), and finally, it proceeds to the third cut-scene.
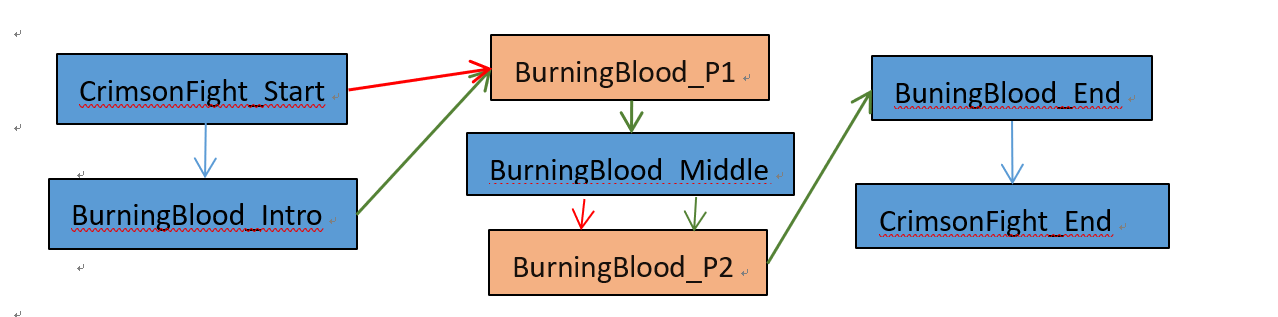
There was a challenge during the sound design because players would be allowed to skip the cut-scenes (note the red arrows in the image above). In this case, we had to create a separate Stop event to stop the transition between layers and the cut-scene sounds. When players don’t skip the cut-scenes, the music will be transitioned to the next segment over a beat drop.
So, that’s how we designed the audio system for Hardcore Mecha. Please feel free to contact me if you have any suggestions. Thank you!
Enjoy the closing song performed by AHKE!
댓글