
Engine sounds have always been a challenging part of game audio design, mainly for the following reasons:
1. Increased quality requirement, expensive original assets.
It’s been a while since racing games were introduced, and engine sounds play a crucial role in them. Each game studio has its own unique approach, and some even develop in-house game engines for this purpose. As time goes by, players are demanding higher audio quality. Moreover, the original assets are not easy to obtain. Luxury vehicles are very expensive and there will be a considerable cost even if you just rent one for sound recording. And the recording cannot be done simply with a few microphones set up in a studio, as there are exceptionally strict workspace and recording technique requirements.
2. Complex & manifold sounding mechanism.
When a vehicle is running, there are many parts making sounds at the same time. They make sounds in various ways and the sounds change in different manners. To create engine sounds and simulate a vehicle naturally in-game, not only superb sound design and production skills are needed, but also deep understanding of the underlying mechanism of how every part works, including the internal combustion engine (ICE), transmission shaft, clutch, gearbox, turbo, suspension, exhaust pipe, etc.
3. Challenging audio interactivity in-game.
The vehicle sounds in-game need to change with the game progress, vehicle status and player actions in real-time, as well as conform to physical laws and listening habits. However, the sounds in-game are mostly based on a simple sample-store-trigger-play logic, where the sound samples are fixed. Many sound engines now provide ways to change the sound with controllable samples, pitch and filtering, yet it is challenging to meet the increasing demand for audio interactivity in racing games.
4. High requirements on the audio programming.
For the engine sounds to work, you need a program kernel to simulate the vehicle engine. It must provide a variety of parameters for the sound engine, which reproduce the details in real vehicle operation.
Recently, I did some research on the REV plug-in for Wwise, and created a demo project with the racing-game template in UE4. In fact, it turned out to be pretty good. Also, it provides a possibility to create racing-engine sounds at a relatively low cost. Here, I’d like to share my process and results with you all.
Introducing the REV Plug-in
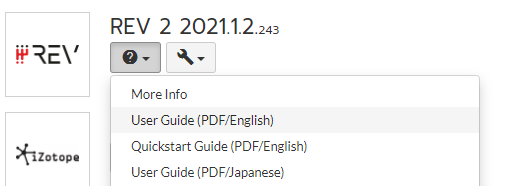
REV, by Crankcase Audio, allows Wwise users to create authentic and powerful engine sounds via a granular synth. For more details on REV and its parameters, you can check the plug-in’s user guide.
To better understand the following sections, let’s have a look at some key parameters in REV first:
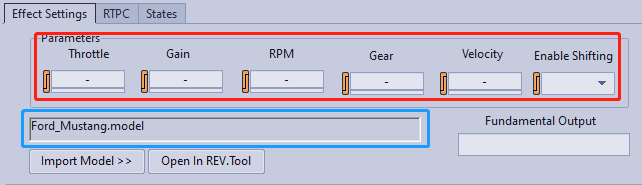
The image above shows some key options and parameters in REV. The blue box indicates the engine sample loaded currently. With the "Import Model" button, you can import other samples as needed. REV comes with a lot of great ready-to-use samples, and they can be used directly in your game as long as you get a license.
The red box shows all the parameters required to control REV, and you can use them to adjust the engine sound as you like.
• Throttle: to simulate how the engine sound changes at different throttle levels.
• Gain: to control the overall volume of the engine sound.
• RPM: to control how the sound changes with the engine speed.
• Gear: to reflect the player’s gear-shifting operations.
• Velocity: to control how the sound changes with the vehicle speed.
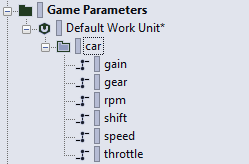
First, we need to create a Game Parameter for each of these parameters. For example:
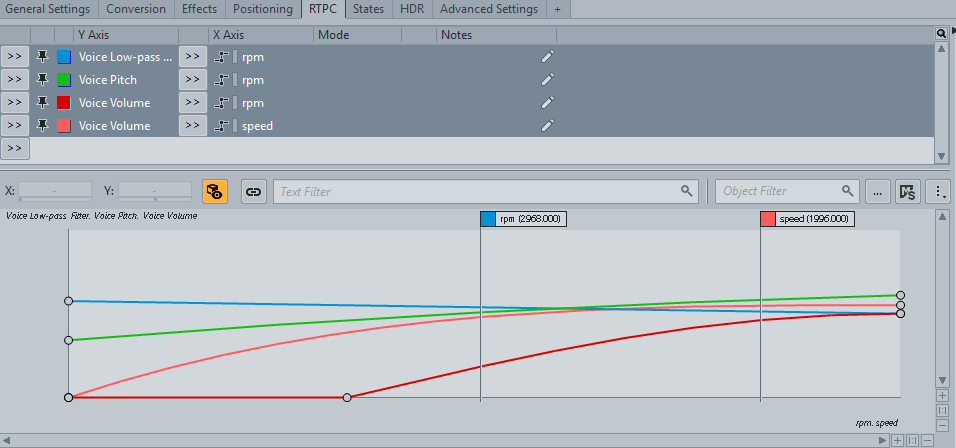
Then we map all these RTPCs:
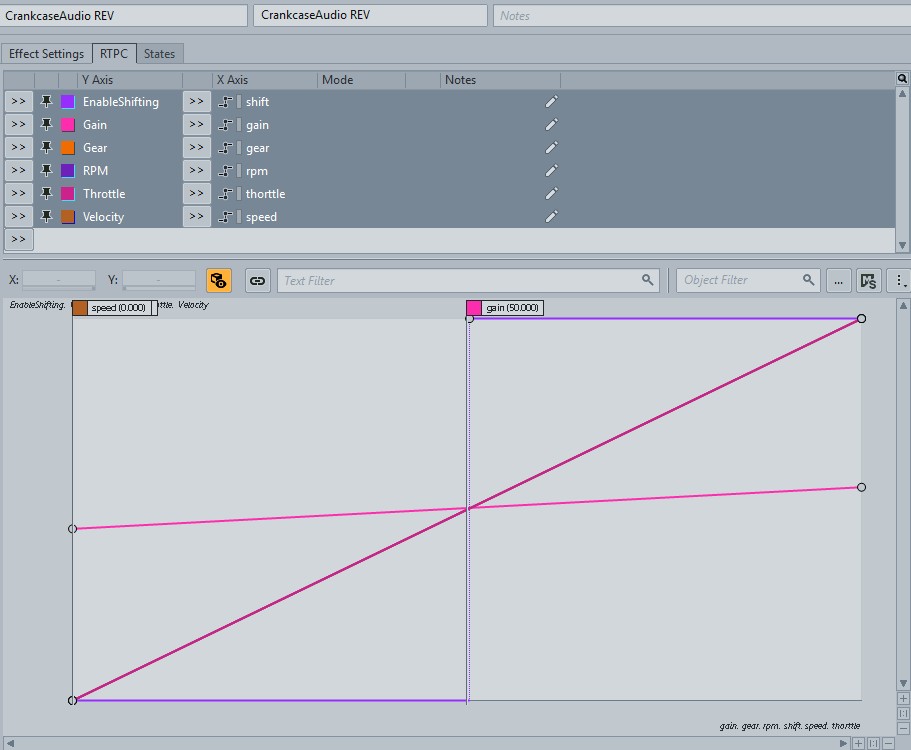
This way, REV can receive the parameters from the game engine, thus simulate the vehicle status in game and make sounds in real-time. Next, we need to create an Event for the engine sound and implement it in UE4.
Calling the Sounds Created with REV in UE4
Open an advanced vehicle template project in UE4, and then open the Blueprint and check the audio settings. You can see that it only has a very simple looping engine sound, modulated by the vehicle’s movement speed.
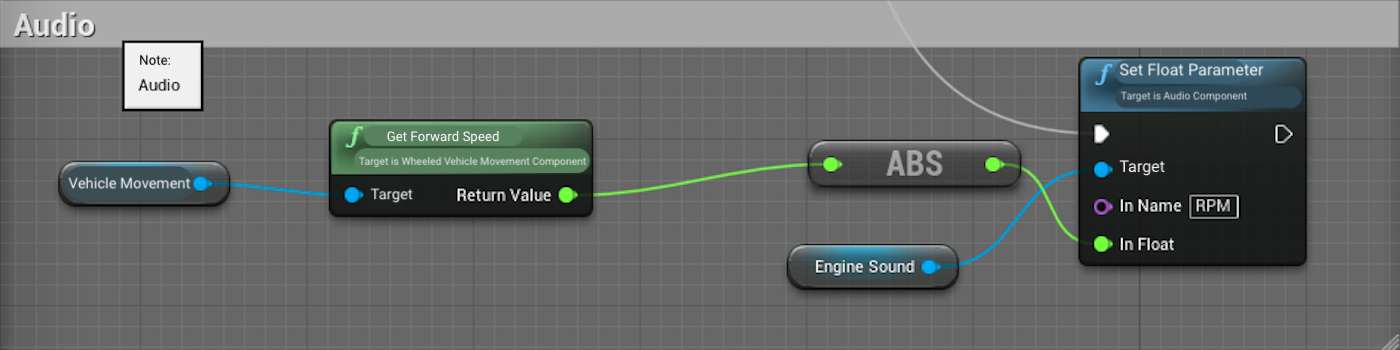
Let’s remove that sound, add the sound created in Wwise, and then modify the parameters. This way, the movement speed, the gear level and the engine speed can be read and sent to the RTPCs.
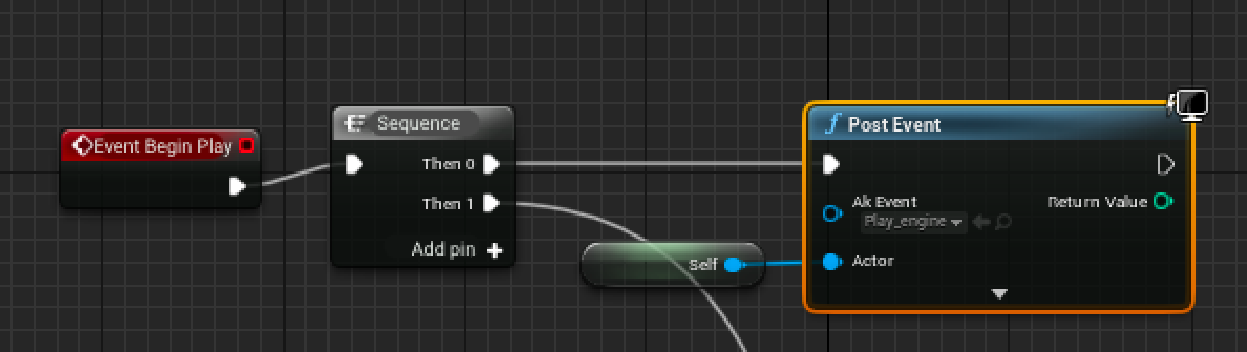
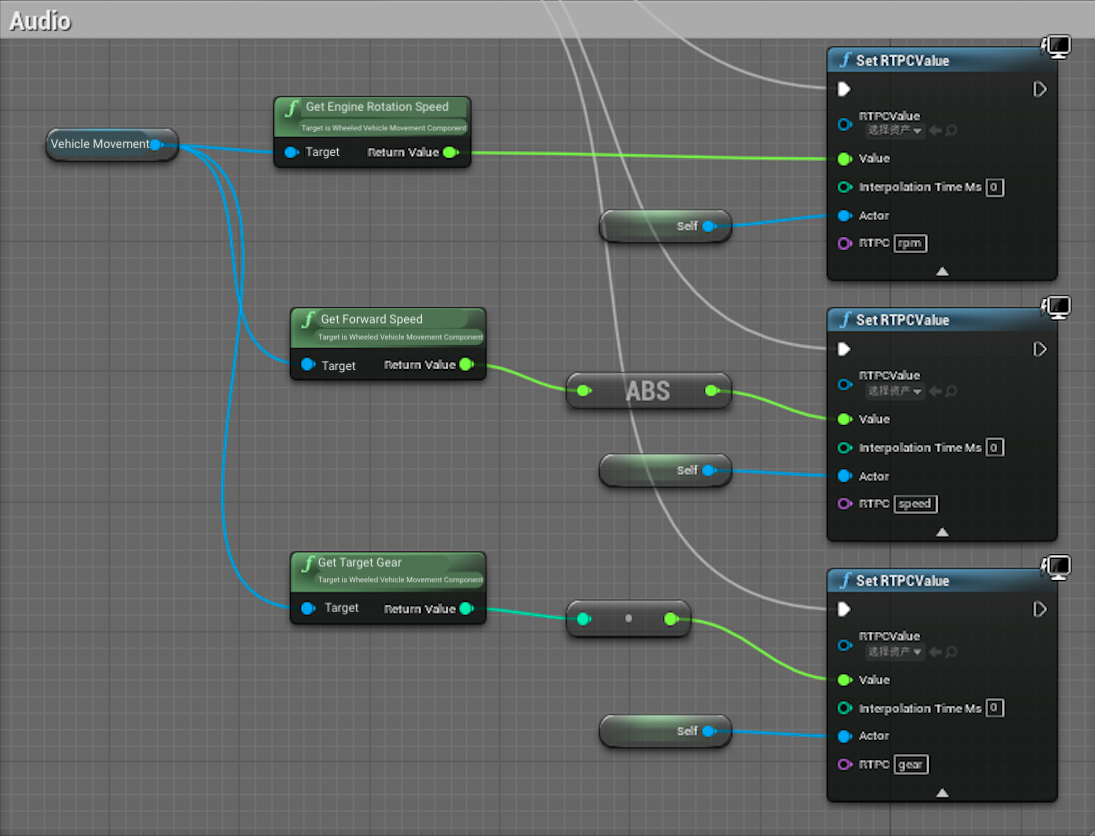
UE4 will read and modulate the sound from Wwise. Here is what we get:
The engine sound is improved thanks to the superior audio quality of REV itself. However, the overall listening experience still needs to be improved. It feels unrealistic at some points. For example, when the vehicle reaches a relatively high movement speed, the engine speed stays at 5,700 RPM, and the sound stops changing. This will never happen in the real world. In fact, the engine speed always changes. All ICEs have a protection system where the fuel supply will be cut off by force when the max RPM is reached (known as Fuel Cut). To avoid this, we need to optimize the sounding mechanism.
It’s quite complicated to solve this problem. You cannot just modify one or two parameters and expect it will work. We have to forget about the game engine for now, and get a general idea of how the ICE actually works.
How the Vehicle Engine Makes Sounds
Here we will describe the vehicle’s dynamic structure and operation mechanism in three parts: internal combustion engine (ICE), clutch and gearbox.
1. ICE
There are numerous types of ICEs, and it would be impossible to explain their all engineering structures in such a short blog. So here we will focus only on how they work. Un-relative issues won’t be included. You may explore concepts like number of cylinders, number of strokes or rotor engines later if needed.
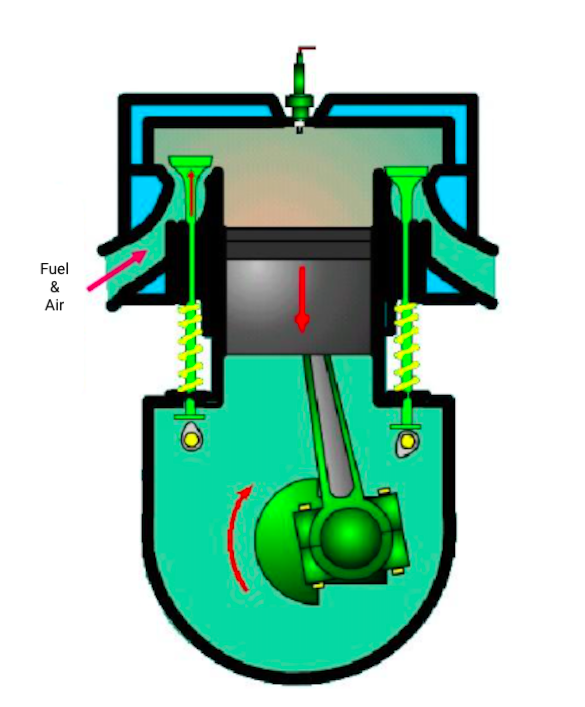
Take the most common reciprocating piston ICE for example. A mixture of foggy fuel and air enters the cylinder through the air inlet, and is ignited by the spark plug, pushing the piston down and driving the rotor. Then the air outlet opens and the piston goes up, expelling the combusted discharge gases. The entire cycle repeats over and over. That’s how it works.
There are three parameters in this process that are closely related to the game audio production: Throttle, Engine Speed and Torque.
When you step harder on the throttle pedal, more fuel enters the ICE, it combusts more violently after ignition, thus more power is generated.
The Engine Speed is the most important parameter that affects how the vehicle sounds change in game.
For most people who don’t know much about the operation mechanism of the ICE, the Torque parameter can easily be ignored. Sometimes, they simply take it as how much power the engine generates, thinking it’s proportional to the Throttle and Engine Speed parameters. This is actually inaccurate.
The Torque parameter is used to represent the power output when the ICE finishes an operation cycle. It’s easy to understand with a simplified formula:
Torque x Engine Speed = Engine Power
I’d like to highlight two common misconceptions here:
• Higher engine speed means higher torque.
Wrong. When the engine speed increases and exceeds a certain threshold, the torque becomes lower instead.
• Higher engine speed means higher engine power and higher power output.
Wrong. The engine power does increase at a low and medium engine speed, but it decreases at a relatively high engine speed.
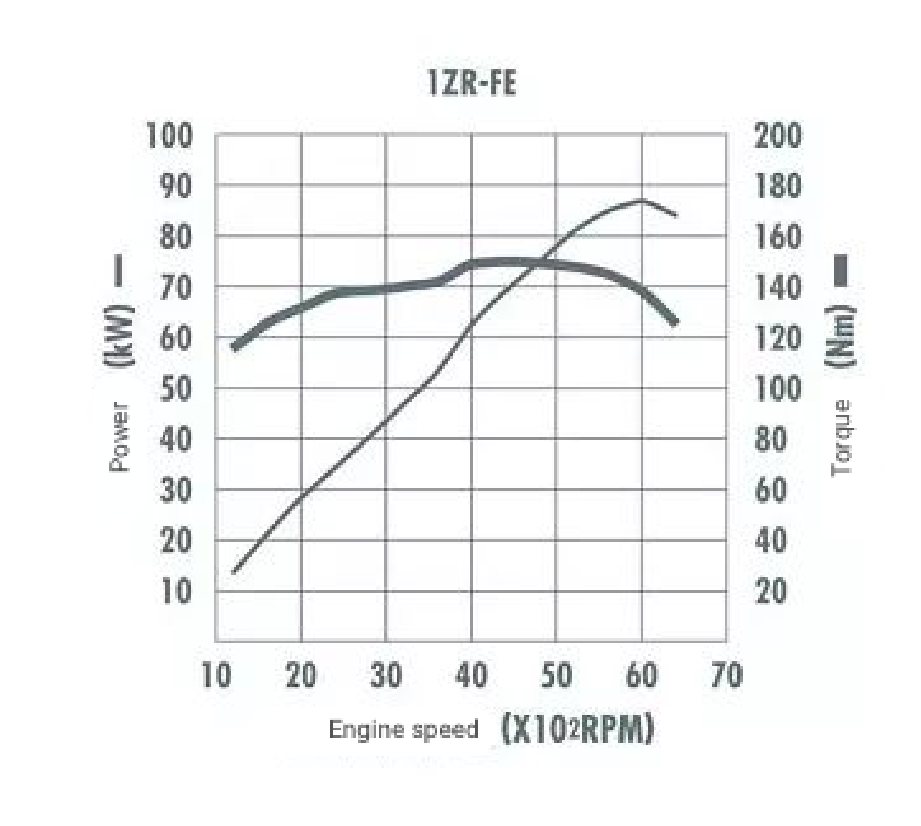
To better understand the relationship between the torque, the engine power and the engine speed, here I present two charts to illustrate the working conditions of a turbocharged engine and a normally aspirated engine.
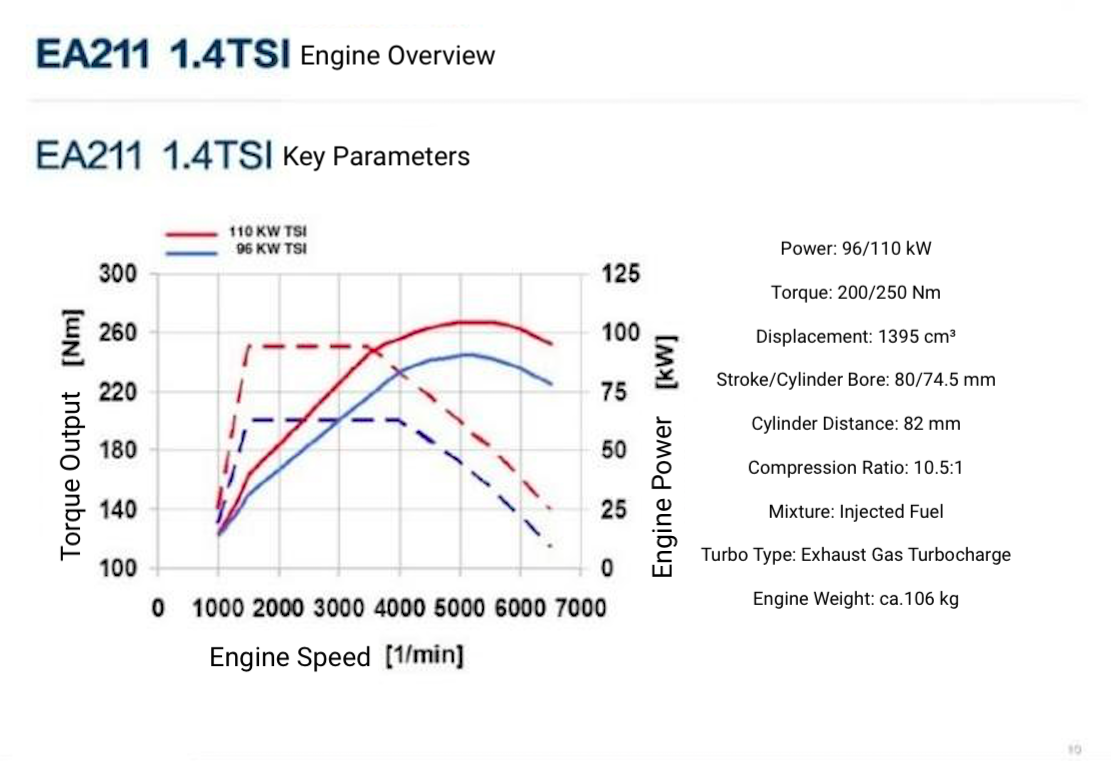
The Engine Torque Output chart for the Volkswagen EA211 1.4TSI engine
For people who are not familiar with ICEs, the above two points are a bit counter-intuitive. For experienced drivers, however, it’s quite easy to understand.
All drivers know that you will choose an appropriate gear level while driving on the highway, and keep running at a medium-to-high engine speed. Whenever you want to gear up, you slightly raise the engine speed, instead of waiting for it to reach the upper threshold. As mentioned earlier, the power output is not proportional to the engine speed. When the engine speed reaches a certain value, the power output won’t go up any further. In this case, you need to gear up to ensure that the engine runs efficiently. This way, you can travel further with the same fuel consumption (known as Fuel-saving or Fuel-efficient). However, in some racing games, you may shift the gear when the engine speed is close to the upper threshold. The reason for this will be explained later.
According to our analysis above, we know why the engine speed reached its upper threshold in the last demo video: the torque or friction was set unreasonably.
Normally, in a racing game, when the vehicle approaches its max movement speed, the engine speed should be at a value corresponding to the max power output, which is usually about 90% - 95% of its upper threshold. When that threshold is exceeded, the power provided by the engine per unit time will decrease. That’s why you cannot keep increasing the engine speed without gearing up. An appropriate Torque or Power Curve should be set to simulate this in game; otherwise the engine sound will change in a way that’s different from the real vehicle operation. As such, I made the following modifications to the Torque Curve in UE4’s vehicle blueprint.
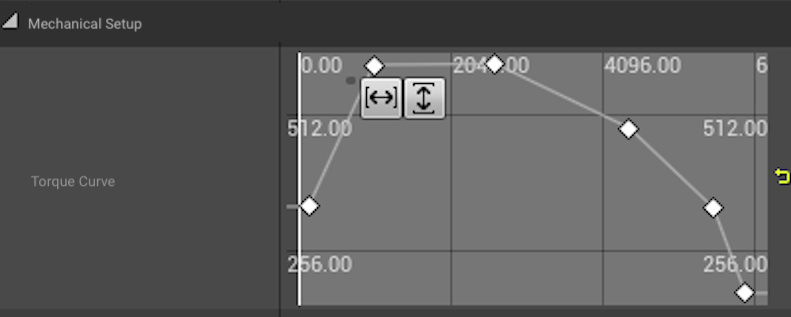
In fact, the curve is not completely accurate. You can adjust it according to your own needs. After such adjustment, the upper threshold will no longer be easily reached.
However, you may encounter new problems if other parameters were modified as well. For example, it won’t gear up smoothly, or it may even fail. When you gear up to the 4th gear from the 3rd gear, it will go back to the 3rd gear instantly. To solve these two problems, let’s look at another important part of the vehicle engine: the gearbox.
2. Gearbox
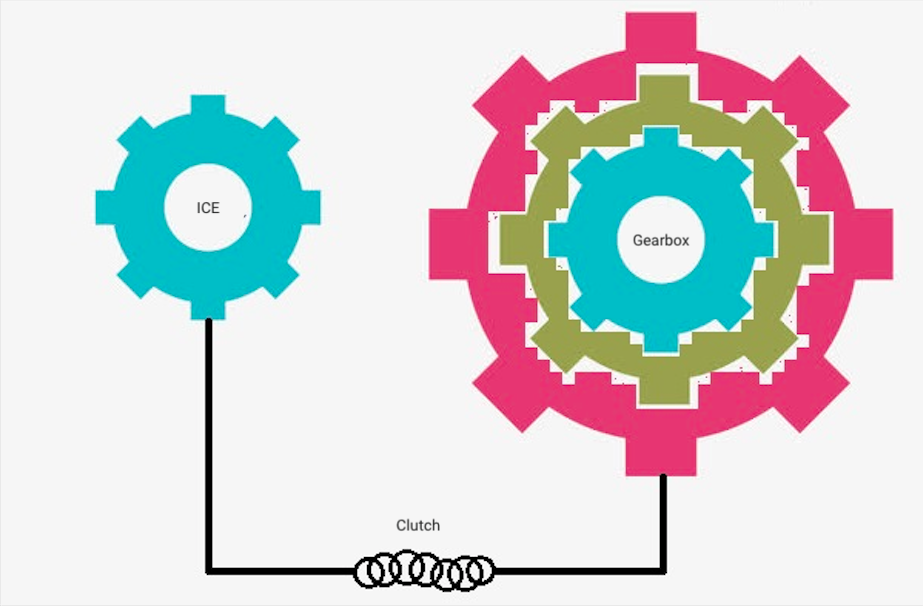
The gearbox is used to coordinate the relationship between the vehicle’s engine speed and movement speed. Here is a simplified diagram that shows how the gearbox works. The gear to the right represents the gearbox. A smaller gear means longer travel distance in one revolution cycle and heavier engine load.
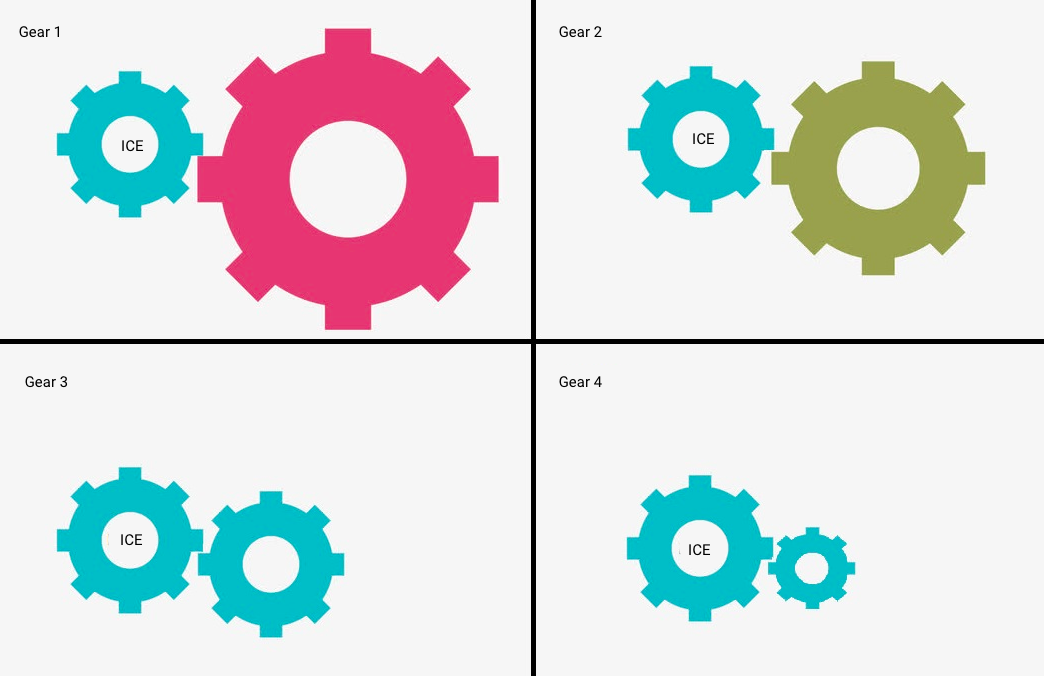
With the gearbox, you can get a different movement speed with the same engine speed under different gear levels. This allows us to keep the engine working efficiently by shifting the gears. In the game engine, the parameters for each gear level are usually adjusted via the gear ratio. With the diagram above, you can understand the gear ratio clearly.
Let’s have a look at the Gearbox Settings in UE4, and see what each parameter does.
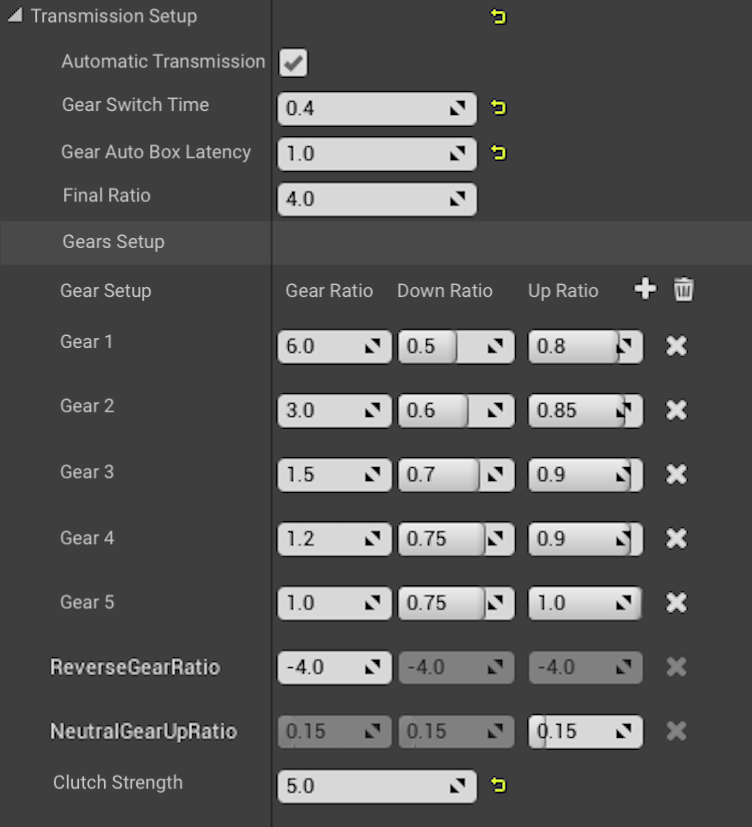
(Note: The parameter values shown here are only for demonstration, you can change them as needed.)
• Automatic Transmission: this parameter determines whether the vehicle shifts the gear automatically or the player shifts it manually.
• Gear Switch Time & Gear Auto Box Latency: these two parameters control how long the gear-shifting takes.
• Final Ratio: this parameter affects all gear levels. A smaller value means a higher max movement speed and a heavier engine load.
• Gear Ratio: this parameter indicates the ratio between the engine speed and the movement speed at each gear level. A smaller value means a higher movement speed at the same engine speed and a heavier engine load.
• Up Ratio: in Automatic Transmission mode, it gears up automatically when the ratio between the engine speed and its upper threshold is larger than this value.
• Down Ratio: in Automatic Transmission mode, it gears down automatically when the ratio between the engine speed and its upper threshold is smaller than this value.
Now that you know how the gearbox works and what all the parameters do, we can solve the problems mentioned earlier.
If the vehicle shifts the gear at an inappropriate time in Automatic Transmission mode, then the cause is that you set the Gear Ratio at each gear level unreasonably. For example, if the Gear Ratio setting is the same for all gear levels, then the acceleration is the same at each gear level. There would be no difference between various gear levels.
If it fails to gear up and goes back to a lower gear level, then the cause is that the Gear Ratio difference between two gear levels is too large, or the engine torque is too small. In this case, the engine load is too heavy to support the acceleration. In return, the engine speed drops, and the vehicle gears down automatically.
In addition, there is another part that is critical to control the gear-shifting: the clutch.
3. Clutch
Here is a simplified diagram that shows how the clutch works.
The clutch is mainly used to control how the ICE coordinates with the gearbox. This way, they can be attached or detached slowly. No mechanical damage will occur even at a very high engine speed. The details on how the clutch does this won’t be discussed here. For sound designers, all we need to know is how the clutch controls the power transmission and triggers the gear-shifting.
In driving-simulation games, non-core players rarely use the manual clutch. In non-realistic driving games, players cannot even control the clutch. All that players can control is the throttle, steering and braking. The gear-shifting is left entirely to the auto-transmission system. So we need to design a clutch system that's the same as the real vehicle operation. However, it’s complicated to explain how to use the clutch exactly; so let's simplify it a little bit. When the engine starts supplying power to the vehicle, the clutch should be attached. When the engine stops supplying power to the vehicle, the clutch should be detached. In the UE4 demo, we can use the throttle to control the clutch directly. This works for other non-driving-simulation games too.
The vehicle module in UE4 works the same way. When the throttle is released, the vehicle slows down. Gearing-down operation won’t be triggered as the engine speed decreases. To better understand how the sound is affected when the clutch is attached and detached, let’s have a look at the following video:
Please turn on subtitles/closed captions for this video. At 26 seconds, we hear the clutch attached effect. At 53 seconds, we hear the clutch detached effect.
In real life, if you step on the throttle pedal when the clutch is fully detached, the vehicle won’t move. As you can hear, the sound effect here is not so good.
With the clutch attached throughout, the gearing-up sound was triggered when the vehicle slowed down or even braked. This is not exactly what we want. Especially when the vehicle brakes, we want it to stop as soon as possible, and cut the power supply to the engine. It definitely shouldn't raise the engine speed while gearing down.
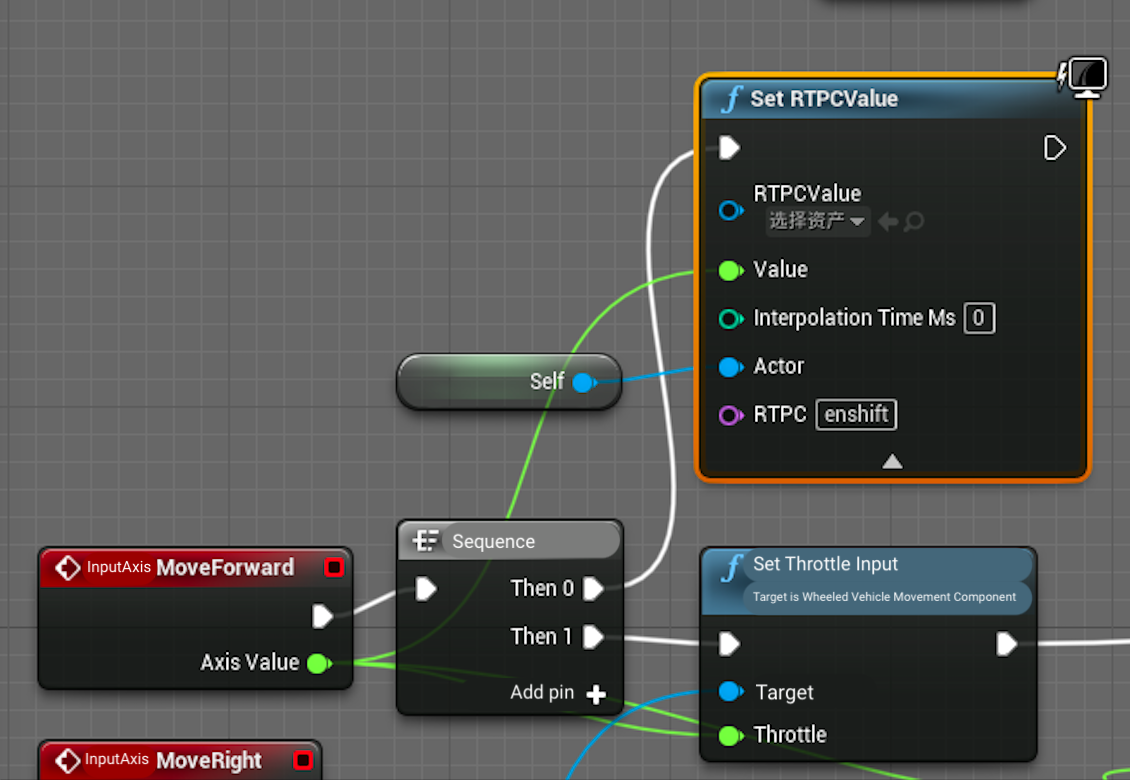
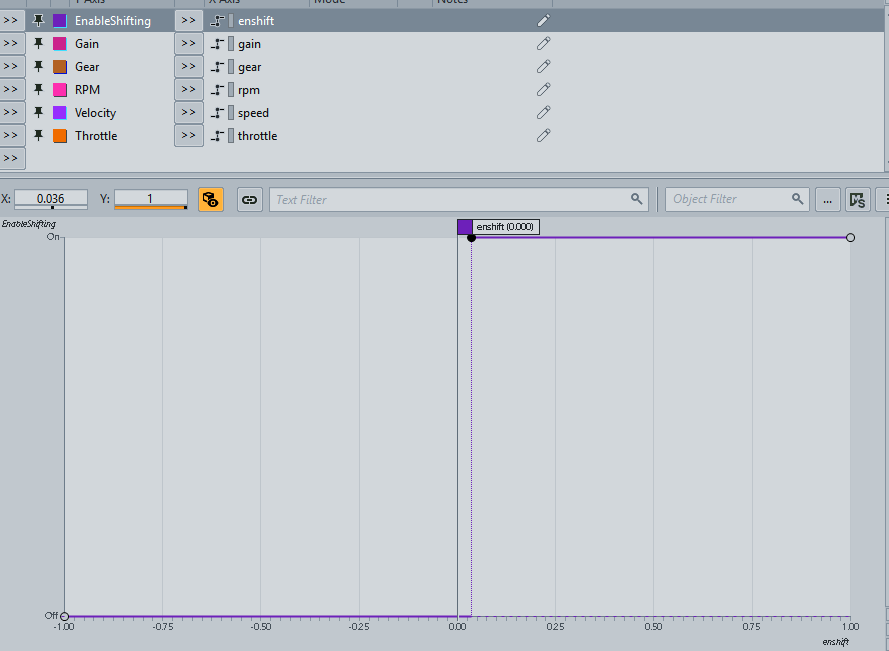
With a more realistic clutching logic, we can implement a complicated interaction logic in game. Without it, we may control the clutch simply with the throttle. Now that you know how the clutch works and how it will affect the sound, we can go back to Wwise and set the parameters:
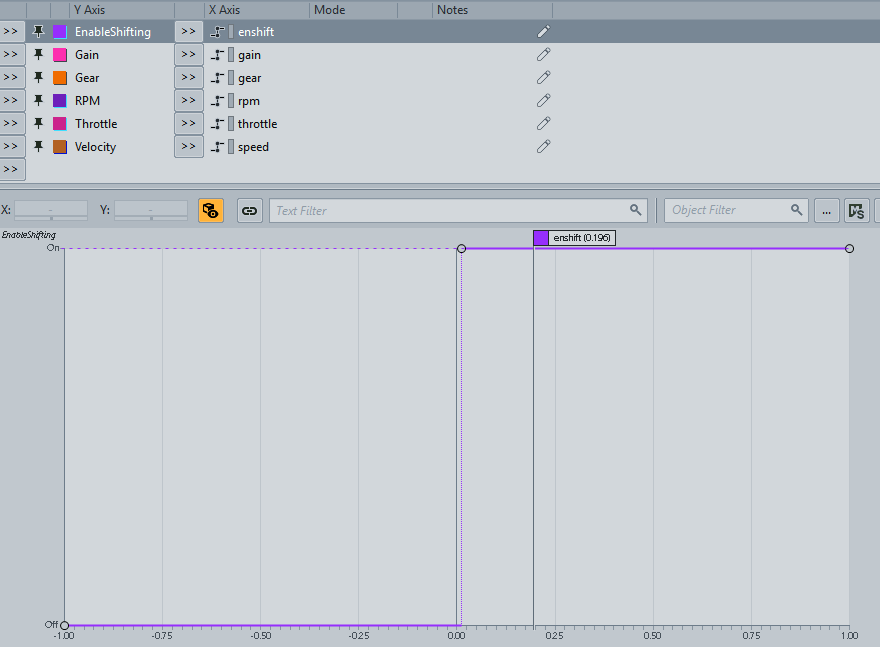
Enableshifting: this parameter is used to control the clutch. When it’s set to “On”, REV will play the gear-shifting sound when the gear level changes. When it’s set to “Off“, the gear-shifting sound won’t be triggered. Let’s bind it with the Throttle parameter. This way, when you step on the throttle pedal, the clutch will be attached.
With the gear level, clutch and engine parameters set, we get the following result. Basically, it matches with the real vehicle operation.
However, now we only have the engine sound. There are still many details missing. In the next chapter, we will add further details to the vehicle sounds.
Adding Further Details to the Vehicle Sounds
Generally, we can group the vehicle sounds into the following categories.
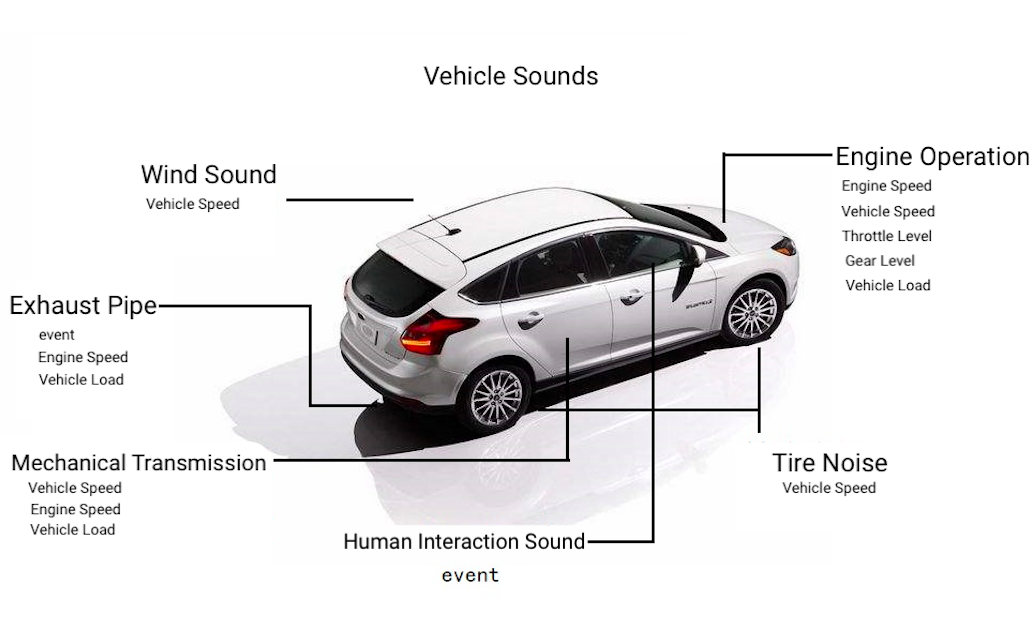
As for the ICE, the clutch and the gearbox, we’ve already explained earlier. Now let’s see how other parts make sounds.
1. Tire noise and wind sound
Tire noises mainly use loop samples. We can add some random assets to the loop to create variations, and add an RTPC for the movement speed to modulate the loop’s pitch, volume and transition. Also, we need to create various ground materials and change them with Switches. It would be even better to obtain the friction coefficient between the tire and the ground. This way, we can use it to control and trigger the tire-skidding sound. Here I didn’t calculate the friction coefficient. Sounds will be triggered while braking and steering.

2. Suspension
There are actually many types of suspension. Here we only talk about how it affects the sound. The suspension is essentially a shock absorber that ensures the stability of the vehicle while driving on rough roads. The engine sound will be affected when the vehicle bumps. And the suspension affects the tire pressure, which changes the engine load. For the suspension system, we are going to do two things here:
• Create a body-shake sound that changes with the suspension stress.
• Allow the suspension shake to affect the engine sound and the tire sound.
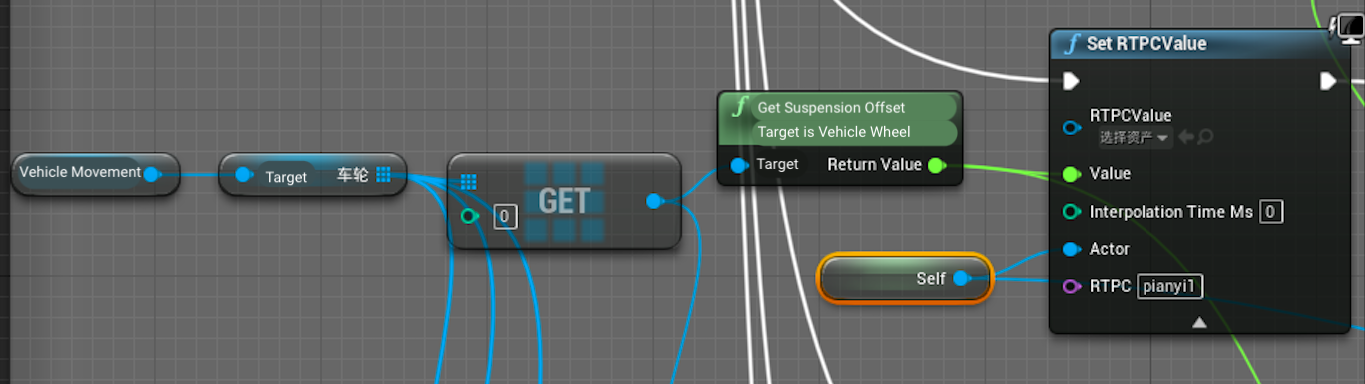
To do this, first we need to obtain the Suspension Offset parameter. Here we have 5 RTPCs: "pianyi1", "pianyi2", "pianyi3", and "pianyi4" for the offset of each wheel, and “zhendong“ for the total offset of four wheels.
We need to create vehicle-shake sounds of different intensities and modulate them with the offset level and the movement speed.

Then we use the suspension to affect the engine sound and the tire sound.
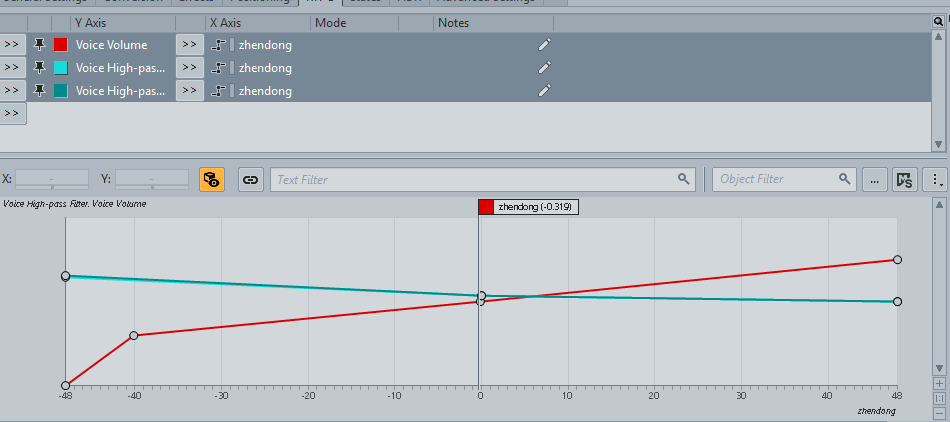
This creates sounds that change dynamically when the vehicle bumps.
3. Turbo
The turbo is actually an ultra-high speed fan that is used to increase the air intake of the engine and combust more fuel within one stroke, thus improving the engine performance. While talking about the torque, I presented two charts to illustrate the working conditions of a turbocharged engine and a normally aspirated engine. Turbocharged engines are more likely to reach the max torque and hold for a longer time. I won’t go into details about how the turbo works. Here we will just focus on how the turbo makes sounds, under what condition.
The sound emitted varies slightly depending on the type of the turbo. However, in most games, it’s presented as a high-frequency rotor sound. That’s because the turbo itself is a super-high-speed fan, and it can easily reach 10,000 RPM, or even exceed 100,000 RPM.
Generally, the turbo makes sounds when it reaches a certain RPM value. To be specific, at least 2,000 RPM . The turbo sound won’t be heard unless the RPM value is high enough. Also, the turbo sound varies less than the engine sound.
When the engine speed drops, the turbo sound doesn’t necessary stop. Some high-performance racing cars are equipped with an anti-lag system to avoid turbo lag and to keep the turbo working even when the engine speed drops. Therefore, the turbo sound needs to be customized for different vehicles. And there is no universal solution.
For simplicity, special cases were ignored in my project. The turbo was bound to the engine speed, and turbo samples were not used. Instead, a processed electric drill sound was used to simulate the turbo behavior.
4. Exhaust Pipe
For high-quality racing games, the exhaust-pipe sound needs to be created separately. You can loop them as required. Here we focus on a sound that is exaggerated in-game: backfire.
In real life, backfire usually occurs on large-displacement vehicles. The visual/audio effect is one of the key elements to enhance the player experience. To make great backfire sounds, we need to do some analysis of the backfire behavior. In general, there are three kinds of backfire sounds:
• Stable backfire
Scenario: only occurs when the vehicle runs at high speed, under heavy load.
Behavior: stable and continuous tail flame.
Sound: continuous and stable combustion sound, without popping sound.
Cause: For some vehicles, the fuel injected into the cylinder is increased when the engine temperature is too high (running under heavy load, at high RPM), in order to cool down the three-way catalytic converter and the engine cylinder. In this case, the fuel-air mixture will be in an incomplete-combustion condition, because the fuel is relatively too much. The excess vaporized fuel will continue to combust as it meets the air at the exhaust pipe, where there are light blue flames. In the game, the stable tail flame is usually used in a variety of ultra-high-speed driving conditions, such as nitrous acceleration.
• Burst backfire
Scenario: occurs when the air intake of the engine is seriously inadequate (usually starting at high speed), or when the vehicle runs under heavy load and the throttle is retarded suddenly.
Behavior: short, spot-blasting tail flame.
Sound: crisp blasting sound similar to an explosion.
Cause: Due to the lack of air intake, the fuel combustion in the cylinder is very inadequate. During an exhaust stroke, the un-combusted high-temperature fuel passes through the hot exhaust header and the three-way catalytic converter (which is heated up again) with the airflow. And the high-temperature vaporized fuel cannot be combusted due to insufficient oxygen. So when these gases come to the air outlet, and meet the outside fresh air, they burst into flames instantly, which is followed by a burst backfire.
• Anti-lag backfire
Scenario: occurs when you shift the gear and throttle back.
Behavior: short tail flame, with weak explosion.
Sound: low-frequency muffled exhaust-pipe sound.
Cause: In racing games, when you shift the gear and throttle back, the displacement decreases and the turbo RPM drops. The turbo lag occurs when you step on the throttle pedal and re-accelerate. The racing car is equipped with a device called Anti-Lag System (ALS). It will stop the ignition when the engine doesn’t need to supply power to the vehicle, and deliberately let the fuel-air mixture enter the exhaust header after the exhaust valve is opened. The exhaust header is very hot, so the fuel-air mixture bursts instantly. The big explosive pressure pushes the exhaust blades, and drives the turbo blades running at high speed to maintain the boosting state. This way, the boosting effect lasts even when the vehicle runs at low speed or when you shift the gear and throttle back. This type of flame ignites inside the engine and exits from the exhaust pipe. That’s why we get low-frequency muffled exhaust-pipe sounds.
In my demo project, I didn’t actually create separate exhaust-pipe sounds. Because the vehicle here doesn’t have an exhaust pipe at all, and it doesn’t feel like a high-end racing car. And there is no visual effect for it. The backfire sound will be triggered only when the engine speed drops below 4,100 RPM. No other complex sounds were added.
Let’s check how the vehicle sounds now:
At this point, we get the sound effect mentioned at the beginning of the article. Basically, it contains all the sounds that are needed when the vehicle runs. If you want to further improve the audio quality, you can search for better samples for all the previously mentioned sounds. Also, you can re-write the program to achieve more complex controls.
REV’s Granular Synth
The previous chapters are basically all about how to add more sounds to the vehicle. This chapter will give you a brief introduction to REV’s granular synthesis feature. And you will learn how to make your own granular model for the engine sound.
First, we need to prepare three engine-sound samples: a loop sample for the idle state, a sample used during uniform acceleration from idle to max speed, and a sample for uniform deceleration from max speed to idle.
Then open the main REV screen, click "Open in REV.Tool", and go to REV’s granular synth.


Then click "File" and choose "Open wav file". Load the uniform acceleration sample we prepared earlier. REV will analyze and display the resonance peak spectrum.
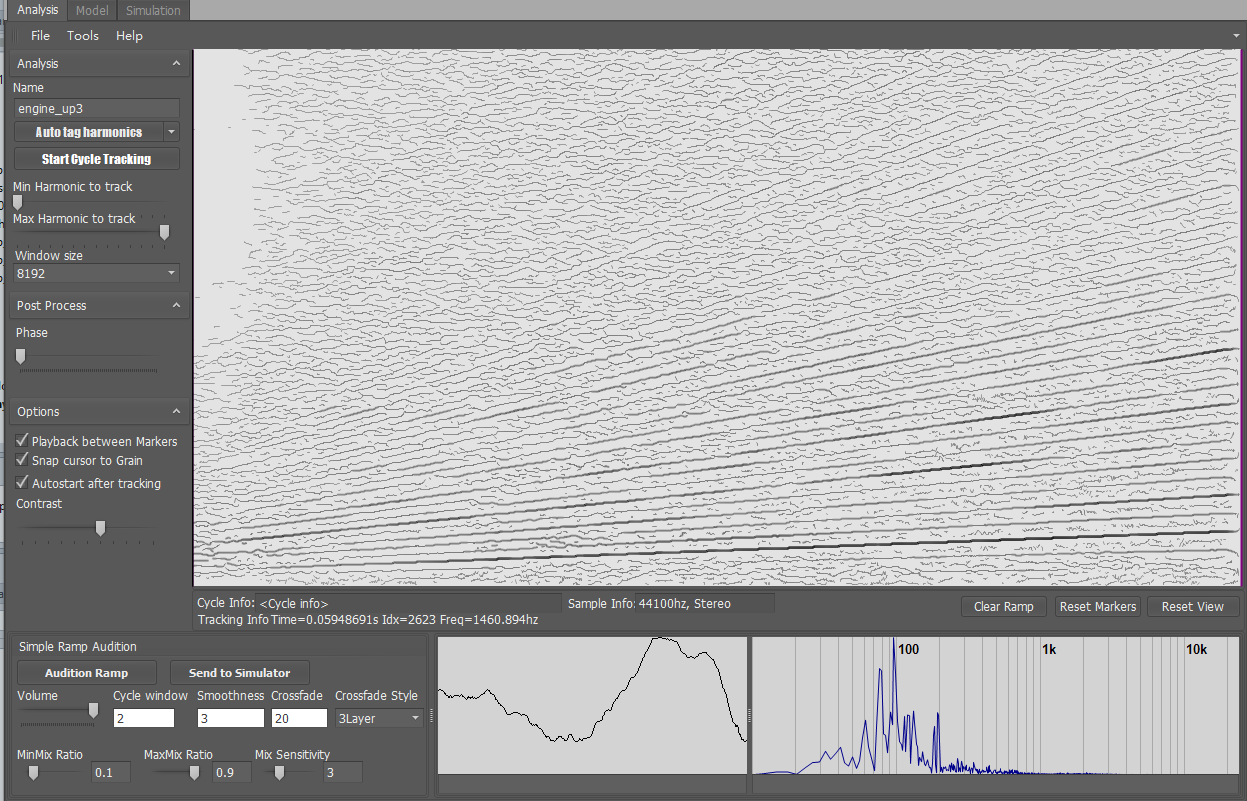
You can see that the spectrum is a little messy. This is because my sample contains some mechanical operation sounds, which caused less continuous changes in the resonance peaks.
Click "Auto tag harmonics" to select a set of resonance peaks within the spectrum. Theoretically, ideal resonance peaks should be continuous. However, due to my poor samples, the selected spectrum is intermittent. Then click "Start Cycle Tracking”, or select the resonance range manually.

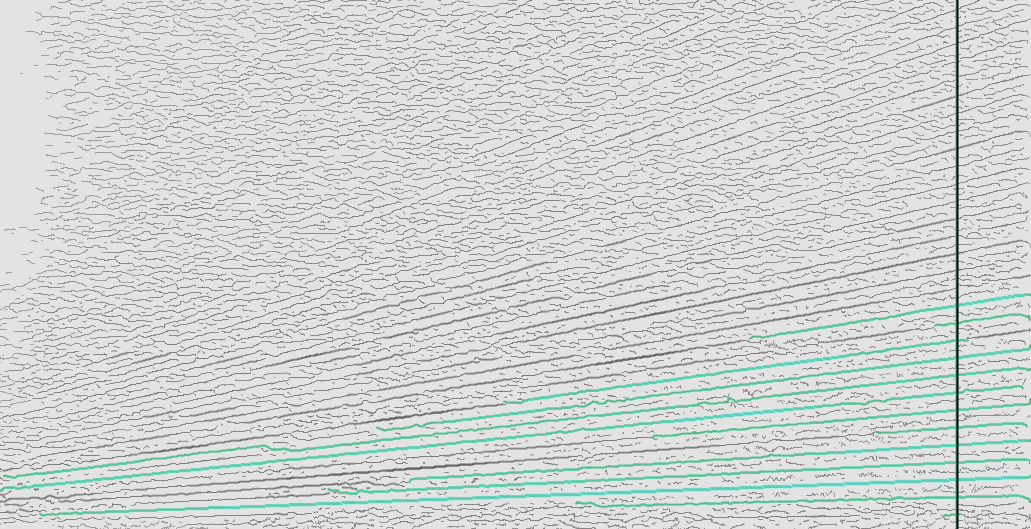
When you complete the operation, REV will analyze the spectrum and generate a granular model. Then you can listen to the acceleration sound at different RPMs by dragging the line on the spectrum.
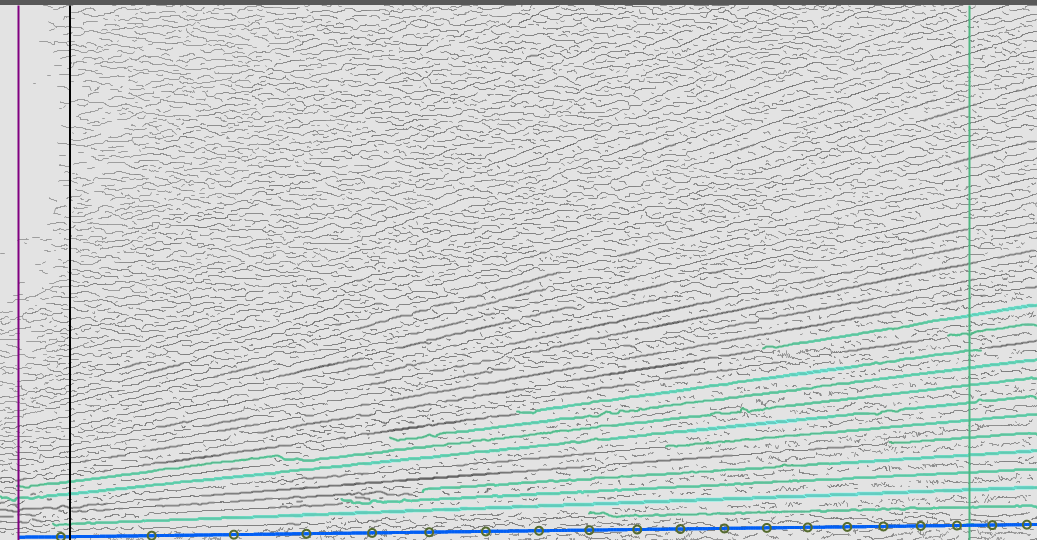
The black circles on the blue line indicate different RPM nodes. You can adjust the variation range by changing the interval between the black circles.
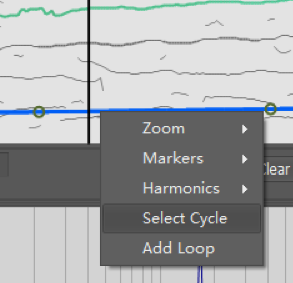
Then we can zoom in on the spectrum and choose "Select Cycle” to modify the generated resonance peak curve, and remove unwanted segments from the model.
Finally, click "File" and choose "Save partial document". The generated granular model will be saved. Then open the deceleration sample and generate the granular model in the same way. After that, switch to the "Model" tab.
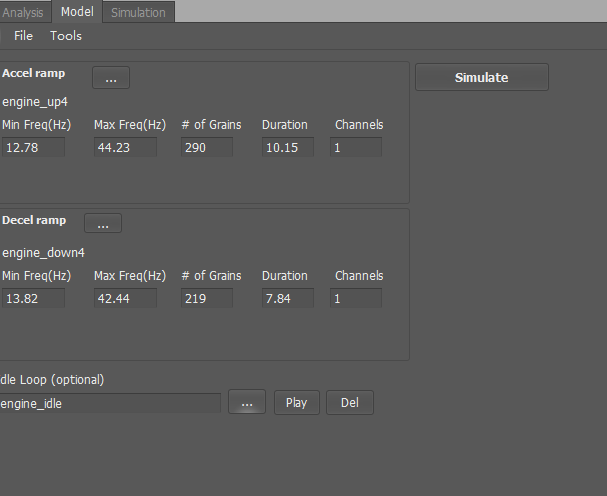
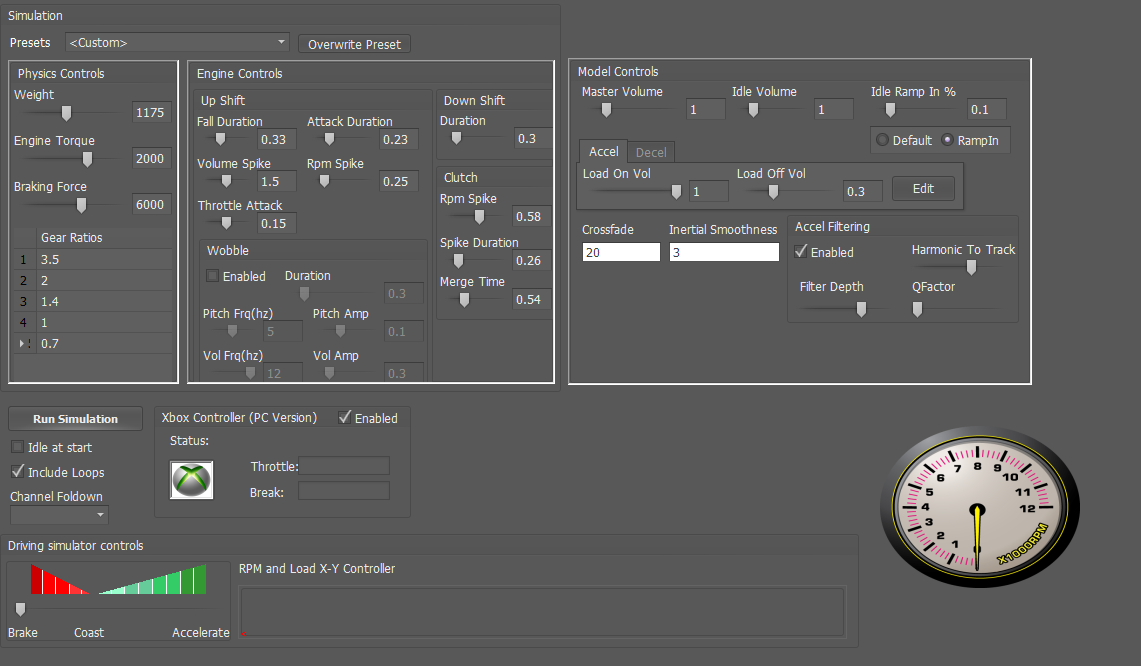
Add the granular models and the idle loop we made before. Click "Simulate". A new engine sound model will be generated. In the "Simulation" panel, you can adjust and verify the model.
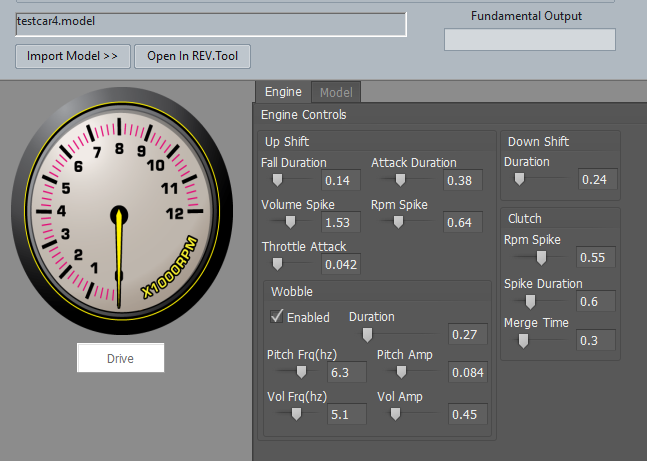
Finally, click "Save" to generate our own .model file.
Back to the REV screen, and click "Import Model", then find the model we generated. This will allow us to use our own generated engine sound in the game.
With the bnk packaged and sounds rebuilt in UE4, you can get a new engine sound. Let’s check how it sounds now.
Conclusion
This is how I used the REV plug-in to create the racing-engine sounds. The final rendering effect still needs to be improved. The engine sound is only a small part of my daily work, and I’m interested in the production and research of this kind of sound because of its specificity. I look forward to hearing your thoughts and ideas!

댓글