
It is pretty common for any project to experience performance issues at some point during the course of development. The causes can vary, but most of the time, issues are directly linked to the number of sounds playing at the same time. Physical voices, as opposed to virtual voices that only compute volume, are processed entirely (streaming, decoding, filters, and so on). It is a good thing to make sure that each one will actually be heard and contribute to the soundscape. Wwise can’t decide on its own as it doesn’t know the meaning of the sounds. Fortunately, there are a lot of tools at your disposal to manage this aspect of the sound design process.
How many physical voices should I aim for?
This, of course, is a very open-ended question. It depends on the minimum specifications of the platforms your game will support and, obviously, what CPU budget your team wants to allocate to sound. Fortunately, with modern consoles and computers, we are a lot less limited and usually the limitations lie elsewhere than CPU. At some point, too many sounds is just too noisy. That said, here are ballpark figures you can work with:
- PS4, Xbox One, Nintendo Switch: less than 100 channels in total
- PC, Mac, PS5, Xbox Series X: less than 300 channels in total
- Low-end Android, iOS (5 years old): less than 50 channels in total
- Android, iOS (recent): less than 100 channels in total
It should be clear that these are not limits of Wwise, far from it. Wwise can support way more than that (especially with latest computers), but higher counts tend to exceed usual CPU budgets. Note that I stated “channels” instead of “sounds” because, generally, CPU usage scales with the number of channels (e.g. stereo takes twice as much CPU as a mono). But, these are good ballpark figures to start with and grow above only if the game design allows for it. These numbers greatly depend on the type of codec as well as what else the game is processing. Most games will have an average that is lower than those numbers. Less is better because past a certain point polyphony becomes cacophony and the perceived quality of the overall sounds will decrease. Of course, there might be situations where the numbers of voices will peak above that. As long as this peak doesn’t last very long, the sound engine should rapidly recover and fall back to normal numbers. Controlling the peak number should be done through Playback Limits, as we’ll see later.
Plan and prototype
The cost of voices can be reduced right at the beginning of the process, if planned appropriately. You should evaluate how many sounds you’ll need for a specific game component. Don’t forget to multiply by the number of game objects that will use this “component” design. For example, a race car that would need 9 sounds is fine by itself, but if your race has 20 cars, it brings your count to 180 sounds! That would work, but you are spending resources for no good reason as there is no real benefit of stacking up so many similar sounds, the player would not notice.
While you are designing don’t forget that you can use the Profiler, without an actual game. Simply click on “Start Capture” on top of the screen.

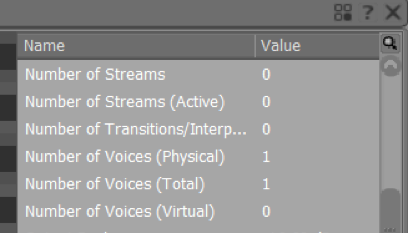
This is very useful to test your sounds’ behaviors as you build them and validate the numbers you predicted earlier. To test such prototypes, use the Soundcaster to trigger multiple sounds, change RTPCs into various ranges, and use other Events you have set up, as the game would do. The CPU usage doesn’t provide a good indication of final performance because the scenario will run on PC or Mac instead of the final console. However, you can rely on the voice counts and Effects count. Also, you can assume that anything that makes the PC CPU go lower will also help the CPU on the final target. You can find the physical voice count in the Performance Monitor window, as seen in the following screenshot.
Use distance-based attenuation
In an interactive environment like a game, sounds may be triggered repetitively and add up and overwhelm the CPU (or even the user’s ears). An obvious way to reduce that is to avoid playing the sounds that are too far. The important settings to get this working are:
- The Volume Threshold (Project Settings): This determines at which level a sound is considered “inaudible”. This level might be different depending on the platform the game is played on, but also on what type of game you make. Consider a very noisy FPS compared to a puzzle game. In a noisy environment, players will not notice a -50 dB sound missing, whereas it would be noticed in a quieter game. That level should be as high as you can tolerate. Generally, there are very few reasons to leave it to -96 dB. And in a last minute pinch, bumping this up a few dBs can buy a few precious CPU cycles.
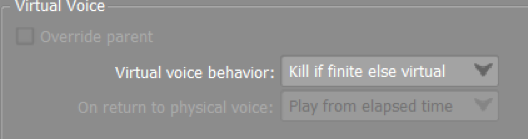
- The Virtual voice behavior (Advanced Settings tab): This specifies what to do with that sound if it goes “inaudible”. This setting should almost always be Kill if finite else virtual . This will terminate the sound if it is not looping.
- 3D Positioning & Attenuation (Positioning Tab): These two settings go hand in hand, when controlling voice count. As expected, this reduces the volume as the emitter and listeners move apart. Then, the Volume Threshold and Virtual Voice settings kick in to terminate the quiet sounds.
The bulk of the sounds in the game will be culled through this mechanism. Don’t forget that you can set up different attenuation curves for different components, to make some components cut off earlier than others. Simply override the Positioning parameters to do so.
If you have trouble with your attenuations ranges, you can always use the Game Object Profiler (F12) and watch multiple objects and their attenuation sphere.
Low-end platform versioning
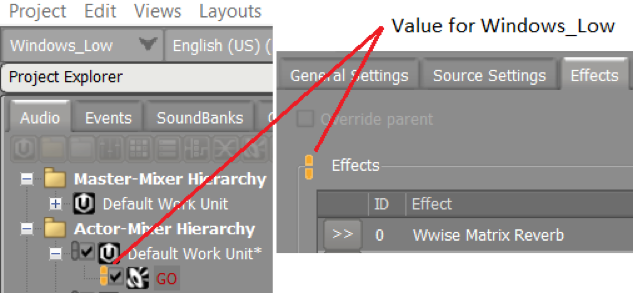
Often, the performance bottleneck manifests itself only on the least capable platforms. Fortunately, Wwise has “Platform Link/Unlink” for most properties. This feature allows different values to be set for each platform. Also, it allows the exclusion of whole sound structures or a part of them. In the UI, look for the orange “pill”. Right-click on it to unlink the value from the common value, then change the value. The value shown is the one for the platform given in the top-left combo box.
You can create sub-platforms for the low capacity platforms using the Platform Manager (Project menu or Shift+Alt+P). When used in conjunction with the Link/Unlink feature, you can now easily exclude the less important parts of the design, thus saving some CPU cycles.
RTPC-based detailing
Any game parameter can also be used to add or remove sound details. Attach your RTPC to Switch Containers or Blend Containers at various points of your sound design. This can obviously be done with the built-in distance RTPC, although it would have mostly the same effect as the Attenuations. But, you could use Height to remove sounds that would happen on a different floor. Or make a Player vs Non-Player Switch to add or remove details pertinent to the player, but not for the NPCs around.
Make different versions for player and non-player sounds
An easy way to use less voices is to have simplified versions of the same audio components depending on if it is the player object or not. For example, you could have a version of a “car” with full details (engine, turbo, rolling tires, wind, suspension, etc.) for the player Game Object, and a simplified one (engine and tires) for the NPCs around. This could be triggered by two different Events or a single event on a Switch container. This is an easy one, however, this is not always desirable. Replication of structures, even when simplifying, may lead to confusion and maintainability problems during the game production. But it is still a viable solution in simple cases.
It is entirely possible to have only one structure using Blend Containers and Switch Containers and turn on/off the sub-elements, as explained in the previous section. This is preferable than a copy of the structure, to avoid extra maintenance. Do not worry about the duplication of audio data, Wwise handles data duplication correctly; it will keep only one copy in the banks or streaming files.
Set up Playback Limits
Playback Limits are useful to avoid triggering sounds in the first place, if enough of that type are already playing. For example, in a city environment with lots of NPCs walking about, you may end up with a lot of footsteps sounds. Of course, using an attenuation will automatically cull the far ones. But still, a lot could be within hearing range and players don’t need to hear 100 footsteps to know they’re in a crowd. To cull within the hearing range, you’ll need Playback Limit and Priority settings.
Setting up limits can be done at three levels: actor-mixer, bus, or global.
The global level is meant as a last resort catch-all, making sure that the whole game doesn’t have more than it can support and that no runaway game process takes over all CPU. This is set up in the Project Settings, Max Voices Instances. It should be set up slightly higher than your expected peak voice count.
In the Advanced Settings tab of any object of the Actor-Mixer or Interactive Music hierarchies you can set limits for a specific object. Note that the limits apply on the sounds and not the parent structure. For example, a global limit (as opposed to game object) of two on a Random Container with three variations will ensure that only two variations play at the same time across the whole game. It doesn’t limit the number of Events triggered. Multiple limits can be set in the hierarchy. In the example of a footstep hierarchy, you could set the limit on the top-most Actor-Mixer object to limit, in one change, all sub-containers that implement each surface.
There are Playback Limits on the Busses as well, and they will limit the number of bus inputs. This is useful to allocate quotas to large categories of sounds. An example of this would be setting limits on the top SFX bus, VO bus, and Music bus to ensure that there is always enough space for at least one VO and enough music stems. In theory, that would add up to the global limit, but not necessarily.
A sound that starts playing will be checked against all limiters (actor-mixer, bus, and global) and will play only if there is a slot for it at each level.
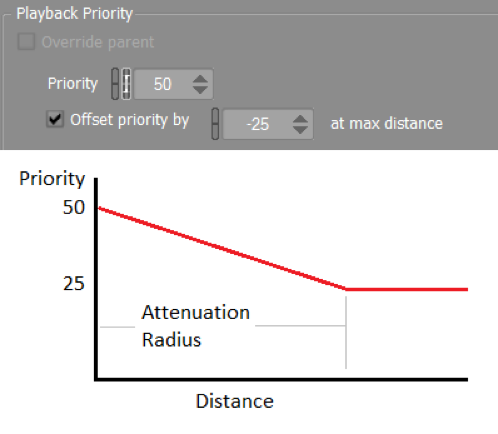
Still, with limits alone, you could get into annoying situations where important, nearer, louder sounds would be cut instead of others. This is the case with the footstep example. If we limit the footsteps to 10 instances, which ones of the original audible ones should we cut? This is solved with the Playback Priority settings, more specifically by the Offset priority by X at max distance setting. It is not obvious in the UI, but this will gradually decrease the priority from the specified priority P to (P – X), just at the end of the hearing radius. This means that the farthest sounds will get cut first.
Choosing the right codec
The reason why voices take up a lot of CPU is mostly because of the decompression of complex codecs. The codec used, and its settings, can impact the CPU a lot. The best codec to use is always a balance between audio quality, CPU cost, file size, and streaming constraints. It is wise to pick different codecs and settings for different usages throughout your game. Music has different bandwidth needs and restrictions than voice-overs, for example.
People tend to favor quality a lot from the beginning, and rightly so! But choosing the right level of perceived quality is a good way to make sure you spend the CPU cycles at the right place. As a rule of thumb, you can compress most “noisy” sounds (such as explosions, footsteps, and impacts) slightly more because having compression artifacts in such sounds won’t register as “wrong” in the user’s brain. This applies to most codecs. Obviously, try these quality settings on a few representative sounds before applying to a large collection. These settings can have a large impact. For example, a Wwise’s Vorbis file compressed in very high quality (Q = 10) takes twice as much CPU as the same file compressed in low quality (Q = 0).
The software codecs (PCM, ADPCM, and Vorbis) have one advantage over hardware codecs: they work the same way on all platforms. You’ll have the same file size and the same audio quality. Obviously, the CPU cost will vary. Vorbis will often be slower than hardware codecs, but ADPCM may be faster. Of course, PCM isn’t really a codec, so the CPU cost is minimal.
For platforms which have hardware decoders (PS4, PS5, Xbox One, Xbox Series X, Switch), do not assume these codecs are free of processing cost! Depending on the platform, the memory bus or the CPU might be blocked while the audio is transferred back and forth between the decoder and CPU. This translates in less processing capacity. However, in general there is a significant gain over the more complex software codecs. Note that hardware codecs may have further constraints on length, placement of loop points, or cues which might prevent you from using them in particular situations.
You can monitor the cost of each codec in the Profiler. In the Advanced Profiler window, the Plug-ins tab will give the CPU breakdown of all plug-ins. In Wwise, codecs are plug-ins too, so their usage is reported in that list.
Final words
Controlling the voice count is one of the main avenues to lighten the CPU load. The ideas above might not be applicable in specific situations; but, in general, implementing them will have a significant impact on your game. While in many games the CPU usage is dominated by the active voices, there are, nevertheless, many other performance pitfalls.
Comments
Jimmy Smith
August 15, 2017 at 01:27 pm
Great article! Keep them coming.
Alexandre Carlotti
February 10, 2018 at 12:59 pm
Great sum-up, thanks. I'd add to this list the possibility to set the built-in distance RTPC on the Priority param ensure the closest assets is not killed or virtualized...Anyone already tried it? Thanks
Ludo Game
May 22, 2019 at 07:27 am
It is very interesting for me to read this blog. Thank you for it. I like such topics and everything that is connected to this matter. I definitely want to read a bit more on that blog soon.
André Molkenthin
October 14, 2020 at 08:18 am
Great blog with amesome tipps! Sadly there isn't a part 2, so Mathieu, if you read this, I am very curios about the second part! Kind regards, André