
The Obsidian audio team is pleased to share with you this two-part, in-depth look at how we used Wwise and Unreal to craft the sound, music, and VO in The Outer Worlds. Wwise was an integral part of our workflow, and provided us with the flexibility and features we needed to realize our creative aspirations. In Part 1, we will be discussing how we implemented creatures, music, VO and AI dialog (chatter), and spatialization.
Creatures
The Outer Worlds is filled with a variety of NPC creatures ranging from small to large, hostile to friendly, organic and inorganic. We had two primary goals for creating creature audio: believability and affectivity. We strived to ensure that all creatures felt sonically believable and grounded in The Outer Worlds universe. In many cases this meant trying to make sounds that were both alien and familiar at the same time. Additionally, we aimed for these creatures to be effective and evoke feelings in the Player. Sometimes a creature's primary function is to feel dangerous and threatening and in other cases a creature is meant to be comforting and disarming. In all cases creatures are intended to tell a story about their environment. These are some of the ways that we achieved our goals of creating believable and effective creature audio.
PRE-DESIGN CONSIDERATIONS
Physiology
To begin with, we approached designing creature audio by focusing on the physiology of each creature. This means taking into account a creature's physical make-up and body construction. From there we developed directions to try out when capturing and editing audio source. Here are a few examples of the sorts of things we focused on when deciding how to go about building each creature's sound set in The Outer Worlds.
Mantisaurs are large insect creatures and some of the most formidable enemies in the game. They have scaly exoskeletons and crazy mandibles with twitchy and jittery movements. For these reasons, their designs contained lots of screechy, clicking and staccato elements.
The Biped Robots are large and tanky metal bots. They are slow but powerful; they can also be friendly or hostile depending on the Player's faction. Their chunky build construction lead itself to heavy, metallic and synthetic elements.
Sprats are small lizard-rodents who exhibit lots of spastically cute movements. They are typically friendly to the Player and sometimes even seem to lead the Player through an environment. These qualities called for cute, chirpy and curious vocal elements.
Breathing
Another thing that we tried to take into account to make a creature's vocals feel real is breathing cadence. In typical respiration, lungs need to refill before and after vocalizations that use large amounts of air; the refilling is the inhalation of air and expelling is the exhalation of air. We applied this idea to big vocals like attacks so that whenever possible, inhale sounds trigger either before or after large exhaling attack or exertion sounds. This gives the creature a sense of physical realism that we are naturally familiar with. This was achieved in a variety of ways depending on the needs and behavior of the creature but it was typically in the form of audio events with multiple Play Actions, Blend Containers, Sequence Containers, as well as discrete events within animations. Here are a few examples of this implementation which will be explored more below.
Canid attack with inhale
Primal attack with inhale
Movement
When moving, it is common for creatures to rhythmically cycle through inhales and exhales. We try to incorporate this into our creatures' movements as well as it helps to convey rhythm and energy. Here are a few more examples of how we used movement and breathing to add natural rhythm and realism to our creatures.
Primal walk rhythm
Raptidon run rhythm
Mantisaur attack rhythm
IMPLEMENTATION & TUNING
Sound Object Structure
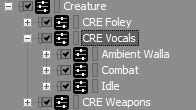
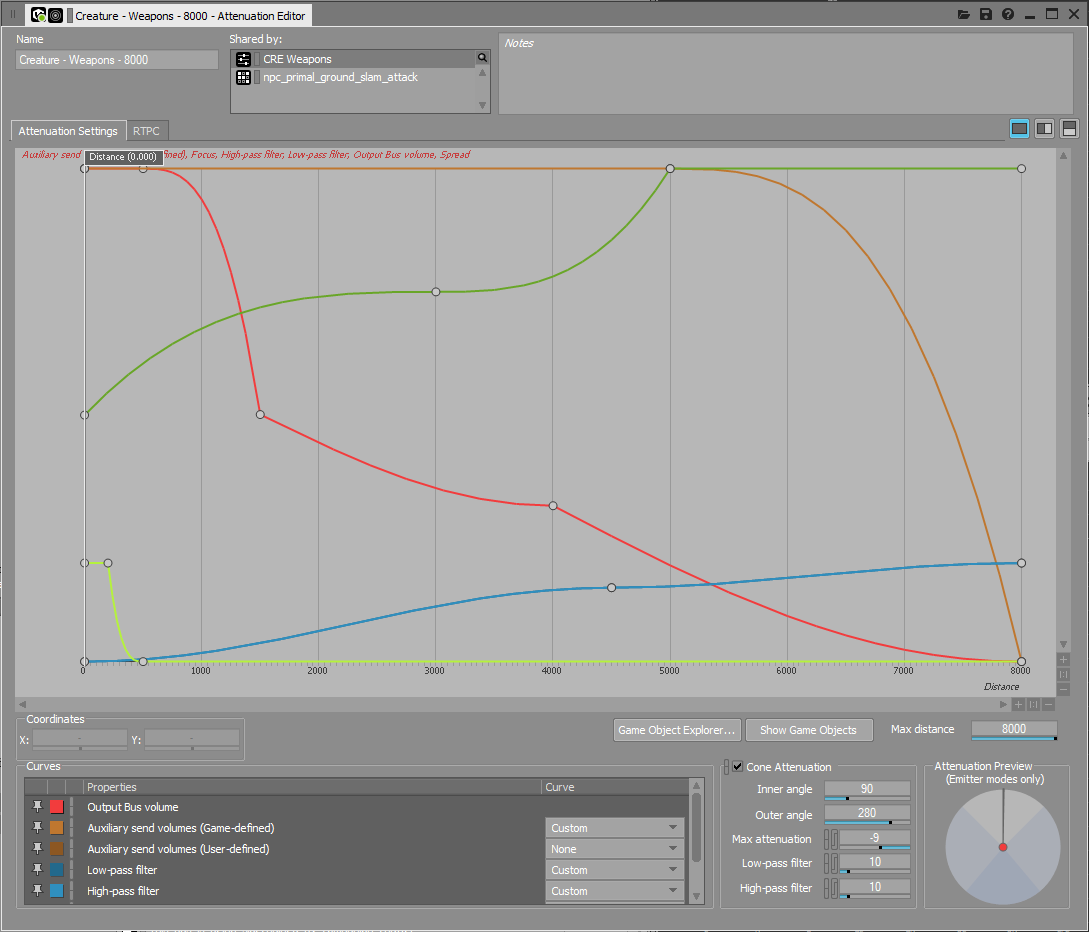
We organized our creature Actor-Mixers by creature sound type which allowed us to have very granular control over important parameters like Priority and Voice Limiting. We also used slightly different Positioning settings on each mixer. For instance, foley sounds used relatively tighter attenuation radii, whereas creature combat vocals and weapons could be heard from further away, to provide the Player the appropriate feedback when in combat.
Creature weapon Attenuation Shareset
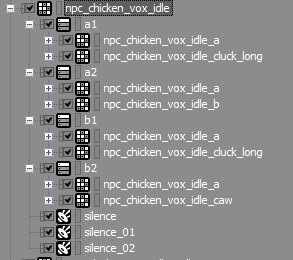
We used a variety of sound object containers to trigger creature audio. We utilized Sequence Containers, Blend Containers with timed delays and Events with multiple Play Actions to implement things like inhales after large vocalizations, as well as to create vocal cadences for some of our more talkative creatures. Again, different creatures had different implementation needs so it was helpful to be able to trigger and control things in a few different ways. As a tool, Wwise provides this for many things particularly well.

Emitter Path Automation
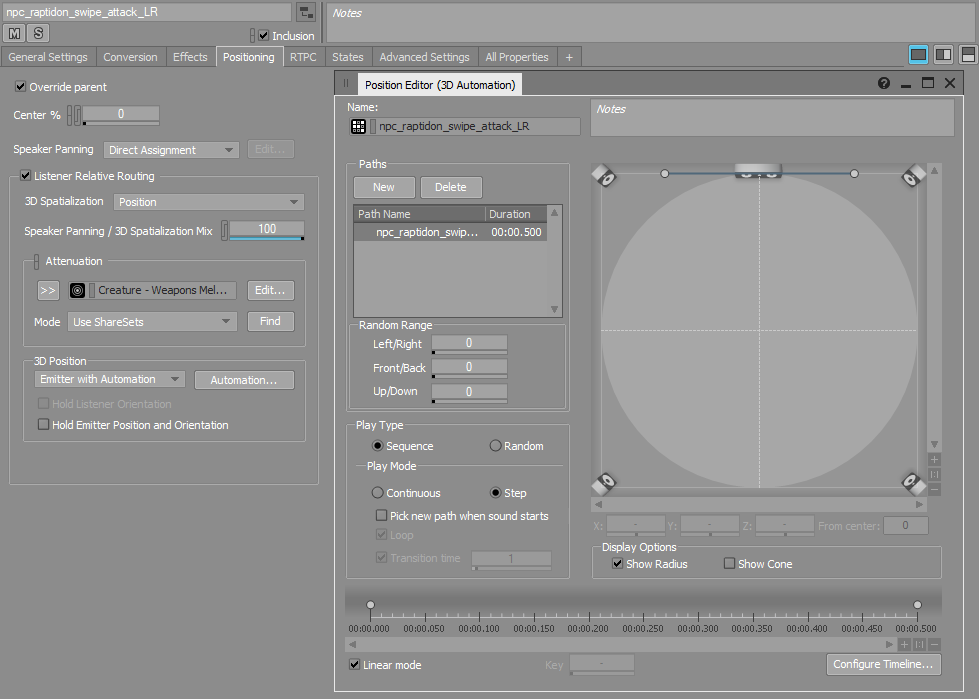
Creatures in The Outer Worlds are capable of a number of attacks both up close and at ranged distances. On close range attacks such as claw swipes we drew Emitter Path Automation to give them movement across the stereo field. We created a simple path for the swipe attack sound objects that follows the animation of the creatures limb as it cuts across the space. Small edits like this helped creature attacks feel more dynamic and real.
Proprietary Tools
Our in-house development tool does many things and we leveraged a part of it to trigger creature audio using Chatter Events. These events are triggered based on certain AI behaviors and states (personal space enter, investigating, target lost, target reacquired etc.) that a character can occupy. This is helpful for us to be able to tap into as sound designers because it allows us to have a creature trigger sounds when it enters or exits a certain state even if that state does not have an associated animation to attach sound events to. We can also control the flow of events for each creature using the system's built-in priority and cooldown properties that can be specified on each event or at a group level.
Creature chatter events
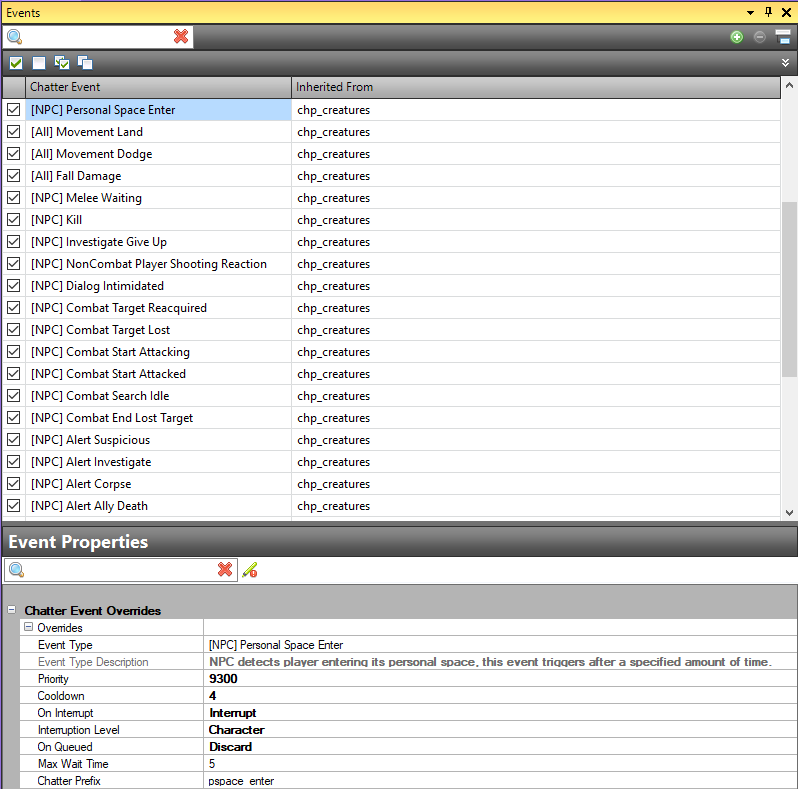
Robot chatter event 'Personal Space Enter' in-game
UNREAL ENGINE 4: ANIMATION TIMELINE EVENTS
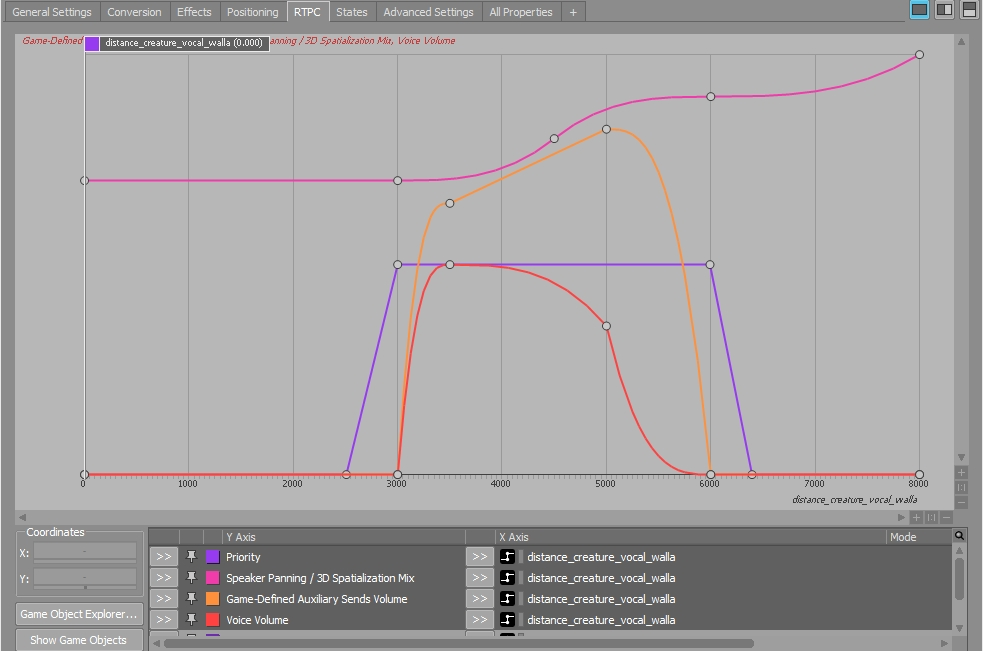
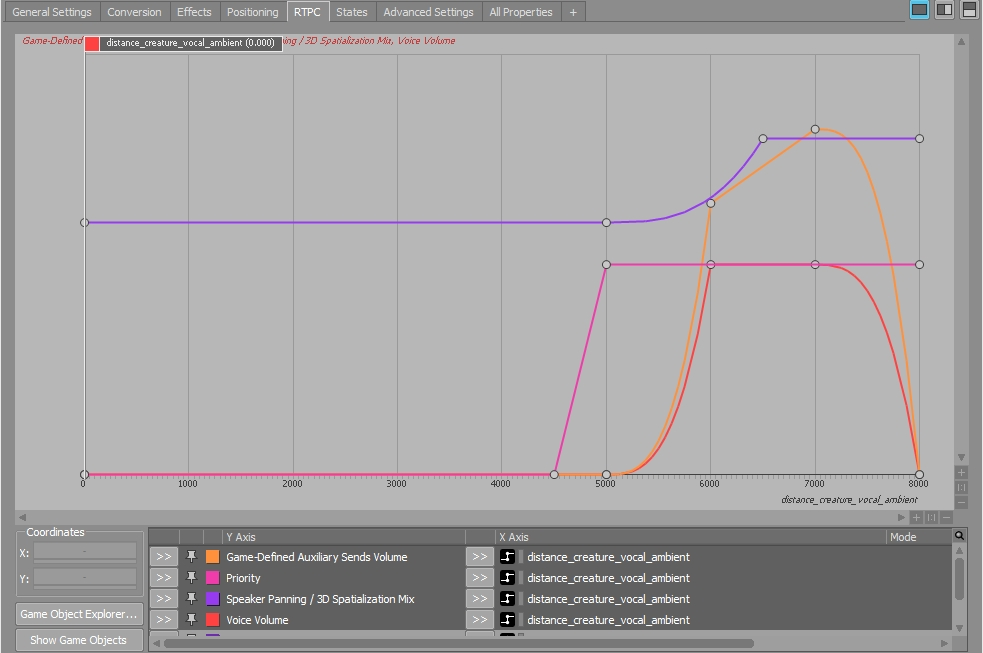
As is fairly common practice, we use animation timelines to trigger audio events that correspond with a creature's various actions. In addition to the majority of our creature sounds, one thing that we implemented using animation timelines was a concept of 'Creature Walla'; "If you hear a distant creature vocal, you are approaching one." By triggering distance-processed creature vocals we aimed to simulate creatures in their undisturbed habitat and to enable them to support the environmental ambience.
Creature Walla events were triggered on idle, out-of-combat animations as a way to telegraph the presence of a hostile creature when at distance. These sounds provided useful feedback to the Player about the location and general density of creatures in the area and added additional context-specific flavor to the level ambience.
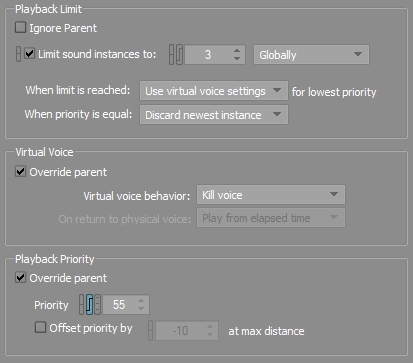
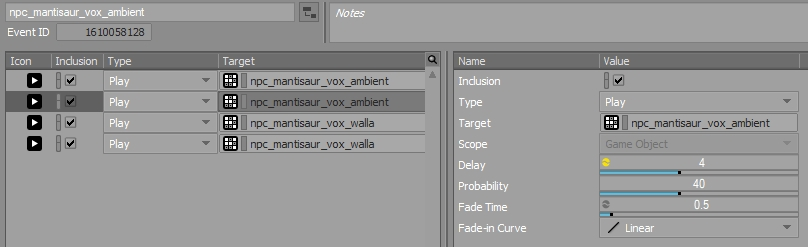
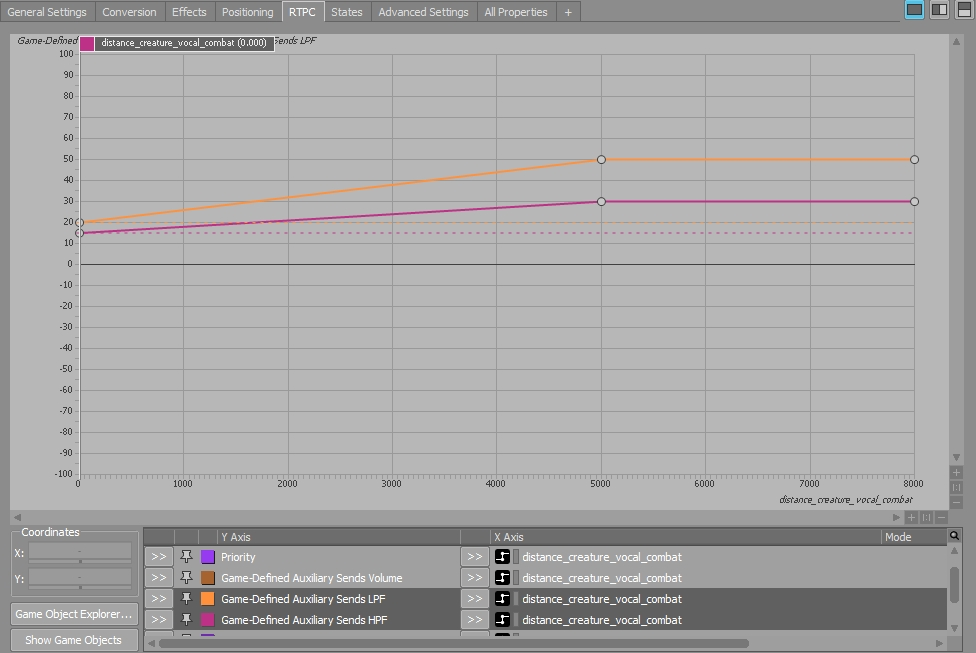
The playback of Creature Walla sound objects is controlled by distance RTPCs, Priority, Voice Limiting and Virtual Voice behavior to facilitate mixing and prevent bloating the voice count. Each of the primary creature families have two sets of Creature Walla sounds that they trigger. We control which sound objects are heard by aggressively defining windows of distance and priority where these objects are allowed to pass through as Physical Voices. 'Walla' objects can be heard between 4000-6000 Wwise units (40-60 meters) and 'Ambient' objects can be heard between 6000-8000 Wwise units (60-80 meters). At distances below 4000, we rely on the synced animation audio of creatures performing their idle actions in the world because they can be clearly seen and are at that point at the range of a potential encounter with the Player. Conversely, these idle animation audio events are progressively culled out both by code and by Virtual Voice behavior. This ensures that no matter what distance a creature is from the Player, we are allowing only a subset of sound objects to be audible.
These events rely on multiple Play Actions utilizing Probability and Delay to simulate the 'call and response' between multiple creatures in nature.
I created new assets using a creature's existing designed vocals inside of Ableton Live by leveraging Live's built-in modulation tools (LFOs and envelopes). These modulators were constantly applying slight random modulation to both the pitch and amplitude of the vocal samples. This coupled with dual pre-fader reverb and delay return tracks allowed me to create a large amount of stylized distant vocal sounds for each creature very efficiently.
Ableton effects chain for distant creature walla processing
Creature Walla in-game
PARAMETERS AND MIXING
We use many of Wwise's built-in parameters on creature audio to help focus the Player's attention. This not only refined the audio feedback being sent to the Player but also helped provide some additional clarity in the mix in certain situations.
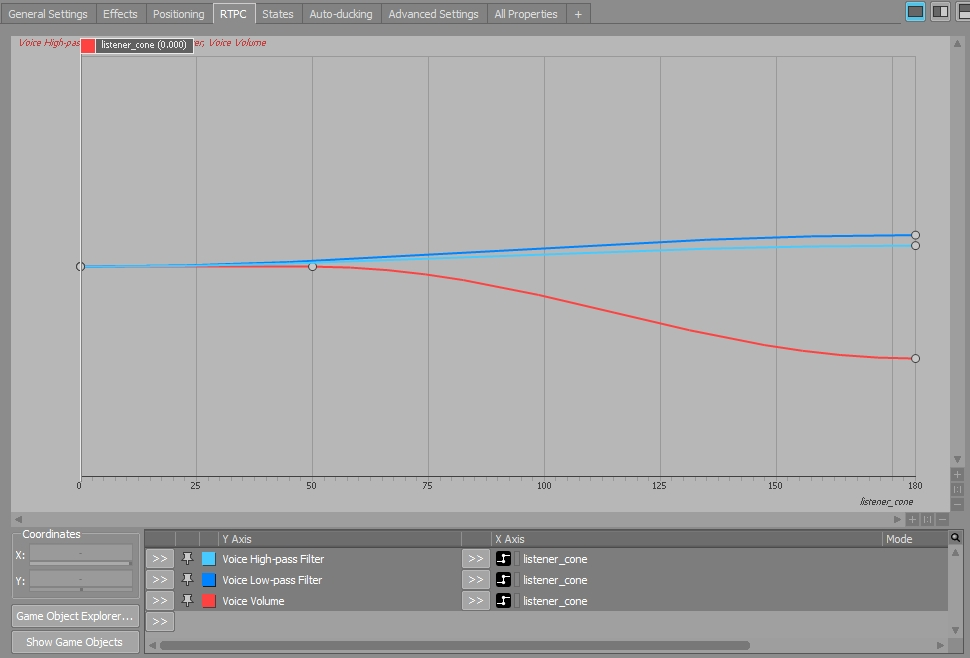
The Listener Cone parameter is used to slightly de-emphasize the volume and presence of creatures behind the Player.
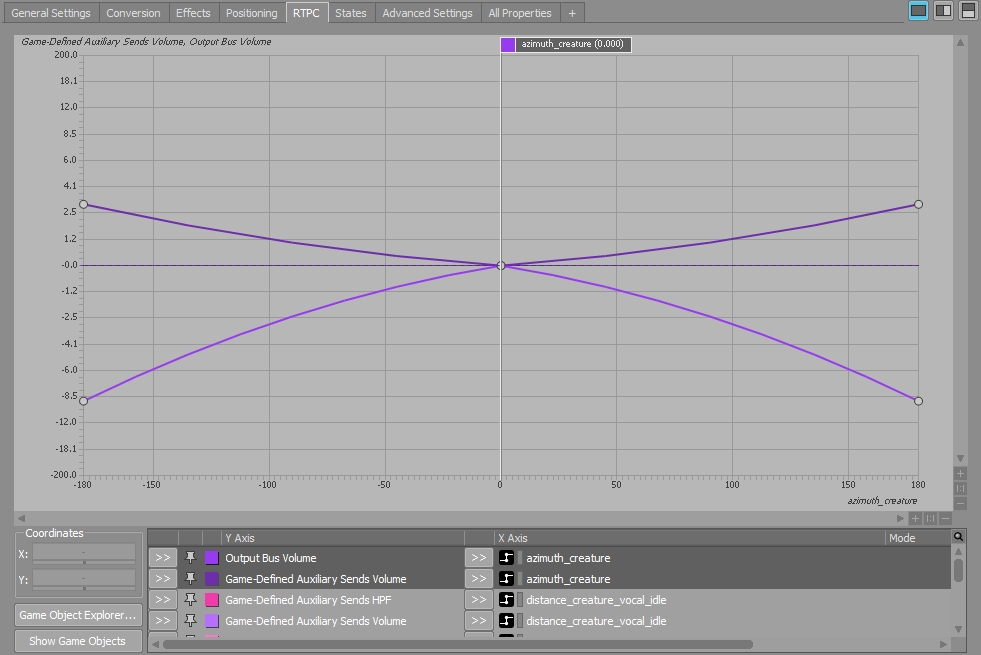
The Azimuth parameter is used to accentuate creatures in the Player's immediate field of view as well as to add slight reverb boost if the creature is at the left or right extremes of the Player's vision.
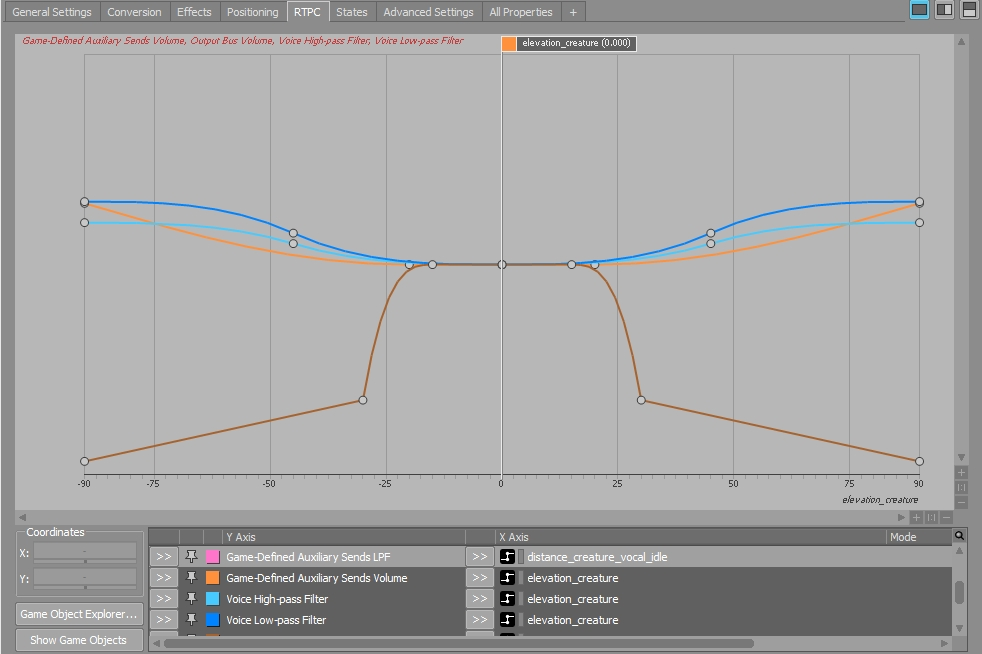
The Elevation parameter is used to attenuate the volume and presence of creatures high above or below the Player as well as to add a slight reverb boost to increase their sense of depth.
Like many of our other sounds in the game, creatures are sent to game-defined reverbs helped to give creatures a sense of depth in the environment. Additionally, we filter our game-defined sends to simulate the 'Abbey Road' effect. The goals with this modulation are to avoid excessive frequency build-up in the reverb return signal and to achieve a cleaner wet/dry mix. We feel that this helps creature audio sit more naturally in the environmental ambience.
Music
The goal of the music for The Outer Worlds was to immerse the player and excite their emotions by providing a sense of scale and wonderment to their journey through the Halcyon colony and it's environments. It was our intent to craft a unified and memorable score that was also ambient and minimal enough that it didn't call too much attention to itself when that wasn't desirable. Nearly every major questing area of the game has its own exploration and combat music, written specifically to support the area's world building and narrative subtext. Because exploration is a huge component of this game, and the player spends a ton of time doing that, music tracks themselves tend to be on the longer side, between 5-8 minutes long.
How we used music to pull the emotional heartstrings
- Lots of moment to moment scripting especially in the beginning, sprinkling the key theme throughout to unify things
- Some modular and reactive music
- The interactive music system explained with examples
- How interactive music in Wwise was organized
Interactive Music Hierarchy Structure
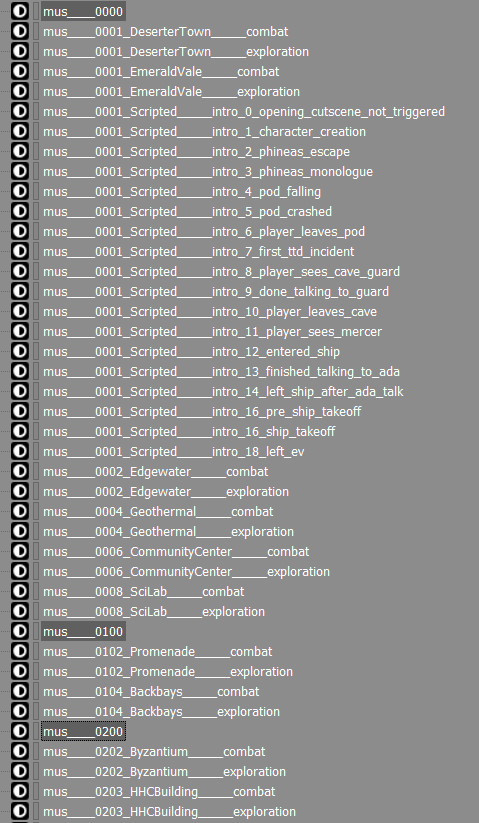
For the most part, we used one Switch container and one State Group for the entire game, though there were a handful of examples where we used additional states, RTPCs, and in Music Track switches. All told the State Group had 203 States. States could be grouped into two different categories of music:
- Default map music, i.e. exploration and combat music
- Scripted music, i.e. music that could potentially override default music when the narrative or player experience called for it
We opted to use one giant state group and one master switch because we had to be able to handle the player transitioning from any piece of music to any other piece of music at a moment's notice, and we wanted to take advantage of Wwise's nice transition manager to ensure everything transitioned in a musical way. More on transitions later.
A quick note on states. A state group with 203 states is quite a lot to manage, and can be cumbersome to navigate from within the Wwise editor. A consistent and easy to read naming convention was key. Here at Obsidian, our level designers label levels with a unique numeric identifier as a prefix. Since we primarily group music together by level (as described below), we opted to maintain level's unique numeric identifier in the State name, which helped to keep things organized. Additionally, we added states that weren't intended to be used in the music switch as "makers" to help visually denote where one level starts and stops.
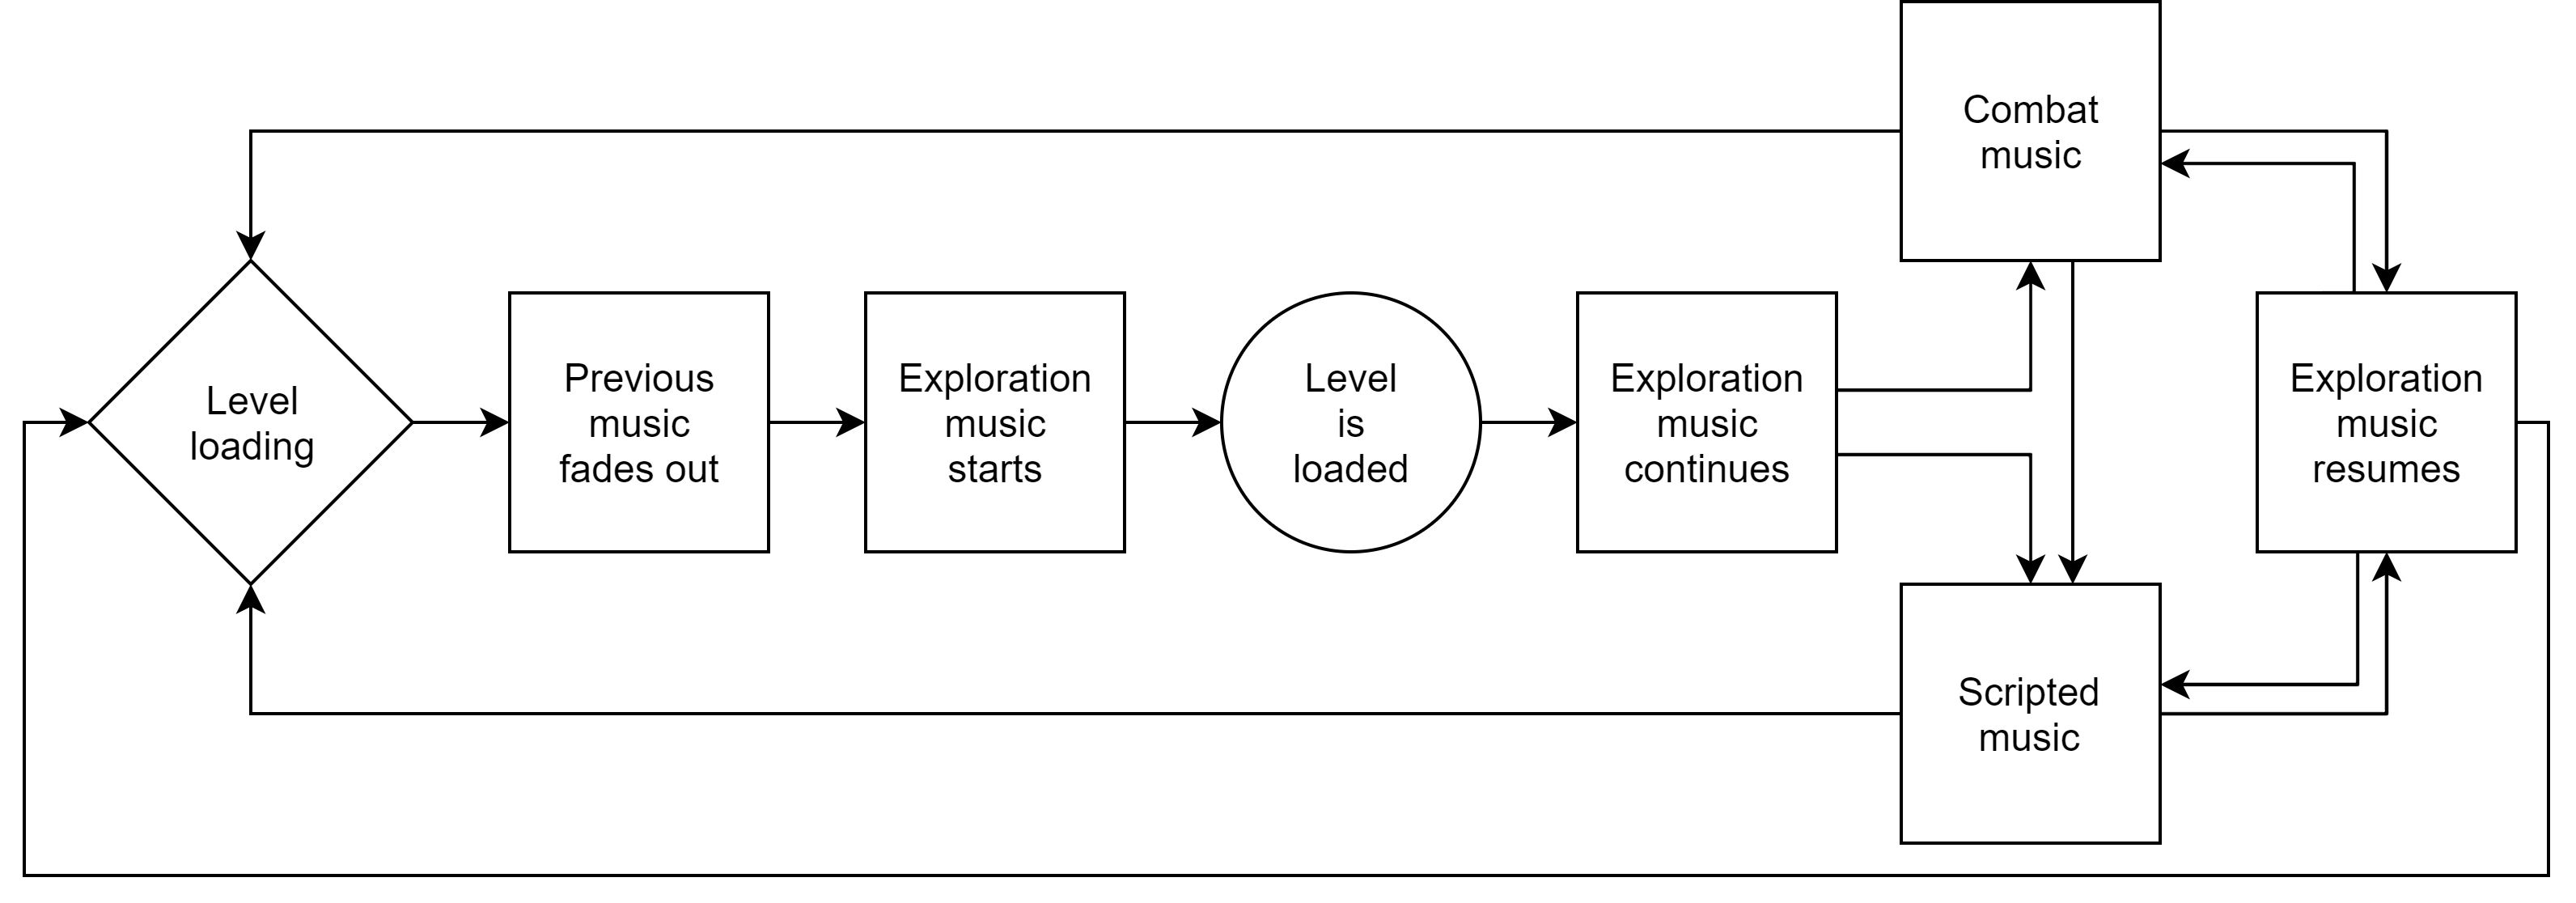
Basic Interactive Music Flow
For the most part, music in The Outer Worlds is interactive in a very basic way, and primarily consists of simple transitions between exploration and combat music. This behavior can also be conditionally overridden to trigger scripted music as desired. When the player is loading into any given map, we start playing the level's exploration music during the load screen to help set the tone up front, while the player is waiting. Once the player has loaded into a map, exploration music will continue until it's either interrupted by combat, or overridden through scripting. Once combat has ended or the scripted music is cleared, exploration music will resume. When the player leaves a map, the current music fades out and the cycle starts over. The basic state machine looks like this:
Music Manager
To manage transitions to and from music states in a reliable and systematic way, we needed a code-side solution to handle it. Jerad Dunn, one of our talented gameplay programmers at Obsidian, wrote a simple yet powerful music manager system that acted as a layer between the game and Wwise to ensure that:
- All default music triggered at the appropriate times
- The state of any special scripted overrides are stored in a persistent way
At Obsidian, we use the term "persistence" to describe saving the current game state of something to the save file, so that it can be retrieved when reloading a save. With regard to music, we use this to ensure when we override default music that the music remains overridden if the player chooses to save and later reload the game.
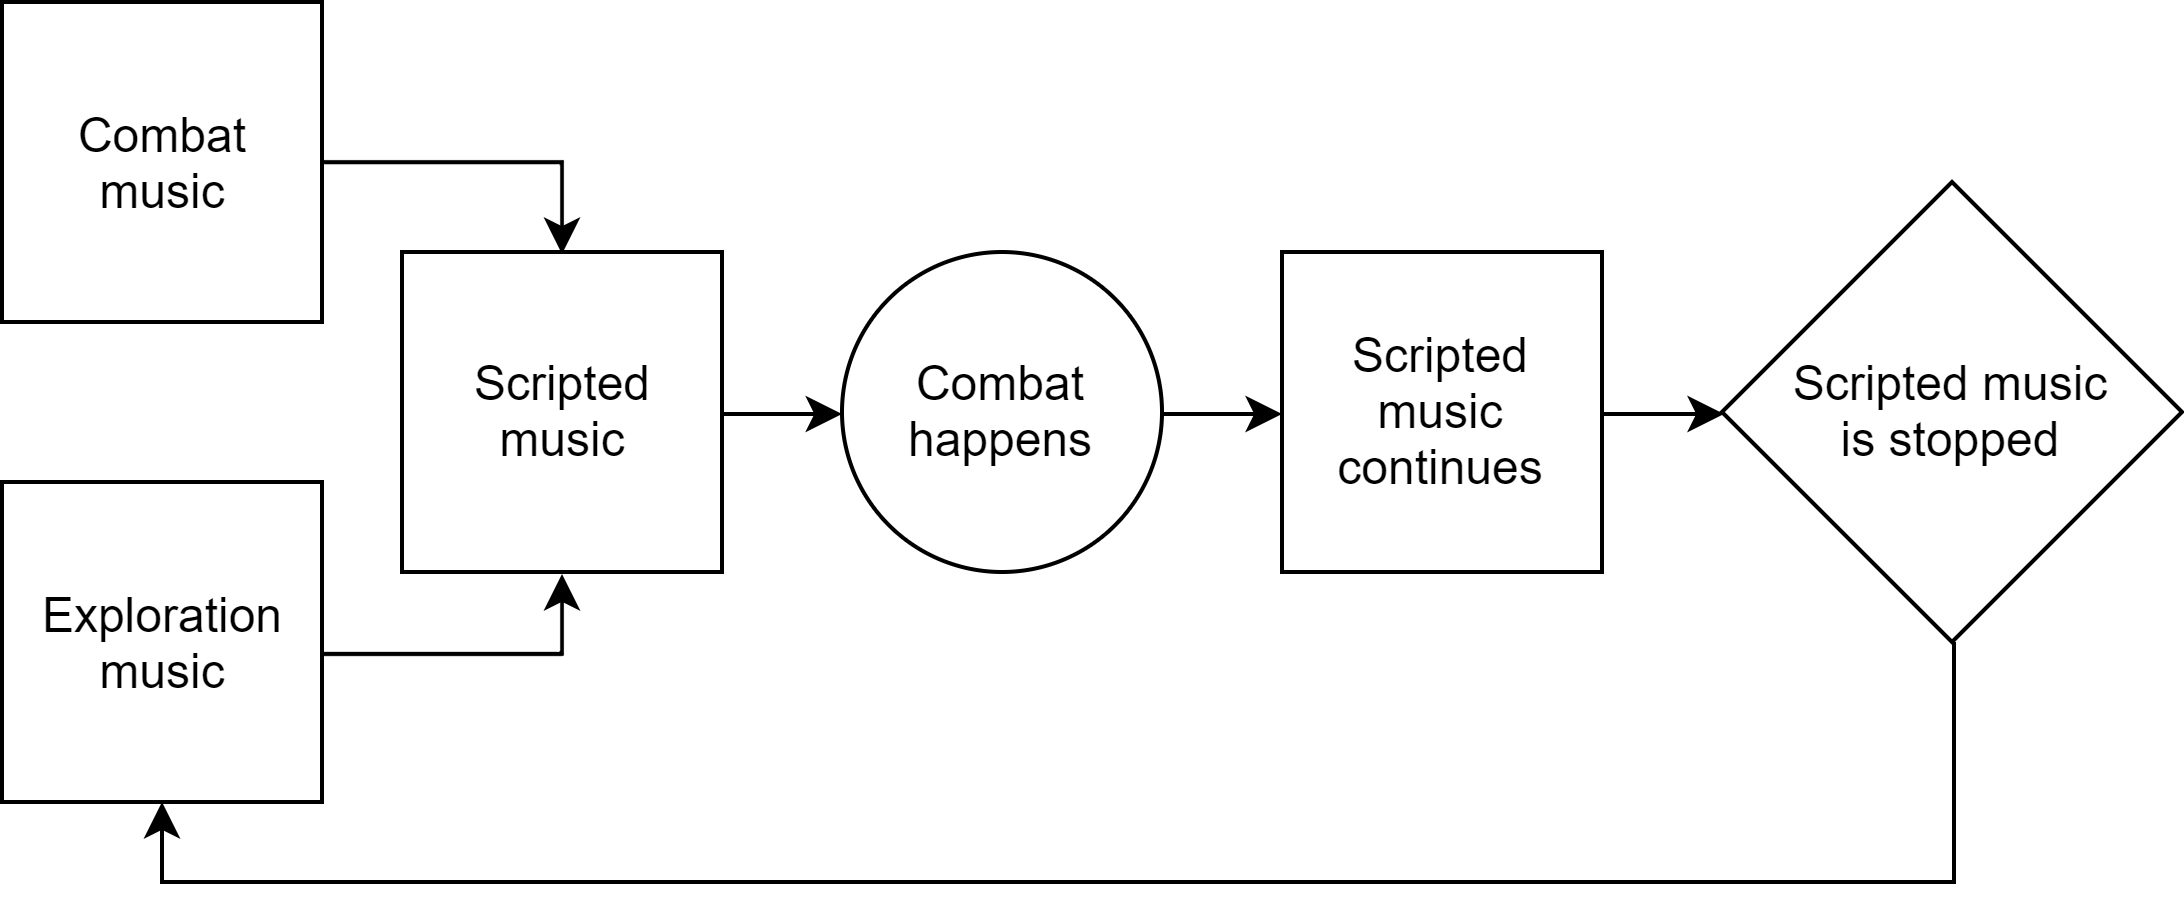
The music manager also allows us to define a default set of exploration and combat music per map, of which there are 43 in The Outer Worlds. Each map contains a default set of exploration and combat music which is defined in data. Conditional overrides are also defined per map. These can be triggered at any time during gameplay, and they completely override the default exploration>combat>exploration transition behavior. When conditional music is active, combat music cannot trigger even if the player engages in combat. Exiting scripted music requires additional scripting, and once it has been exited the manager will resume playing exploration music, and combat music will once again be allowed to trigger:
Here is a look at how that data is stored. The Outer Worlds was developed using Unreal 4, and we used a Data Asset to indicate what music to trigger for default exploration and combat music. We also used that Data Asset to conditionalize music. Here is a look at our Music Gameplay Settings Data Asset followed by a brief explanation of some of its key features:
- A - This is where we define the default exploration music of a map
- B - This is where we define the default combat music of a map
- C - This is where we can add conditional music. This is an array that is user defined and can be re-ordered. The logic flow is read in by the game from the top of the array to the bottom of the array
- D - This is where we define the conditional. At Obsidian we have user definable conditionals that we call Global Variables which we can use to track the state of quests (for example), and those variables are persistently stored.
- E - This is where we define the music that should trigger when the condition is met
The music system ticks every frame check to see when the Global Variables listed in the Data Asset get updated. As soon as it detects a change, it plays the music associated with the first conditional that is successfully met in the conditional music array. When the music actually triggers is gated by the transition behavior set in Wwise.
Scripted Interactive Music Example A
We used conditionalized music to support the narrative context of the game as the story evolved, and we did this in one of two ways. The first method consisted of a simple sequence of events that would trigger new music in layered fashion as the player progressed through a given part of the game. When we did this, we went to great lengths to ensure that each part of the sequence flows into the next in a musically organic and opaque way.
A good example of this can be found in the initial starting area of the game, up until the point where the player encounters their future spaceship, "The Unreliable". This section of the game is fairly linear, and we used key moments along that path to change the music. Here's an outline of those moments:
A. When player crash lands on the planet Emerald Vale and exits their escape pod
B. When the player talks to Guard Pelham
C. When the player leaves the intro cave and encounters the Marauders
D. When the player sees “The Unreliable” for the first time.
E. At this point along the path, the player can either choose to
i. Enter the unreliable and investigate
ii. Ignore it and start exploring Emerald Vale
The music scripting is fairly straightforward up to step 3 because the player has been constrained to a linear path because it's overall it's very linear. Things get a little trickier because the player can now do whatever they want, and their choice is not guaranteed. Because of this, we needed to determine how we handle player choice while maintaining a nice musical flow. As such, the logic flow for the conditional music in step 4 required a bit more complexity to ensure that the music flows in a way that is undetectable to the player.
Here is the full music flow from the moment the player crash lands on Emerald Vale, up until the player is free to explore the world at their discretion, followed by two videos demonstrating this in game:
Wwise Music Transitions
We didn't necessarily do anything special with music transitions that isn't explained in other Wwise tutorials online. However, we did organize them within the Interactive Music Hierarchy that made it easy to ensure default transitions were consistent from map to map, while also providing the flexibility to create bespoke transitions for scripted sequences such as the one outlined above.
As mentioned before, we used a single Switch container for the entire game. Within that switch, music was stored in Virtual Folders which grouped things together by in-game function - i.e. exploration, combat, scripted, global, etc.
Wwise allows you to transition to and from Virtual Folders which is very handy if you don't necessarily want to custom script the transition rules lots of pieces of music. Besides being time consuming, it's also prone to user error. We used that feature extensively to reduce the incidence of bugs and to ensure consistent transition behavior from map to map. This was particularly useful for default transitions such as those from Exploration (called "Ambient" in the picture below) to Combat, or Combat to Exploration.
Using Custom Markers to Increase Variety
One small thing we tried to do was break up repetitive transitions from Combat to Exploration. To achieve that we used the Destination>Sync>Random Custom Cue transition behavior when transitioning from Combat.
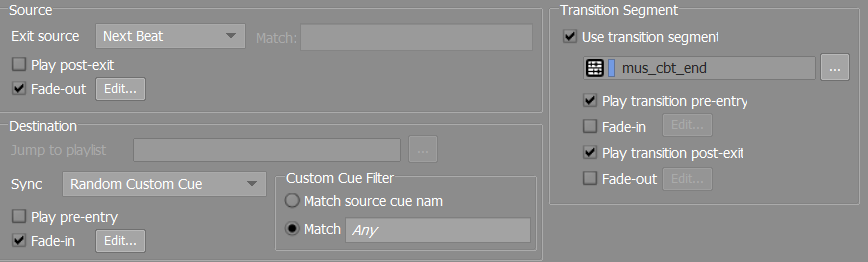
Custom Cues were added to Exploration tracks at strategic places in the music segment to ensure the transitions sounded musical. We tried to make it sound as if the music was restarting on a downbeat, rather than having it fade in, though there are occasions in the game where behavior is present. Fortunately there is plenty of negative space in much of the exploration music, so achieving a music starting point wasn't a huge challenge.
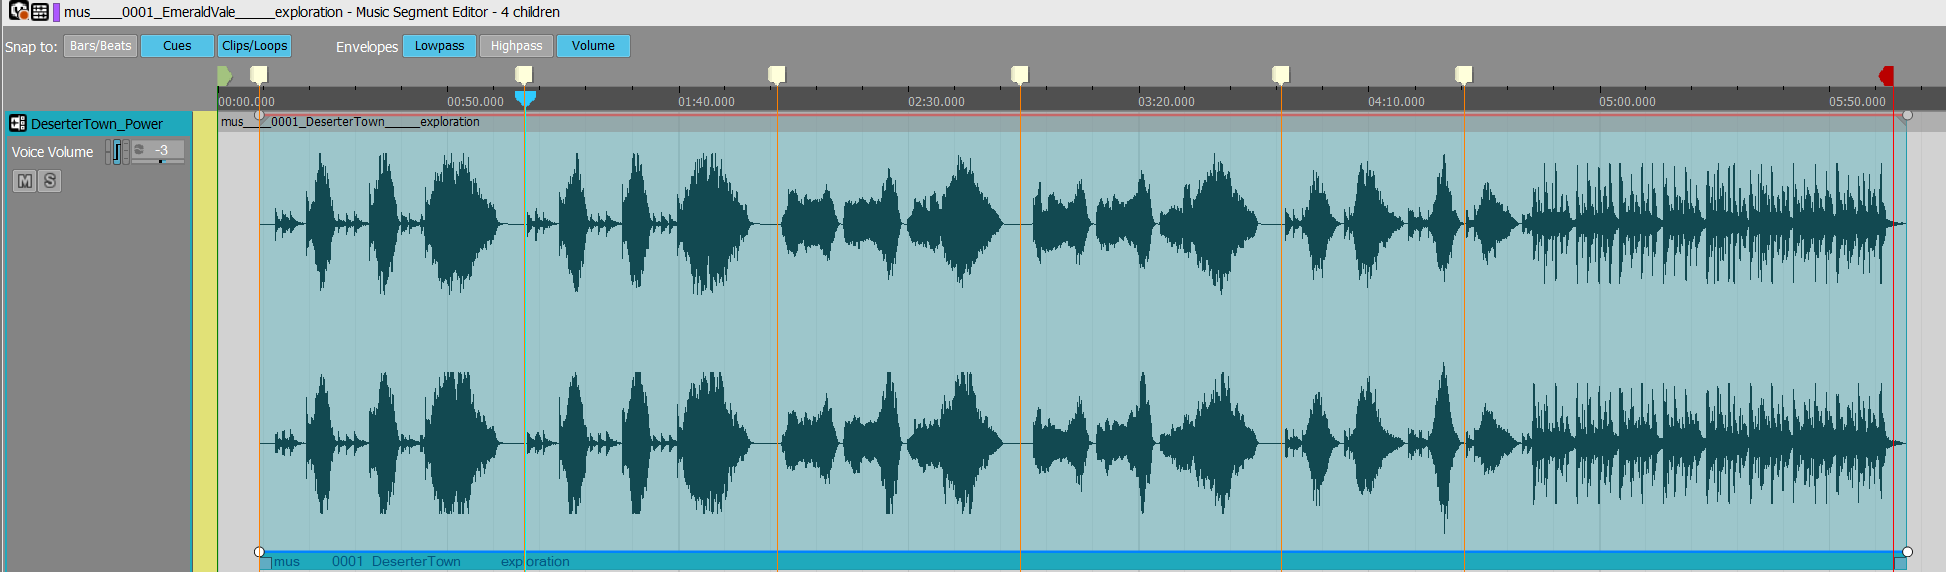
Here is a picture of the Custom Cues on the Exploration music from Emerald Vale, followed by audio examples:
Combat To Exploration Music, Transition A |
|
Combat To Exploration Music, Transition B |
|
Combat To Exploration Music, Transition C |
|
Emitters & Ambience
In "The Outer Worlds" we knew right off the bat that we wanted to invest heavily in the creation and implementation of a large number of emitters. Obsidian makes games that beg the player to get immersed in their stories, characters and the world, and we wanted to reinforce that with the environmental audio of our world - to make it feel real.
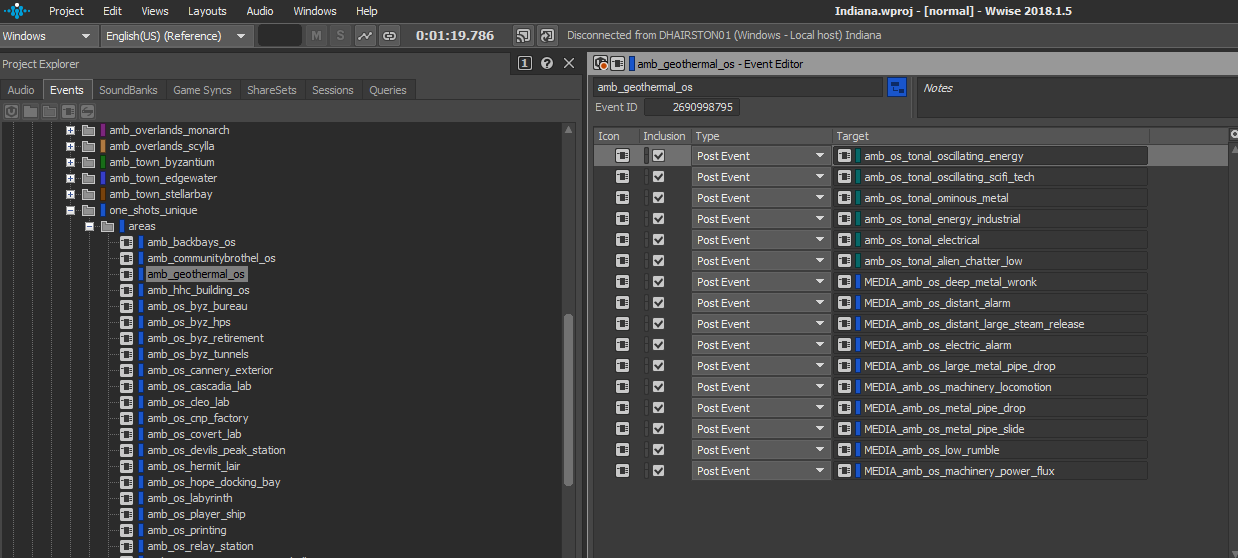
Here’s an example of Ak Ambient Objects in our "Geothermal Plant" Level:
As a part of making the world feel real, we had to ask the question "What would this world actually sound like?" There's a lot of machinery that litters almost every corner of the dungeons, homes, and factories of Halcyon. We wanted to make the machinery feel like it was "coming apart at the seams", so we tried to create the impression of the machines running very inefficiently and sounding like they were full of junk and falling apart. To accomplish that, we very frequently would use our Sanken CO-100k microphone to record miscellaneous junk and metal props we have in our awesome prop library here at Obsidian. The great thing about this microphone is that it allows you to record at such a high sample rate that you can manage to pitch the recordings down around 2-3 octaves before you start to get a noticeable high frequency roll-off. This allowed us to get rich, believable textures to give the machines of our world some life and world building texture.
The process for determining what needed an audio emitter in "The Outer Worlds" was an organic one. We would load into one of our dungeons or towns, and fly around and identify what would give me the biggest bang-for-buck as far as immersing the player and providing a high quality of detail. This resulted in hundreds, even thousands of emitters existing in a scene in some areas. We were careful to prioritize the biggest and "most important" emitters first, which allowed this method to bite us later in the project and end up missing the emitters that add the most to the player experience.
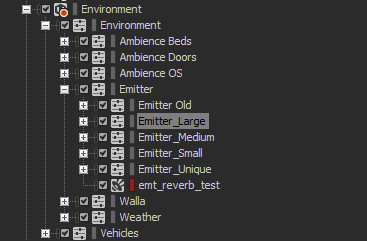
When it came to managing such a large number of emitters in Wwise, we tried to group things together in a way that was easy to understand, while also providing flexibility for the inevitable edge-case emitters that needed very unique treatment compared to our "regular" emitters. This was accomplished by having 4 Actor-Mixers for emitters: Emitter_Small, Emitter_Medium, Emitter_Large, and Emitter_Unique (In hindsight, we would have probably broken this out into 1 or 2 more granular size categories). This allowed us to make a sound and simply place it in one of these 4 Actor-Mixers where it would inherit the attributes for things like attenuation radius and RTPCs. The only exception would be the sounds that were placed in Emitter_Unique, which would require a very specific or irregular attenuation curve. This allowed us to work and iterate quickly on our sound design, with the peace of mind in knowing exactly what parameters were being given to sounds, as we put them into Wwise.
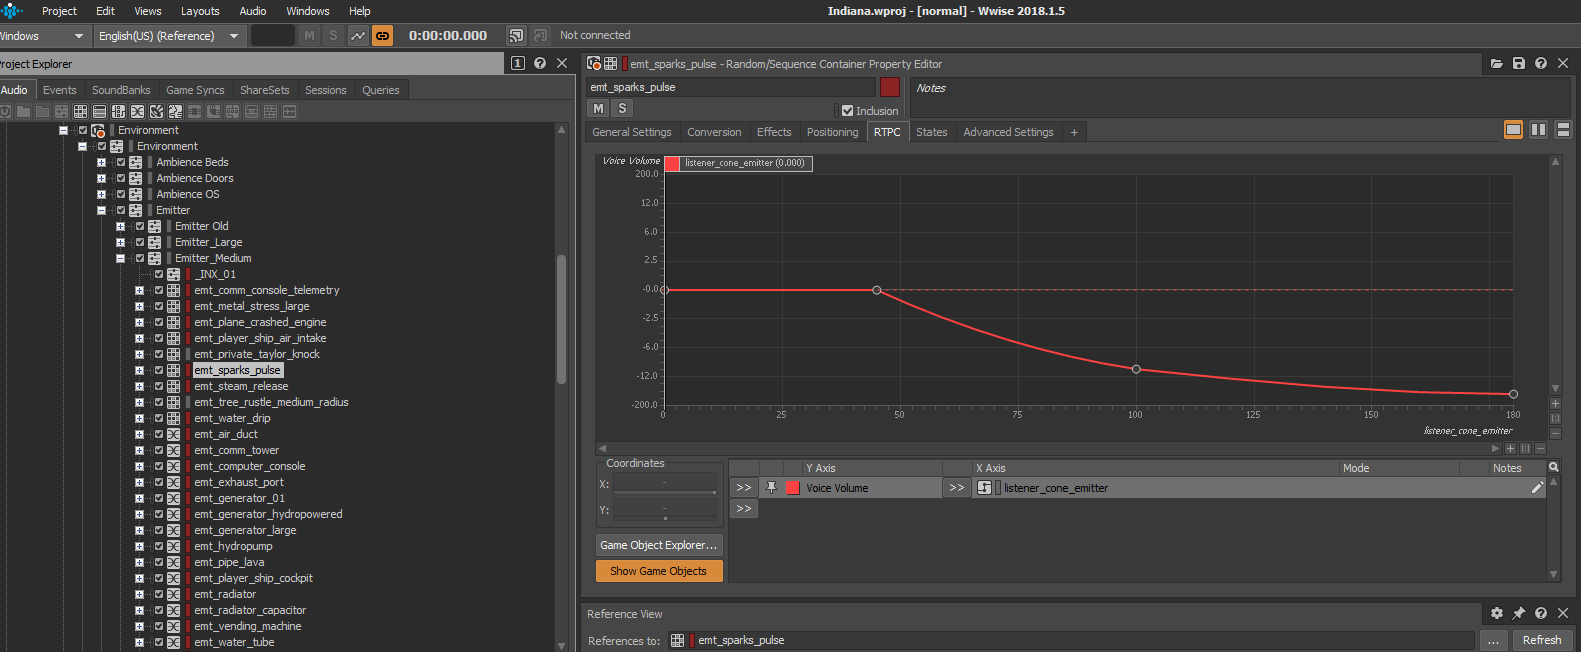
We made use of the built-in parameters "Listener-Cone" and "Elevation" for emitters. A good example of this, is how we implemented the sound for a VFX in our game of a small electrical spark. The VFX was used very frequently and visually demanded a pretty intense electrical burst sound. We knew that the sound associated with this VFX could easily begin to get annoying as the player would hear it all the time. We added a fairly aggressive RTPC curve with "Listener Cone", driving the volume and LPF of the sound. This meant if the player was looking directly at the spark pulse, you would get a loud and engaging sound, but as soon as the player turned away from the emitter, it would go away almost entirely. It was an "out of sight, out of mind" philosophy. The player wouldn't notice that the sound of the spark pulse wasn't audible because they turned away from it, but it gave us more space in the mix and helped prevent the sound from becoming too repetitive to the player.

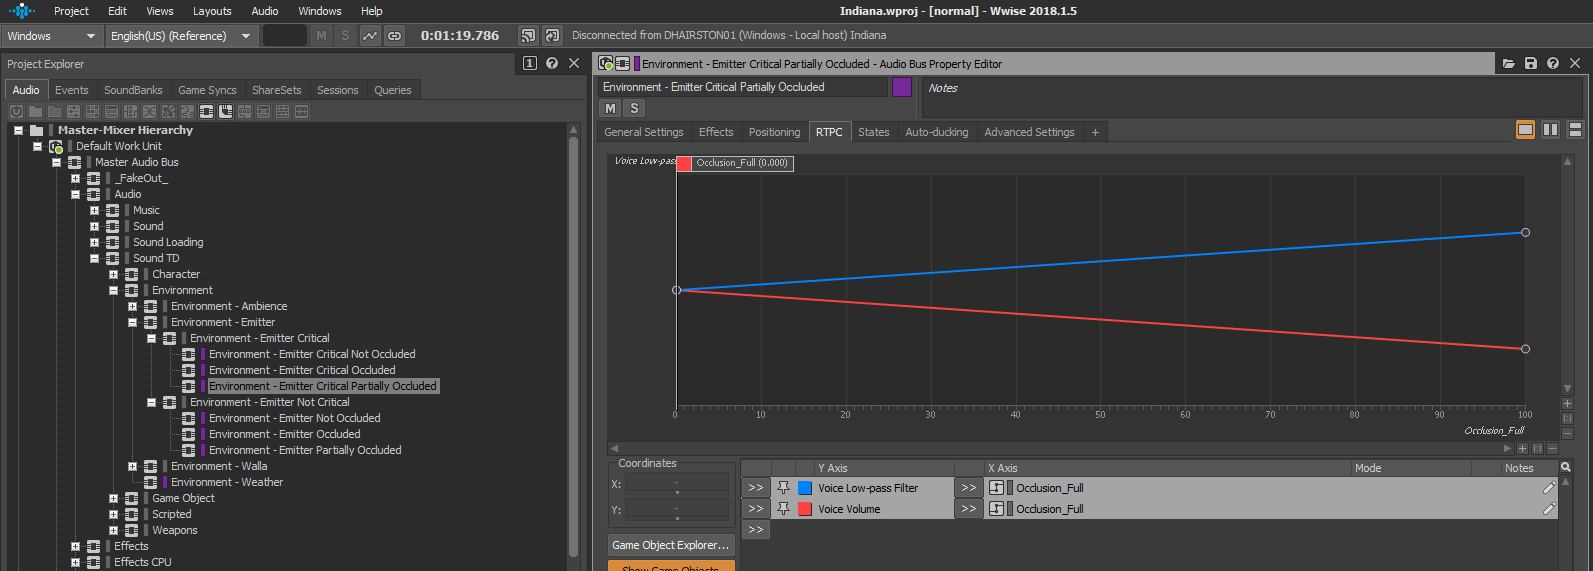
We leveraged the use of Wwise's "Occlusion" parameter with emitters. The way we did this was by breaking out our Emitter Audio Bus into a few sub busses. One had full occlusion, one had partial occlusion, and one had no occlusion. We used this to determine if a sound should be able to be heard normally through doors, if it should be muffled and quiet, or if it should muted if a closed door is between the emitter and the listener (the player).
One of the challenges we faced over the development of "The Outer Worlds" was having a good system for propagating emitters throughout the whole game in a way that was consistent, accurate, and timely. Our Technical Sound Designer, Jerrick Flores, made us a tool that could identify what static meshes existed in a level and then spawn an Ak Ambient Sound on that static mesh with certain properties (such as the correct Wwise event), already assigned to the game object. This allowed for extremely quick placement of our ambient emitters, and allowed more time to iterate on the sound design and mixing elements. This helped shift the focus of development from manual implementation to being concerned with player experience.
Before
After
Before
After
Creating and implementing our emitters in this way led to some optimization and performance challenges. Our first problem was the number of Registered Objects. Depending on the scene that we ran our emitter tool in, sometimes it would simply create too many emitters. The tool did not care if a static mesh was for some reason placed underground, or was a small light bulb 100 feet off the ground that the player can never get to. It would still place the proper emitter for that static mesh. The first step after using the emitter spawner tool, was to do a quality check through all the emitters it had made and delete the ones that were not necessary, or would never be heard. This would sometimes be a lengthy process, but paid large dividends in terms of saving our Audio Thread. The next thing we had to solve was our voice count, because originally all of our emitters were being sent to virtual voice, and while that's not nearly as costly as a physical voice, it adds up - especially when dealing with hundreds of them. We enlisted some programming support to provide us a feature that would "cull" the sound if you were outside of a radius determined on the Ak Ambient Sound object in the level. What this Cull Radius did was stop the voice if you were outside of the radius, instead of virtualizing it. That way if we had 500 emitters in a level, you would have upwards of 15-20 total voices at a time, as opposed to maybe 10 physical voices and 490 virtual voices. The difference was very substantial.
For the Ambiences in our game, we wanted to provide the player with a believable atmosphere that was interesting and detailed, while remaining modular enough to cover the whole game.
In order to have sufficient coverage for all the areas in our game, we broke it up into two main categories: Exterior Beds and Roomtones. The Exterior Beds were all unique to the area they were assigned (Emerald Vale, Roseway, Monarch, Edgewater, etc...) but the roomtones were shared across all areas of our game. We essentially created a matrix of all the different material types and sizes of room that existed in our game and made beds for those areas. It ended up looking like this:

For each of the roomtones, we also had a reverb/delay that corresponded to the roomtone type.
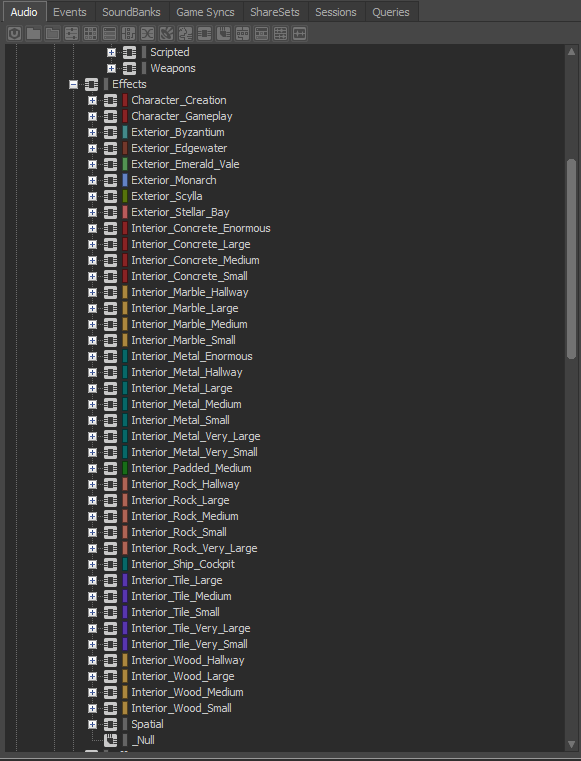
This allowed us to use these roomtones across all interiors in the game whilst making the spatialization and size feel appropriate.
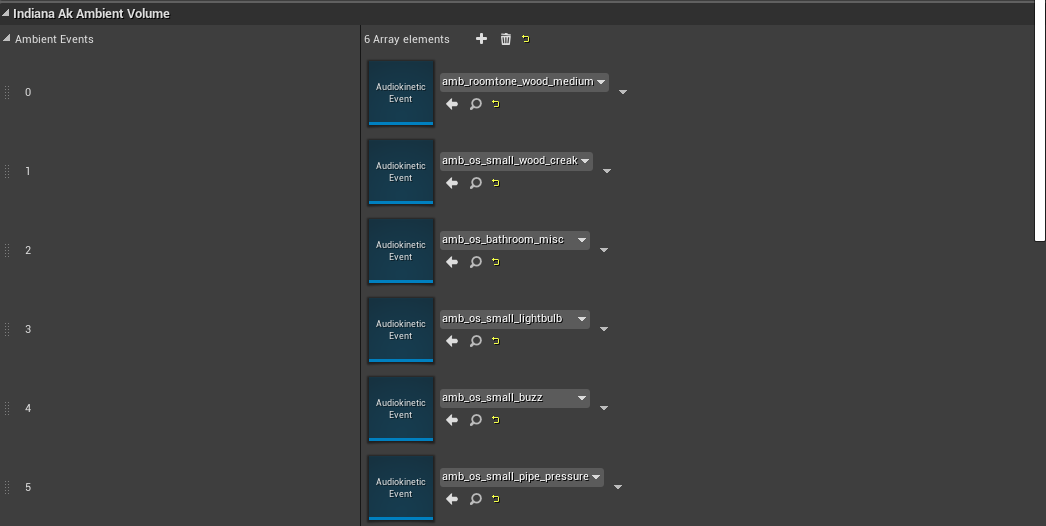
Jerrick also made a tool that would scan all of the ambience volumes in a level and assign ambient one-shot events to the volume based on what the ambience event was. This meant we had an array of events that would always play in tandem with certain roomtones. For instance, "amb_roomtone_wood_medium" would always use the one shot events: "amb_os_small_wood_creak" "amb_os_bathroom_misc", "amb_os_small_lightbulb", "amb_os_small_buzz" and "amb_os_small_pipe_pressure".
We would occasionally supplement this "base-level" of one-shots with a dedicated Ak Ambient Sound object. We used this in dungeons that would have their own suite of one-shots, that we could use to evoke a certain mood, for example, to make it feel more dangerous.
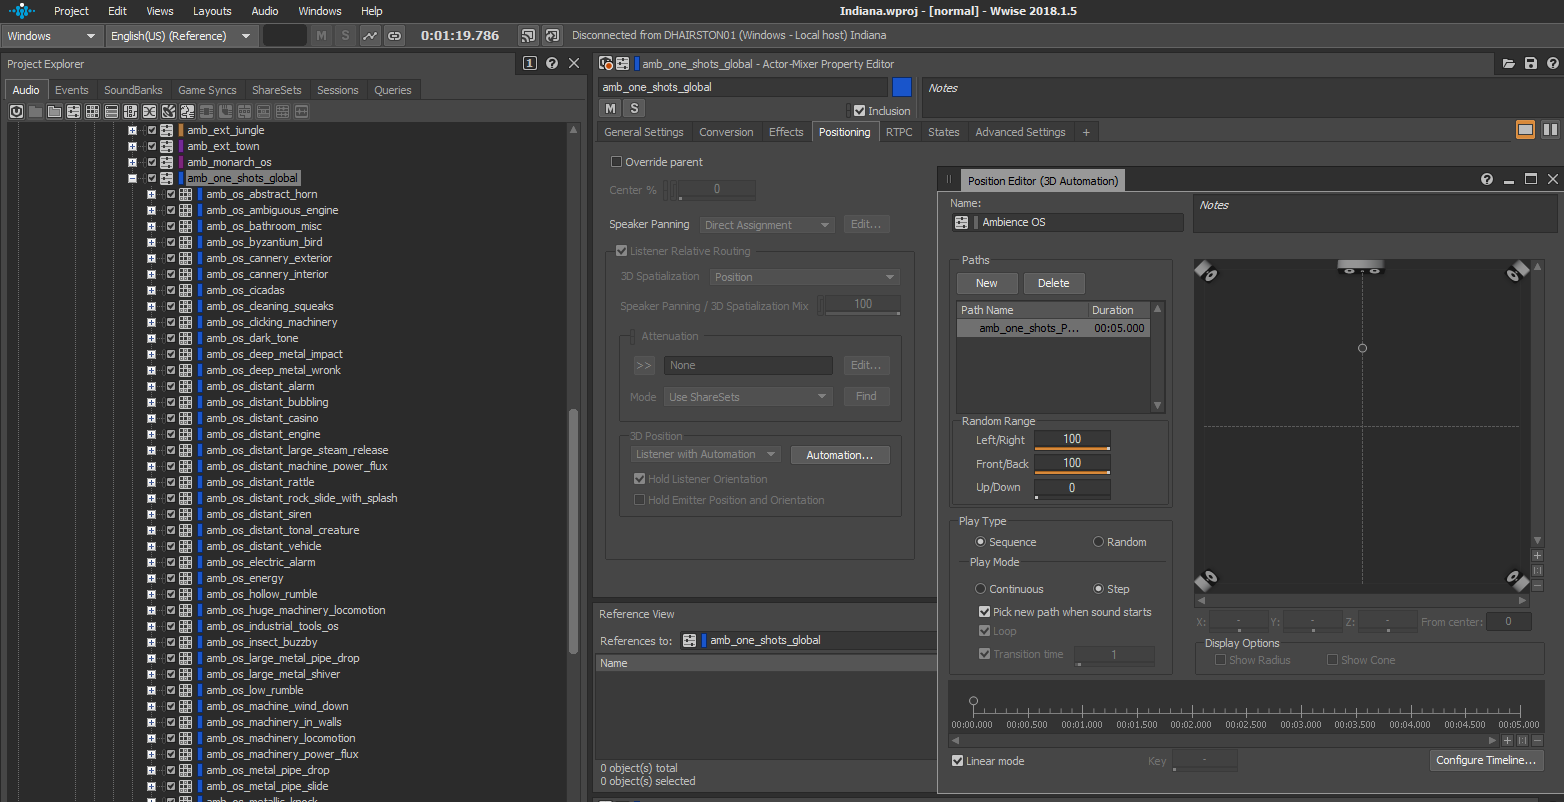
We then made sure that we used the "Listener with Automation 3D position" setting, and only used one path that was randomized to where in the stereo field it would play. We also enabled "Hold Listener Orientation", so that if a one-shot started playing, the player can turn and the one-shot will pan accordingly. This helped ground the player in the environment and make it seem like all the activity happening around them was really happening in the world.
These are the building blocks around which our entire ambience and one-shot audio work! By doing it this way, it allowed us to open a level and ask ourselves, "What are we trying to evoke while the player is in here?". We could then begin building that atmosphere, one event at a time. It was very liberating and fun to approach it this way. I believe it also went a long way in helping to sell the spaces in our game.
One final thing we did to really sell the ambiences, was find a way to simulate the ambiences propagating through our doors from Exterior → Interior. Our current system was unable to do this because as soon as you would transition from the exterior volume to the interior volume, it would fade out the exterior ambience and fade in the interior roomtone. After the exterior faded out, there would be no sounds from outside bleeding into the interior of the building, which would break immersion in areas with open doorways. We worked around this by placing an emitter with a baked down version of the ambience (and walla - when applicable), playing on it. We made it so that this sound was fully occluded by doors so if you closed the door, the sound of the exterior would go away, as you would expect.
VO & Chatter
With Outer Worlds being an RPG title, the VO Chatter system was vital in our game from an audio standpoint. It contained an enormous amount of VO due to the plethora of in-game characters with various lines and different voice acting performances. Outer Worlds has 34k+ source files for chatter VO and associated variants.
When we were establishing a chatter system that was responsible for all this VO, it was important to determine what goals chatter was trying to meet.
We finally landed on our philosophy for chatter to be "an expression of game design intent". Put another way, chatter's primary focus was on reinforcing the associated gameplay event. For writing this meant we simplified chatter lines so they could be easily digested during combat, while retaining just enough world building so that chatter felt contextualized to our world without obscuring the intent of a line. For implementation, we created a priority system for events that allowed higher priority events to interrupt currently playing (or stop newly triggered), lowered priority events. This allowed chatter to play back uninterrupted, except when more gameplay critical events happened.
This philosophy played a big part in the chatter creation process for our in-game companions. Namely, we sought to bring more life into their chatter by representing the current gameplay context in the VO performance: "Out of Combat", "Stealth" and "In Combat". As such, certain chatter lines had restrictions on what context playback was allowed and more interestingly, certain chatter lines had VO performance variants based on those contexts. This allowed the same writing for an event attached to a context-agnostic gameplay event, to regain its context to make the characters feel more present in the world. Something generic like a companion confirming a valid movement command is now reactive:
Walking around in the world, just taking in the sights and you tell Felix to go and see a scenic view? "On the move."
Sneaking around a guarded facility that you're not technically allowed to be in and you tell Felix to move into an advantageous ambush position? "On the move."
In the middle of a fire fight with guards wielding face-melting rifles and you tell Felix to hide behind some cover? "ON THE MOVE!!"
We achieved this reactivity by conditionalizing playback on the game side based upon the player context, i.e. what state the player was currently in. Having playback of these companion events adhering to the player's context respected what the player was currently doing gameplay wise and further reinforced that state of mind. So if the player is in stealth, the companions will talk in hushed voices, to speaking normally out of combat, to shouting during combat:
Finally, to really sell the differences between these contexts, we focused on getting VO at the proper projection levels based on the context. As such, we organized our vocals on an "intensity" scale, wherein we used distance to target as a measurement for how loud a projected a line should be. This is particularly noticeable in combat, where we have a variety of vocal intensities all happening at once:
Intensity 1(1 ft.) |
|
Intensity 2(2-3 ft.) |
|
Intensity 3(3-5 ft.) |
|
Intensity 3.5(7-10 ft.) |
|
Intensity 4(10-15 ft.) |
|
Intensity 4.5(15 ft.+) |
|
Intensity 5(20 ft.+) |
|
At the core, while the overall gain of the assets might be around the same, the added layer of projected intensity shapes the event and VO to reinforce the game design intent.This all came together to produce a chatter experience that constantly communicates game design intent to the player as they go through the gameplay loop:
Now for how we implemented all of the VO (again, that's 34k+ VO lines for chatter and 50k+ total if you add in all dialogue!): at its core, our proprietary tools interfaced with Wwise and the game through external sources.
At a high level, each system was responsible for:
|
Game Code |
Wwise |
|
|
On the game side, we have VO players that would do the following when we wanted to play VO (step descriptions below image):
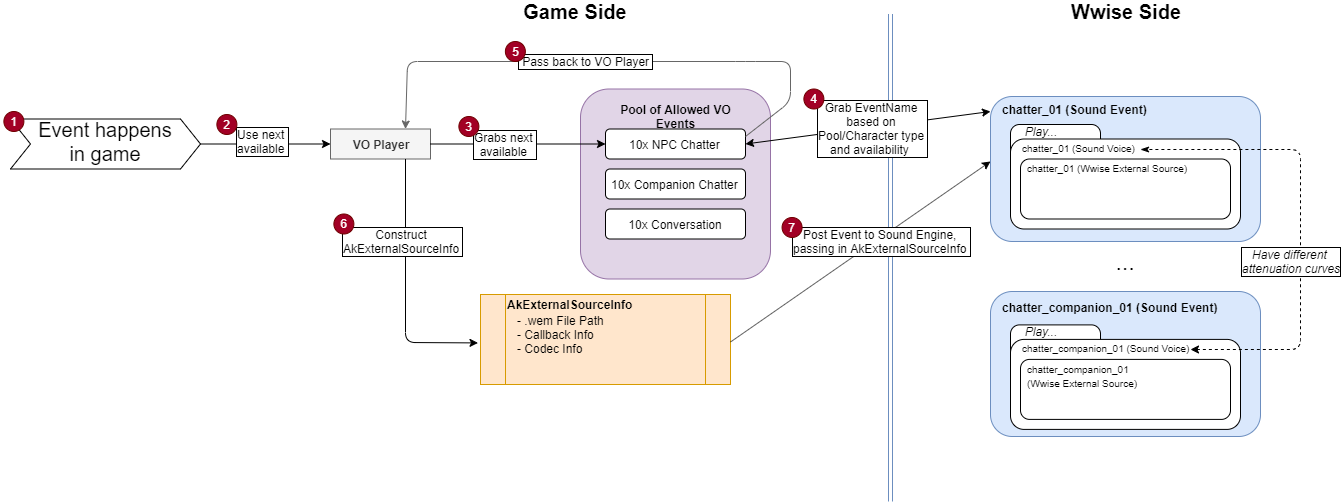
1. When an event happened in game...
2. Use a VO Player that...
3. Picks a Pool of Sound Events to grab an instance from based on the character/what kind of line they are speaking.
4. Grab the next available Sound Event name from the selected pool.
a. This Sound Event plays a generic Sound Voice with a Wwise External Source. Due to the attenuation curve needing to be different based on context, we split up the Sound Voices and Sound Events in this way.
5. Pass that Sound Event Name to the VO Player.
6. Create an appropriate AkExternalSourceInfo object with a constructed .wem file path (already determined elsewhere in game code between steps 1 and 2), info for callbacks, and codec information.
7. Post the grabbed Sound Event, passing in the newly created AkExternalSourceInfo object.
Runtime VO Processing for Helmets
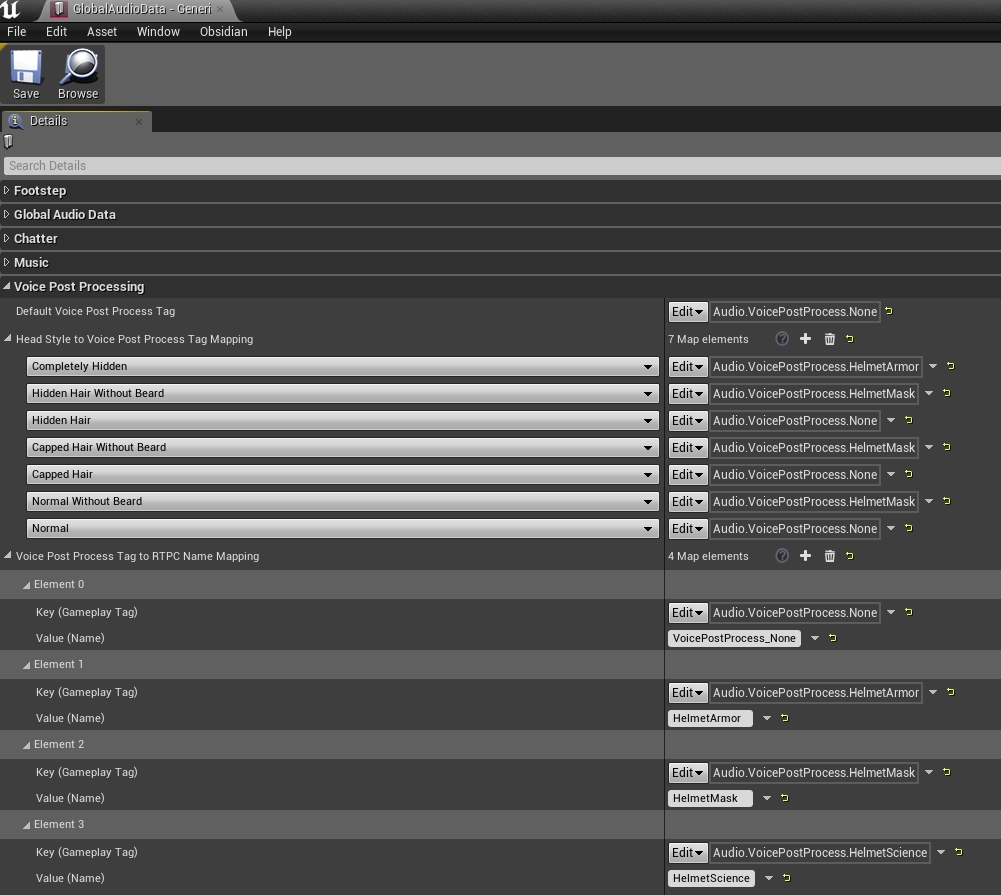
We collaborated with the Programming team to implement a system that dynamically applies voice processing effects to a character depending on the kind of headgear he or she has currently equipped. The goal for this system was to be able to effectively account for the many armor configurations that can be applied to the Player or Companions at anytime. In Unreal, we were able to specify which helmet art assets were to be associated with voice processing. We used a gameplay tag system to tie those helmet (and mask) assets to RTPCs that we created in Wwise. We ended up with a total of 4 different RTPCs: HelmetArmor, HelmetMask, HelmetScience and None. If a character has a helmet of a certain type currently equipped, he or she will send Wwise an RTPC value of 1 corresponding with the helmet asset currently being worn. Once this parameter data makes it into Wwise, we use these parameters to apply variable processing to that character's VO.
Unreal Data and RTPC Definitions
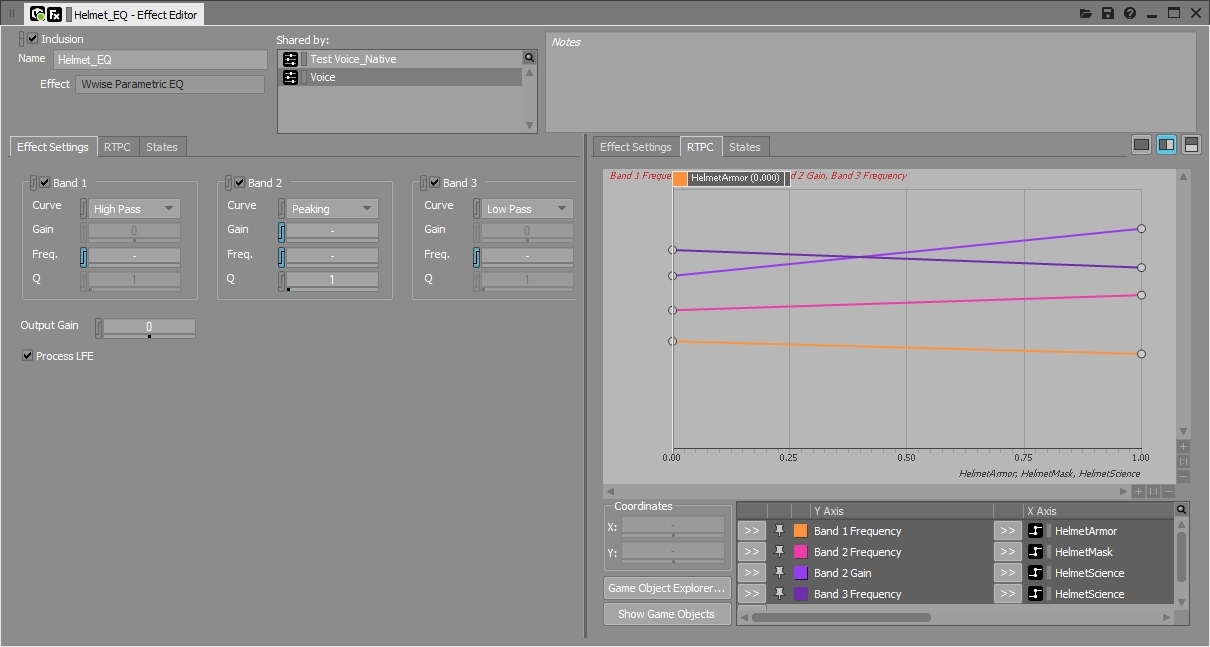
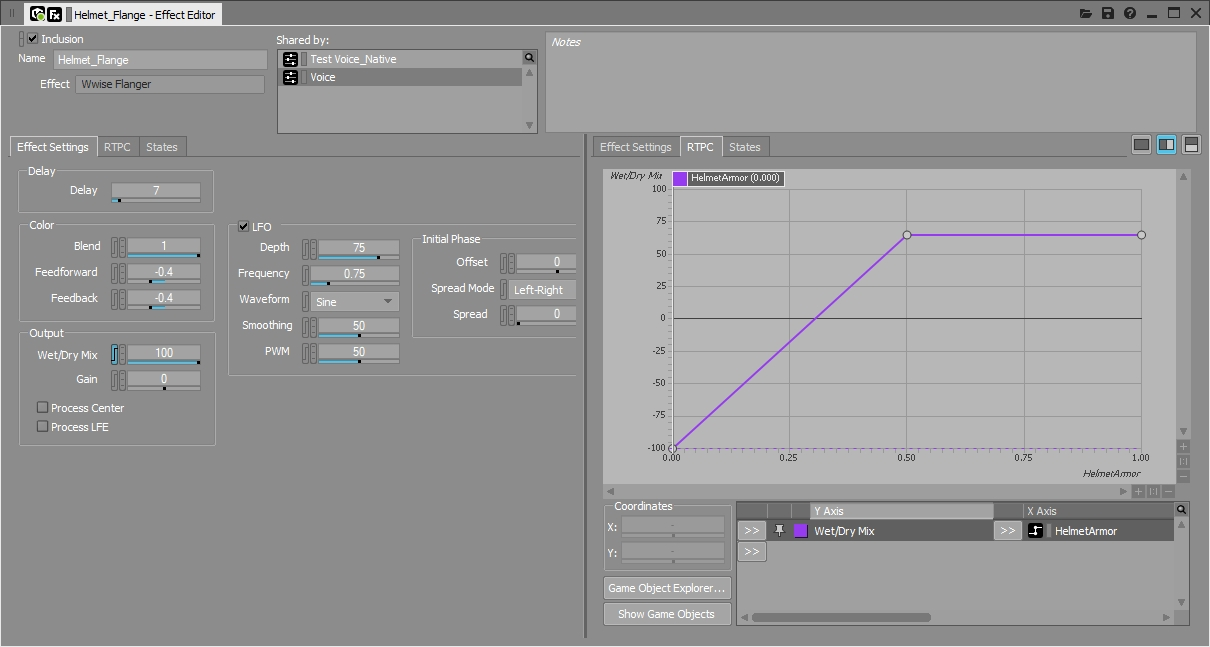
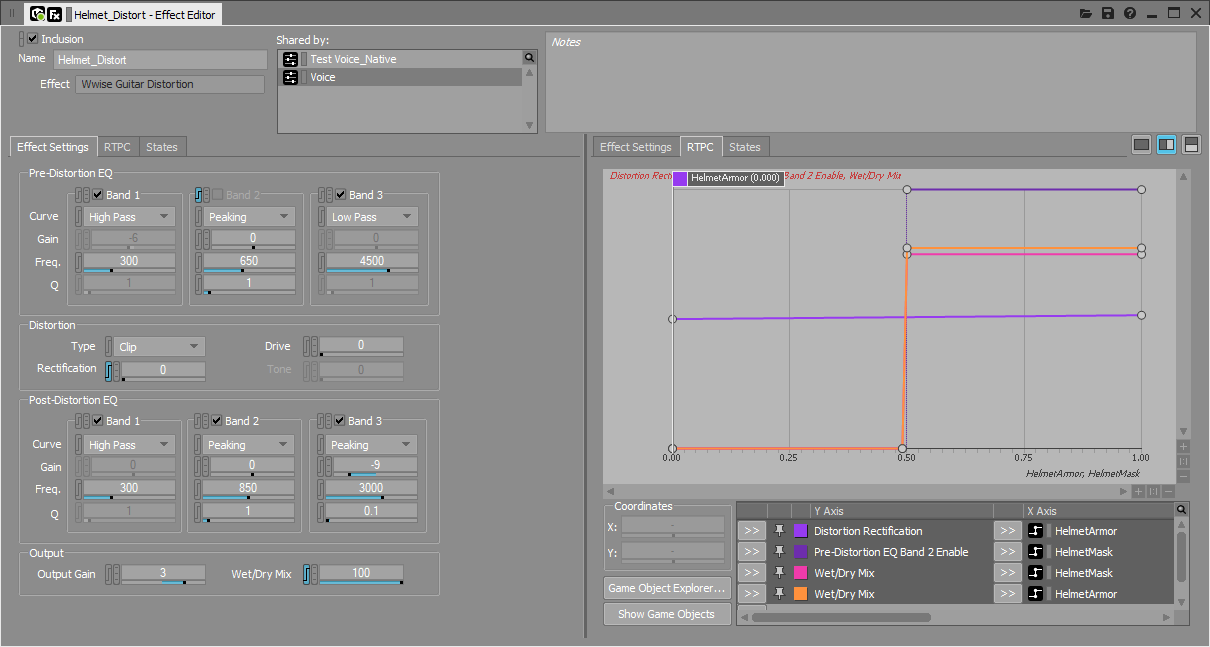
Inside of Wwise on the Voice Actor-Mixer hierarchy, we have a handful of built-in effects inserted onto the parent Voice mixer. These effects get driven and modulated by the parameters we created, named and assigned in Unreal. We designed a few Effect sharesets that serve as the basis for our runtime VO processing. All processing styles (Science, Mask and Helmet) share the same base effects (Parametric EQ, Flanger, Guitar Distortion) but use RTPCs to modulate and recombine each Effect Shareset additively and subtractively to achieve a handful of different effect flavors. The 3 styles of voice processing we are supporting are:
HelmetArmor: medium to large plastic/metal helmets (heavy Parametric EQ muffling effect, medium Guitar Distortion, light Flanger)
HelmetArmor VO processing on guard
HelmetMask: small to medium plastic/metal masks (medium Parametric EQ muffling effect, light Guitar Distortion)
HelmetMask VO processing on ally
-HelmetScience: small to medium cloth/plastic masks (medium Parametric EQ muffling effect)
HelmetScience VO processing on vendor
None: unprocessed
Voice Actor-Mixer Effects
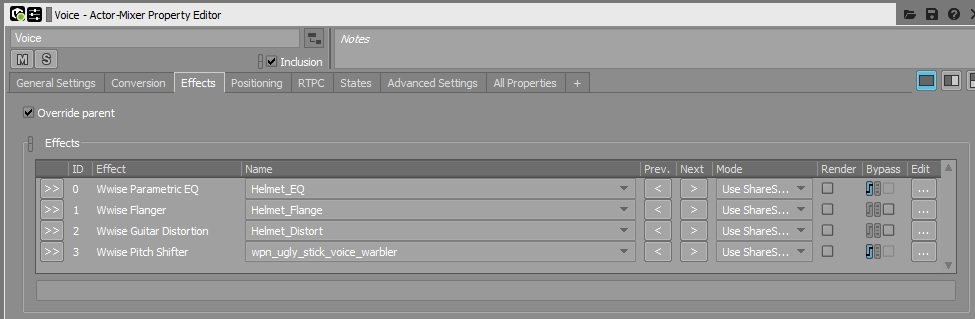
Actor-Mixer Parameters
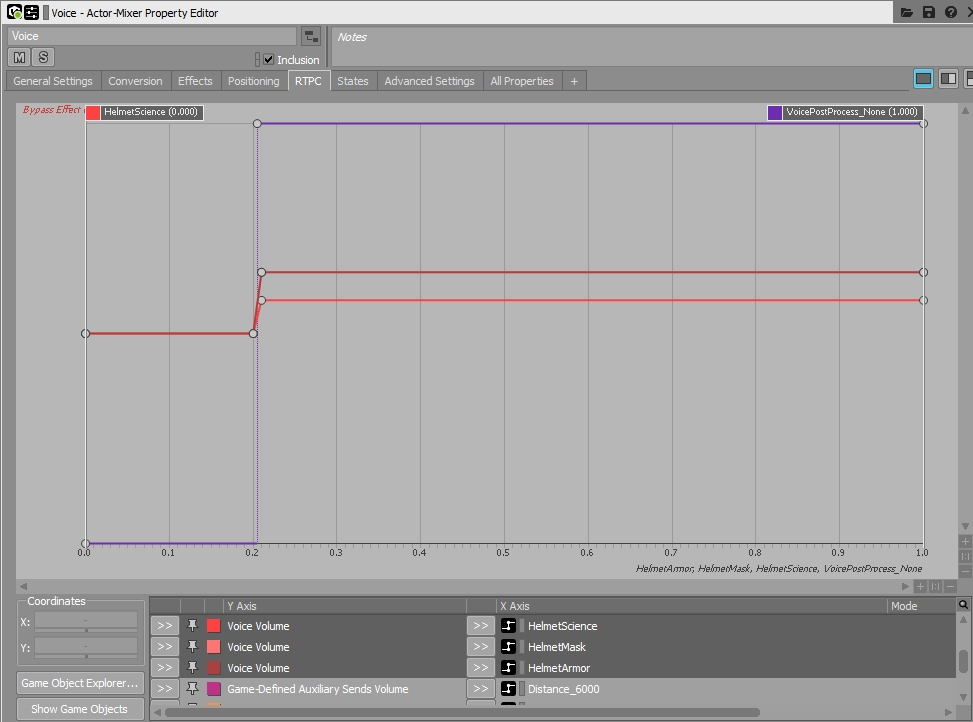
Each RTPC is a boolean value that sends either a 1 (active) or a 0 (inactive) based on what helmet style an actor has currently equipped from the Unreal to Wwise. The RTPCs are then used to modulate parameters on each Effect Shareset, altering the sound of the effect in various ways. This is done across multiple effects in combination to achieve varied composite processing effects. For instance, we are driving more Guitar Distortion and Flanger effects when HelmetArmor is active and relying on only a unique Parametric EQ curve when HelmetScience is active. Each successive processing style (Science > Mask > Helmet) is progressively more processed in terms of the amount and intensity of effect coloring applied. RTPCs are also used at the mixer level to bypass Effects (if the None processing Tag is active) as well as to apply some volume automation to make up some slight overall gain lost when applying filtering effects.
Effects Sharesets and Parameters
The resulting system for applying dynamic runtime VO processing proved to be flexible and easy to iterate on and ultimately served a game of our size and scope. There is a lot of room to expand on this idea and implementation in future projects. Next time, we'd like to incorporate some of Wwise's third-party plug-ins such as the McDSP effects to produce an even wider range of VO processing styles.
Spatialization
A big modifier throughout the audio-scape for The Outer Worlds was Spatialization. With it, we sought out to provide excellent sonic resolution with more geographically accurate features to provide a greater sense of immersion and more accurate tactical information during combat and stealth.
For context: Due to project constraints, we were unable to investigate (or optimize) an implementation of Wwise CORE features. In place of that, we fully committed to going deep with our use of the Rooms and Portals features provided by Wwise Spatial Audio throughout the entirety of the game.
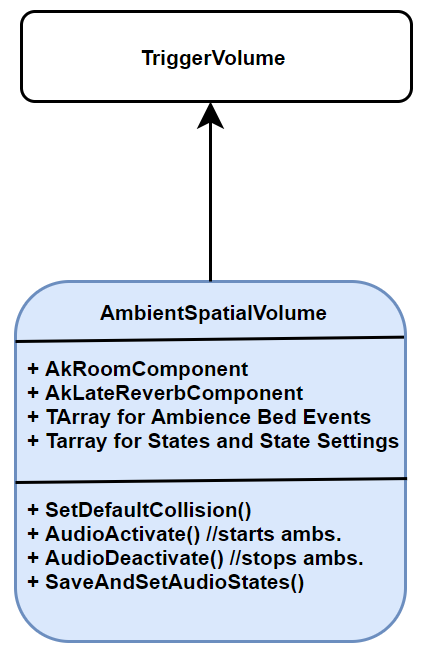
To do this, we started with creating a holistic class in game code that contained all components we would need. For that, we created a code class that inherited from Unreal's TriggerVolume and onto it we added a AkLateReverbComponent and a AkRoomComponent, as well as miscellaneous TArrays to house info for ambiances/states. We also added some logic to the constructor that got a brush component to set up some default collision properties (but also allowed us to make complex volume shapes in Unreal). This class was now an all-encompassing volume that controlled spatial features and ambiances (including reverb), otherwise internally known as an AmbientSpatialVolume:
We then populated the game world with Portals (we add Portals first to help us draw our Rooms in the next step):
From there, we went ahead and added AmbientSpatialVolumes, our Rooms, throughout the area to create a high fidelity room-scape throughout all maps in the game:
Furthermore, since we had full control over how and where we draw these volumes, we looked for creative ways we could implement Rooms and Portals throughout the game.
One example of this is splitting up linear areas with sharp turns/corners, like hallways, into multiple rooms, with a portal at one end of a hallway before it turns into another. This creates a behavior where a sound originates from a portal allowing it to "hide" around a corner, causing a player to have to approach the corner in order to more accurately determine where behind the corner the sound is emitting from. This then reinforces a sneaking player to more keenly focus on what information the soundscape of an area can provide to them in addition to the rest of the normal sneaking gameplay loop:
Another example of an unorthodox way we used Rooms and Portals was to break up open vertical interiors with multiple floors, making a new room on each floor, and adding a portal at the opening between the floors. This allowed for sound to "physically" stay on the floor they originated from and inform the player of sound above them, and where to go in order to get line of sight to retaliate or otherwise.
After that entire process, we had a deep and robust room-scape throughout the game, but that didn't come without some harsh lessons learned:
Automation:
The pipeline to add AmbientSpatialVolumes and Portals throughout the entire game was a manual one. This process took lots of time and is highly at-risk for human error. We heavily recommend spending time automating any part of those processes.
An example of an automation process we developed was for attaching portals to doors to link their behavior together. All doors had blueprint logic that allowed their open/close behavior to also close/open a portal, however this used a reference to a portal which initially had to be hooked up by hand. Realizing this would contribute even greater to the implementation time of Portals, we went ahead and added some automation features to the construction scripts of our door Blueprints to search for Portals within a certain range from the door and set the closest Portal to be linked to the door. Thus when we were done with adding Portals to an area, we could just recompile that blueprint and all doors throughout a level would run that script and look for the nearest portal to link to, creating the connection if applicable:
This automation made it easy if a mass number of doors or portals were moved due to changes: if doors were moved, the construction script already run as part of that moving process, and if portals moved (or if we wanted to double verify everything is hooked up),we simply had to recompile this blueprint. For any sound designers working in-engine, we urge you to look for manual processes like these that can be heavily sped up through the implementation of clever automation techniques.
Optimization:
Another big lesson learned is the topic of optimization. Creating a spatial room-scape to the level of fidelity we did required a lot of CPU, enough so that we were constantly over 100% when debugging Audio Thread CPU in Wwise on consoles. We spent many, many, many cycles optimizing all the audio systems in our game to free up enough CPU to support Spatialization. We optimized the following:
- Reduce Registered Objects: Before optimization, we were over 1000+ registered objects in our denser areas according to the Wwise profiler. Unfortunately due to project constraints, we did not have the opportunity to create a system that safely handled registration of objects into Wwise. In lieu of a formal management that, we looked for places throughout the game where we could remove AkComponents (and thus registered objects) and get by with implementing sounds via PostEventAtLocation, which only temporarily created registered objects. This worked mostly for one-shot sounds, but the method was bug prone with looping sounds as PostEventAtLocation does not give us an object to cache to perform operations on later, like when we want to stop the loop. Overall, we applied this method heavily for module game objects, like Doors, Containers, and one-shot VFXs, and ended up reducing those 1000+ registered objects down to ~500.
- Control Virtual Voices: We used virtual voices at first without regard to how many voices we were sending to virtual voices. This eventually lead to an excessive amount of virtual voices that killed our CPU, regardless of the Virtual Voice settings. The biggest offender of this were AkAmbientSounds, which we made great use of to add lots of life to our environments, and could lead to 300+ of them being loaded at once for denser in-game areas, and thus an excessive amount of virtual voices. For that we worked with programmers to create a "culling" system in-game that managed event playback on AkAmbientSounds when the player left and reentered a certain range (which was just slightly longer then the attenuation radius for the audio on that event). This management system stopping events completely killed the use of them and allowed the resources taken up by the virtual voice to be freed back up, dropping our excessive amount of virtual voices from AkAmbientSounds down to ~30.
- Limit Active Voices: Finally, we didn't have in place an active voice limit prior to optimizations and introducing that limit was one of the major optimizations that freed up our CPU use. Limiting this isn't just about setting a single number on the Advanced Settings tab however, it requires structuring your Wwise Actor-Mixer Hierarchy such that you can have all different actor-mixers respecting a global limit. Thus we had to restructure our project to have an overall Project actor mixer that had a sound instance limit on it and then we nested all other actor-mixers/Wwise Work Units underneath that Project actor-mixer. From there we went and added limits throughout the other actor-mixers and on specific sound-objects if necessary. Furthermore, we heavily used Playback Priority to augment the limits we had in place to prioritize certain sounds based upon their distance to the player. We ended up with an overall active voice limit of 50.
In the end, we found that Spatialization added a great deal of depth to our soundscape, allowing us to increase immersion and add an element of sound to gameplay as the player traversed areas in the game. In this journey to develop a highly detailed spatial soundscapes we learned a lot of lessons regarding the amount of work needed to hand tune these implementations and the need for automation where possible as well as takeaways regarding the amount of optimization work required to support the Spatialization feature. Overall, Spatialization acted as a signal beacon for the entirety of the audio team, as all of us came together to get the feature implemented and optimized through all of our combined efforts, achieving a system that livened up the whole soundscape of The Outer Worlds.
Conclusion
We are really proud of the work that we were able to do for the Outer Worlds. We learned many lessons and did make mistakes along the way, however we were able to use Wwise in ways that we hadn't done at Obsidian before, which helped push our craft forwards. Creating multiple worlds was certainly a challenge, especially when the player can make so many different decisions in our game, however we feel that we were able to craft a coherent soundscape for our players to explore.
We hope that Part 1 of our blog has been informative and helpful, and can give at least some insight into the process that we went through, across the different parts of the game. Thanks for your time and we hope you enjoy Part 2 from Halcyon and the Outer Worlds!
The Team
The audio team would like to thank the following people and teams for their help bringing Halcyon to life. Audio is only one piece of the puzzle and it wouldn’t be possible without your support and talent.
- Outer Worlds QA, Narrative, Programming, Production, Game Design, VFX and Animation Teams
- Noiseworks

Commentaires
Victor Ermakov
October 29, 2019 at 10:03 pm
Wow, that's amazing! Thanks for sharing! In my opinion, it is the best article published in this blog so far! By the way, there is a small flaw with the examples. Video files that are showing the creature's animations have no sound. :(
Sergey Eybog
November 06, 2019 at 08:37 am
Thanks for a great article!
Martin Stig Andersen
December 20, 2019 at 02:24 pm
Great in-depth article, thanks for sharing ideas and tips, and backing with great examples!