
In Part 1, I explained how to create a “blueprint” using the Patch file. Now let me show you how to build an “automatic workshop” with the Heavy compiler, then use it to generate a plug-in and deploy it in our game.
Why build a workshop?
The original Heavy compiler environment was web-based, so we could submit the Patch file online. The Heavy compiler would then return the compilation report and provide a link for us to download the code and the plug-in.
However, since Enzien Audio open-sourced Heavy last year, we now need to clone the compiler code for local use. That’s why I described this process as “building a workshop”, otherwise it would be described as “picking up an express package”.
Before you proceed, please ensure that you have installed a version of the Wwise SDK. I’m using SDK version 2019.1.1.6977.
I. Downloading and Installing Python 2
In order to run Heavy, we first need to download Python 2.7.
Click here to download: https://www.python.org/downloads/release/python-2716/
1. Browse to the following page, and click the corresponding option.
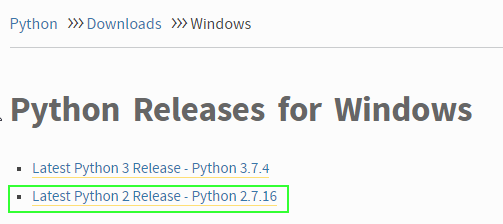
2. I was working on my PC, so I chose the Windows64 installer.

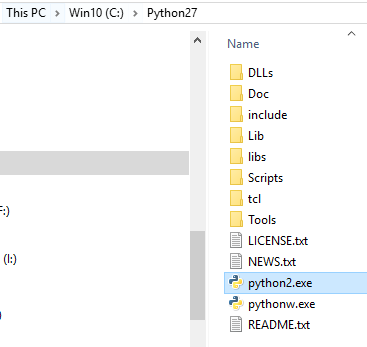
3. I installed Python 2.7 to the root directory of my C drive (I already had Python 3.7 installed on my computer, so I renamed the .exe file of Python 2.7 to “python2”).
Next, let’s set up the environment variables.
II. Setting Up the Environment Variables
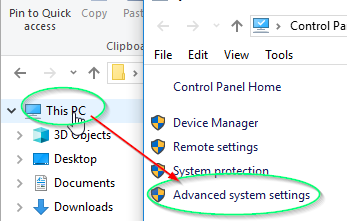
1. Right-click "This PC" and select "Properties", then click "Advanced system settings".
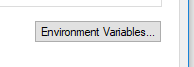
2. Click "Environment Variables...".
3. Double-click "Path", as shown below, then click "New", on the right side of the window, and enter the installation path to Python 2.7 and its “Scripts” subfolder.
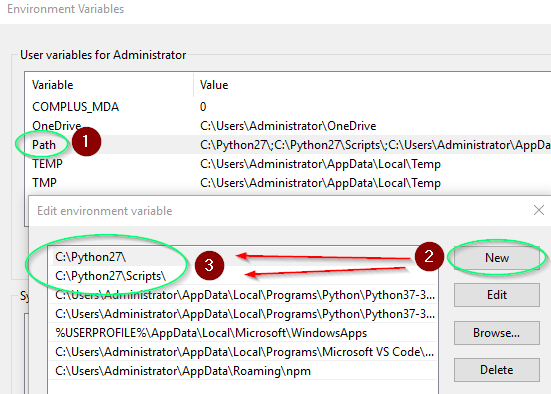
Now, Python 2.7 will run when we type “python2” in the command-line tool.
III. Setting Up Visual Studio
In order to build plug-ins using the Wwise data generated by Heavy, we need to set up Visual Studio.
1. Open Visual Studio, go to the Tools menu, and select "Get Tools and Features".

2. Click the "Desktop development with C++" checkbox.
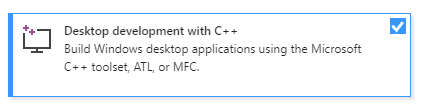
3. Make sure you selected "VC++ 2015.3 v14.00" in Installation Details, if you are using Visual Studio 2017 (this option is unchecked by default).

Next, let’s clone and set up Heavy.
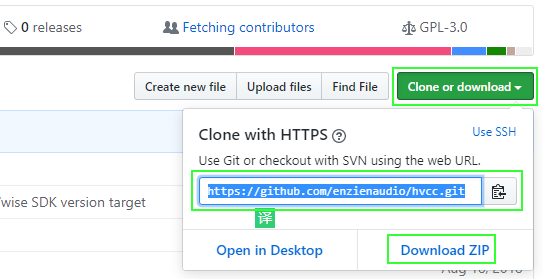
IV. Cloning and Setting Up Heavy
We need to clone or download Heavy from Github to our computer first.
Click here to clone or download: https://github.com/enzienaudio/hvcc
1. You can either copy the address to SourceTree (a source control tool) or simply download and extract the ZIP file.
2. Browse to the Heavy directory (if you are using the ZIP file, extract the contents first).
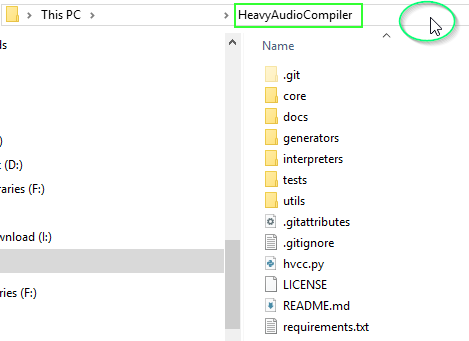
3. Click in the empty space within the green circle as shown above, then type “CMD” and press Enter. This will open the Windows command line tool directly from the Heavy directory.
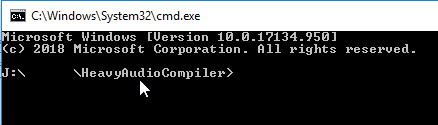
This way, we don’t need to type the address manually.
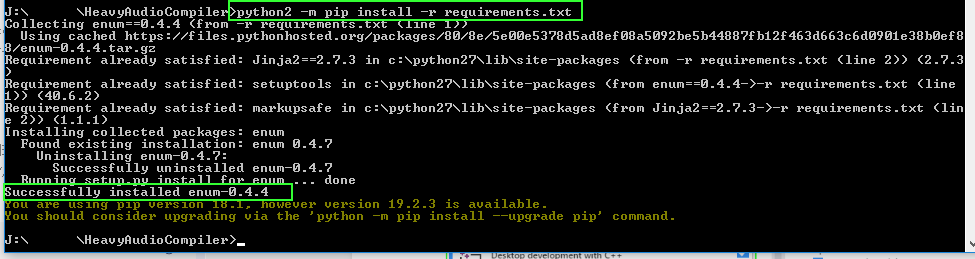
4. We just installed Python 2, but Heavy still needs the library files in order to run. Let’s install them by typing “python2 -m pip install -r requirements.txt” in the command line tool.
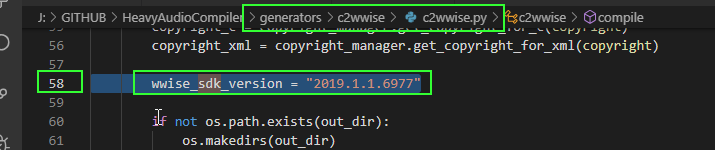
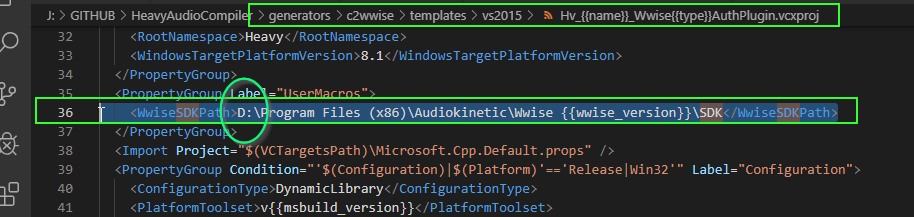
5. Ensure that your version of the Wwise SDK in the Heavy code is identical with your installed version, otherwise there will be compilation errors.
Let’s say I installed Wwise SDK version 2019.1.1.6977, then I would need to replace the entry in line 58 in c2wwise.py (refer to the path within the green box at the top of the following image).
Note: This is also described in the Heavy document.
Click here to see the details: https://github.com/enzienaudio/hvcc/blob/master/generators/c2wwise/c2wwise.py#L58
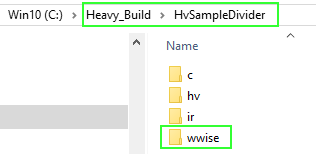
6. I installed my Wwise SDK on the D drive, but the default drive letter for the SDK installation address is C, as specified in the VS Solution template provided by Heavy. So we need to change it ( refer to the path within the green box at the top of the following image).
7. Browse to the path as shown below.
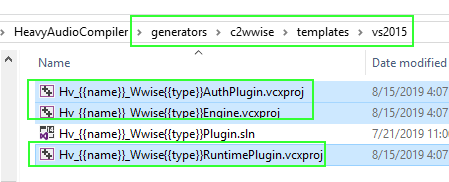
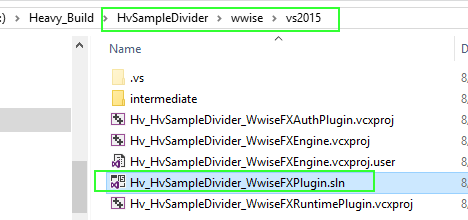
8. Open each vcxproj file, and change all the drive letters from C to D.
You now you have a workshop ready to generate plug-ins.
V. Running the Heavy Production Pipeline
This is the most exciting part!
1. As mentioned previously, type “CMD” in the address bar of the Heavy directory to open the command line tool, then type “python2 hvcc.py J:\HeavyAudioPlayground\bitcrusher.pd -n HvSampleDivider -o C:\Heavy_Build\HvSampleDivider\ -g wwise”.
- J:\HeavyAudioPlayground\bitcrusher.pd is the path to the Patch file that we created before.
- -n HvSampleDivider will rename the generated plug-in to “HvSampleDivider”, otherwise it will be named as “Heavy” by default.
- -o C:\Heavy_Build\HvSampleDivider\ is the output path to the complied assets (you may specify this path as needed).
- -g wwise indicates that Heavy is generating data for building Wwise plug-ins. Heavy supports other platforms as well.
Note: For more details about how to use Heavy, see the Usage section, described here.
2. Press Enter. If no errors are reported, Heavy will complete the compilation.
3. Browse to C:\Heavy_Build\HvSampleDivider\, and you will see the following contents.
4. Browse to wwise > vs2015, and double-click the Hv_HvSampleDivider_WwiseFXPlugin.sln file to run Visual Studio.
5. Select "Release" from the dropdown menu as shown below.
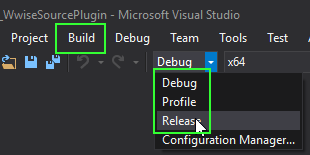
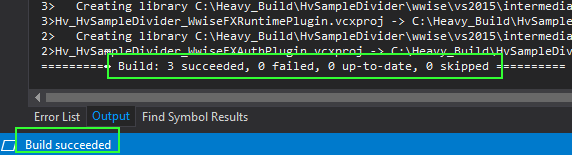
6. In the Build column, click "Build Solution" to start the build process.

7. If you did everything right, a success message will be displayed, as shown below.
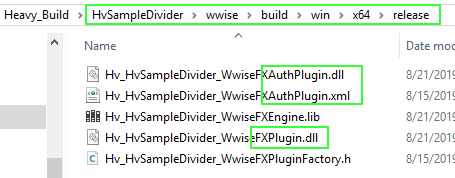
8. Browse to C:\Heavy_Build\HvSampleDivider\wwise\build\win\x64\release, to see the generated plug-in.
Deployment
I. Deploying the Plug-in
Now we need to deploy the plug-in to our authoring tool and game project.

1. If you only want to use the plug-in in the authoring tool, simply copy the dll and xml files shown above to the “plugins” folder of Wwise (see the following image).
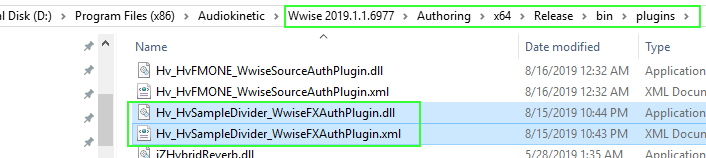
Note: The “Auth” field in the filename indicates that the file is supposed to be deployed to the authoring tool.

2. In order to run the plug-in in the engine and pack it into your game, you need to copy the dll file shown above to the “DSP” folder to the game project directory (Assets->Wwise->Deployment->Plugin->Windows->x86_64->DSP).
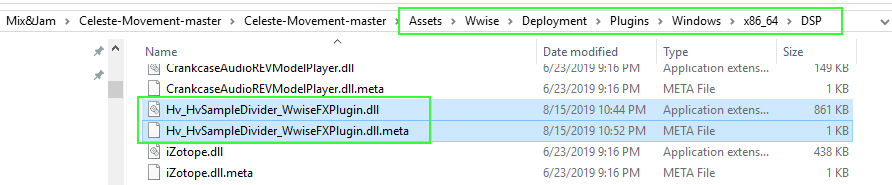
Note: I used the project created by André Cardoso as my demo project. He makes great videos on his YouTube channel, called Mix and Jam. You should watch them!
Also, if you want to know how to deploy plug-ins to UE4, please visit sound designer Derrick Reyes’s YouTube channel.3. Open Wwise.
Since we added an adc~ object in the Patch file, Heavy will generate an effect plug-in instead of a source plug-in. You should be able to see it in the "Effect" column of an Audio Object or Audio Bus, rather than in the Add Source menu in Sound SFX > Contents Editor.
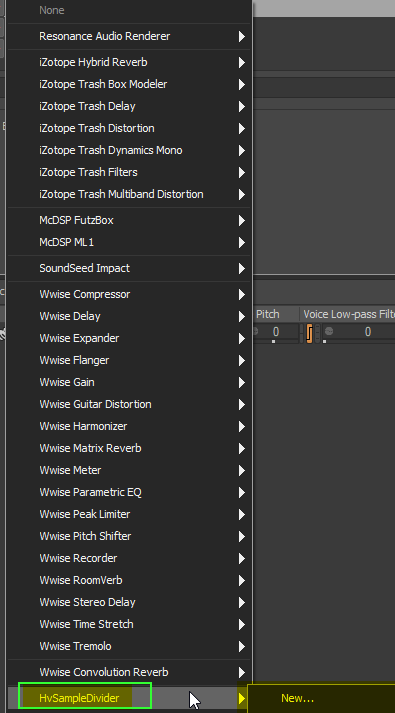
You should now see it in Wwise as shown above!
4. Add it to the effect chain of an Audio Object or Audio Bus in Wwise.
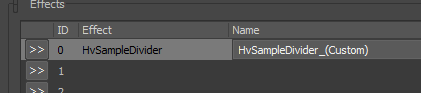
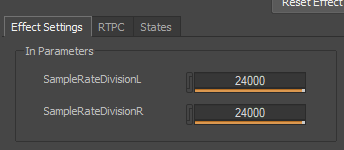
5. Double-click it to check the plug-in interface. You will see the exposed parameters with their default values.
II. Creating and Linking Game Parameters
I want to use this plug-in to achieve one goal: when a character in the game sprints, I want to reduce the sample rate of the music and ambiances while increasing the volume of the sprint sound.
To do this, we need to create Game Parameters to reflect the volume change.
1. I divided the sprint sound into two Sound SFXs (WhooshL and WhooshR) to carry information of the left and right channels, and added a Wwise Meter plug-in for each of them to capture their volume envelopes, then send them to two different Game Parameters.
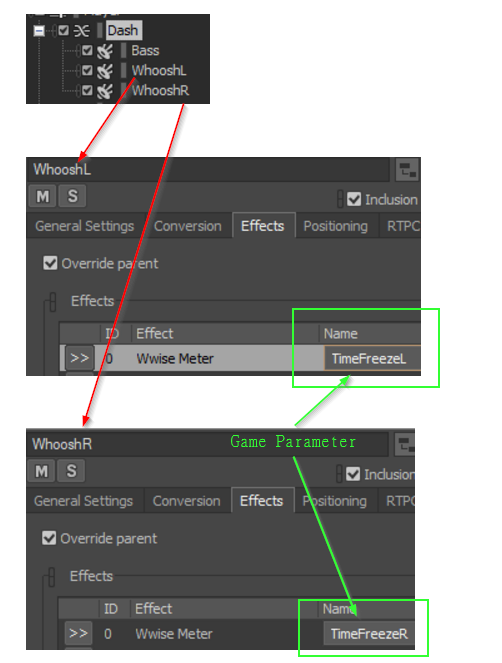
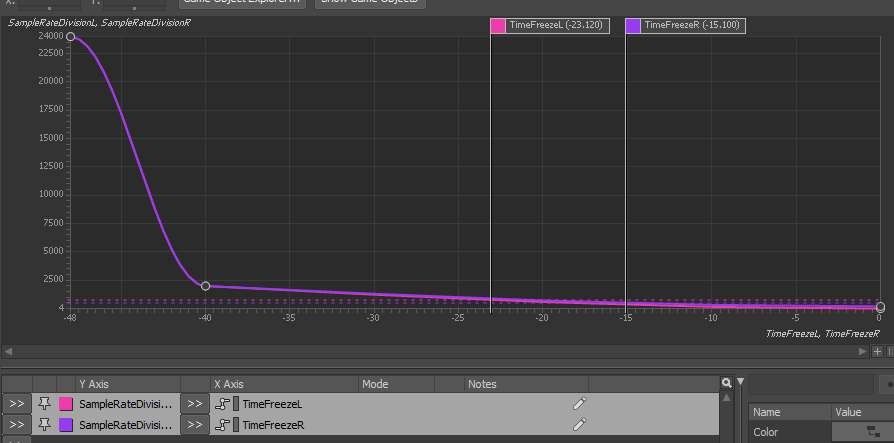
2. We need to create RTPCs for these two Game Parameters for HvSampleDivider, that we applied on the Music and Ambient busses, and then find the ideal curves.
3. The last thing we need to do is to pack and run the game to enjoy the results.
Celeste Demo
Here is how HvSampleDivider actually works in a game.
Note: I wrote the music, yeah ~
Notice that both the music and ambiances change as the character sprints. This is something that Wwise couldn't do. How great is that?
Further Thoughts
So far, thanks for reading!
Sometimes, I wonder: now that we have Max4Live, why can’t we have PD4Wwise?
Is it possible to integrate the Heavy compiler pipeline into Wwise? Will it be easier for the sound designers using PD to create plug-in-like audio assets in Wwise, just like how technical visual artists create shaders? If so, they would have their own HLSL!
Let’s wait and see!
A Little Surprise
By the way, all sounds except the music in this demo were created with SynthOne as the audio source.
There was something I was wondering about for a long time: Now that we had SynthOne, would we ever get SynthTwo or SynthThree?
Now I can make it by myself!
Enjoy FMOne!
Annex - List of PD Objects Not Supported by Heavy
These objects are not supposed to be used when you create blueprints, if you do there will be compilation errors.
| makefilename | polytouchout | netreceive | fft~ | print~ | filledpolygon | setsize | pd~ |
| value | midiout | glist | iff~ | delread4~ | drawtext | append | stdout |
| list | stripenote | textfile | rfft~ | pd | drawsymbol | scalar | rev1~ |
| cputime | oscparse | text | rifft~ | clone | plot | sigmund~ | rev2~ |
| realtime | oscformat | openpanel | log~ | block~ | drawnumber | bonk~ | rev3~ |
| expr | fudiparse | savepanel | framp~ | switch | pointer | choice | bob~ |
| midiin | fudiformat | bag | vline~ | struct | get | hilbert~ | scope~ |
| polytouchin | array | key | bang~ | drawcurve | set | complex-mod~ | namecanvas |
| sysexin | savestate | keyup | readsf~ | filledcurve | element | loop~ | template |
| midirealtimein | netsend | keyname | writesf~ | drawpolygon | getsize | lrshift~ |

Commentaires
Angus Barnacle
December 14, 2019 at 07:14 am
Thanks so much for documenting this process Chenzhong! Would be great to have the alternative path and object names for mac OS annotated too.
Angus Barnacle
December 14, 2019 at 07:14 am
Thanks so much for documenting this process Chenzhong! Would be great to have the alternative path and object names for mac OS annotated too.
Michael Iber
January 04, 2020 at 01:20 pm
Hi CHENZHONG HOU, great tutorial, worked flawlessly for me, thank you so much, best Michael
Julia Krueger
February 17, 2021 at 05:18 am
Hi!Great tutorial, but somehow I can't make it work. Is this still the only way to prepare Pure Data files for Wwise?