
When we recently gave our talk at MIGS, entitled Empowering Your Sound Designer, our purpose was two-fold. We wanted to discuss the audio toolset we had developed over the run of our soon to be released game, Anamorphine, and we wanted to discuss the unconventional place audio had in our overall workflow.
When Artifact 5 brought me on, we were still 3 years away from releasing Anamorphine - they actually needed help with an upcoming grant application, the success of which ended up seed-funding the company. This was a unique opportunity for me as the sound designer of the project - being brought in this early is pretty rare in game development, and it allowed my sound workflow to be built into the primary production pipeline, instead of being tacked on near the end as is so often the case.
This in turn allowed the programmers to work with me in building and iterating on a set of custom Unity-Wwise integration tools, which became invaluable as integration intensified. These tools, which functioned under an umbrella component we dubbed the “Audio Box”, allowed me to have a workflow in which I could conceive of a sound design or interactivity idea, and then create, integrate, and test it in-game before iterating on the original asset. I was able to move through this process from beginning to end as part of my design flow. Since I was able to work independently in Unity, I didn’t have to wait for programmers to complete audio tasks that may sit lower in priority than primary gameplay dependant coding tasks. The programmers, in turn, didn’t have to worry about squeezing in too many audio needs, and the end result was a complex and finely honed audio system integrated seamlessly alongside gameplay.
Obviously, Wwise already has a number of existing integration tools, but they only function for basic integration tasks and are scattered across a number of different tools and components. The Audio Box allowed me to have control over all of these existing functions as well as many additional functions, all from central Audio Box hubs which controlled entire gameplay sections. For example, Anamorphine is a game which has a lot of seamless scene transitions as part of its central mechanics. I needed sound to shift as seamlessly as the graphic scene transitions, and the Audio Box allowed me to move, shift, and control audio for complex transitions within centralized Audio Box controllers.
Let’s take a look at the actual toolset.
THE AUDIO BOX
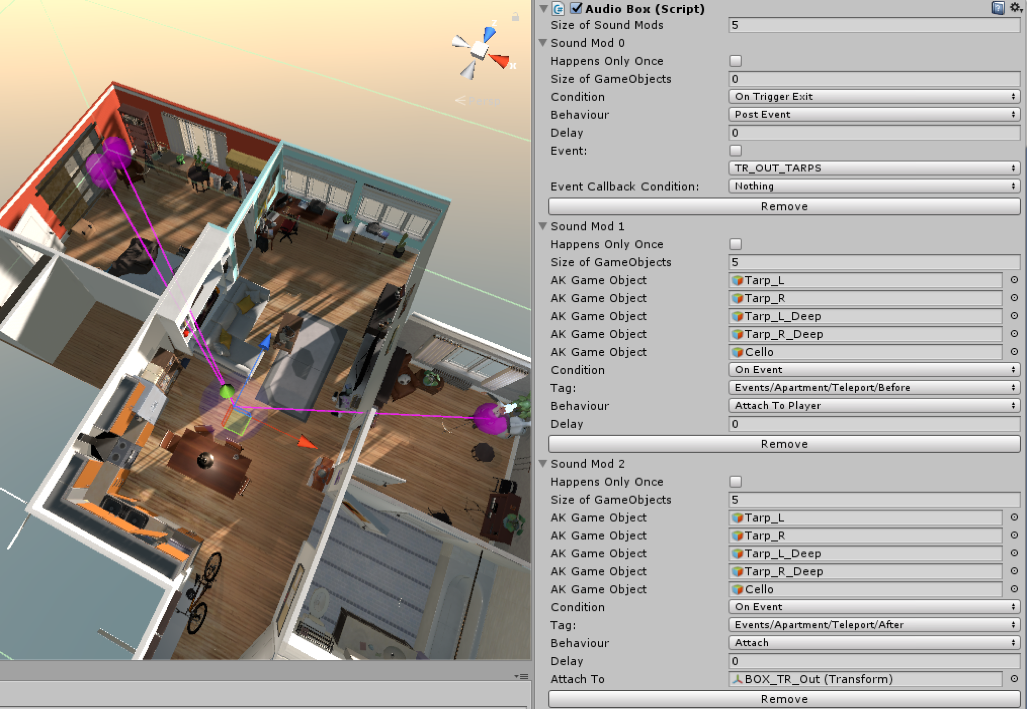
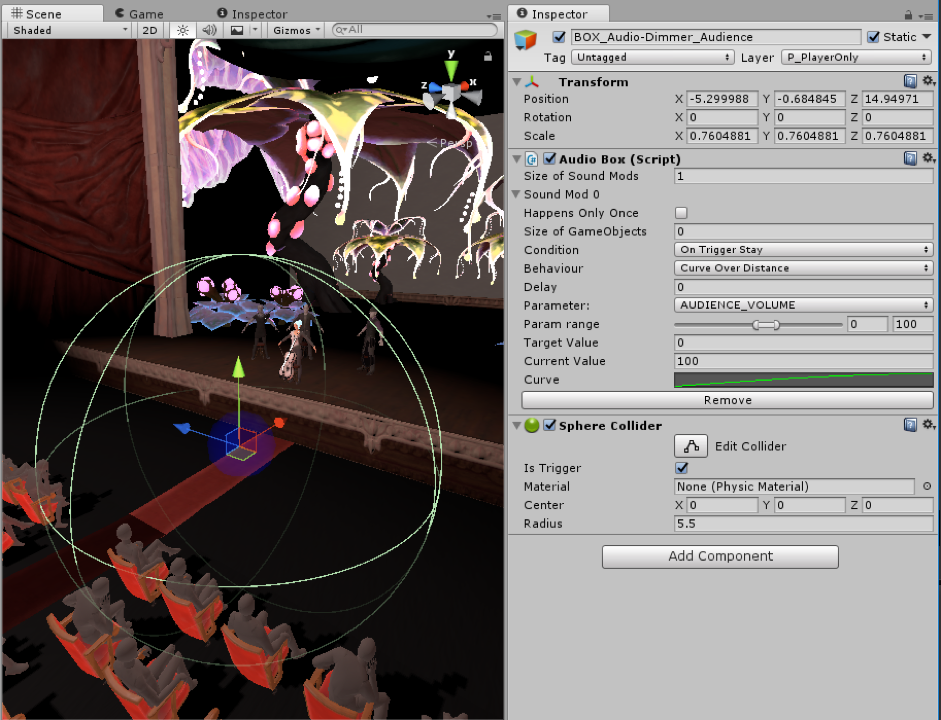
The Audio Box is a central hub which may or may not have a trigger collider, and which controls sections of game audio functionality. You can see the game objects which the Audio Box references by the purple spheres and lines above.
- An Audio Box contains a series of components, and each component has Delay and Trigger Only Once options.
- Delay lets me set a time delay for triggered events and Trigger Only Once is extremely useful for bug-prevention.
- I can put many functional components in each audio box, and I can put several audio boxes on a single game object, allowing me to sort Audio Boxes extensively by functionality set.
POSTING EVENTS
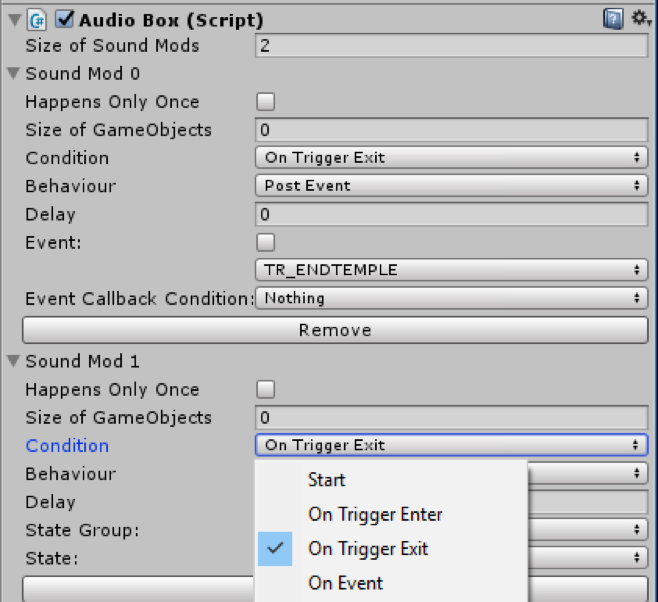
Most importantly, the Audio Box allows me to trigger Wwise Events. I can do this with a Trigger Collider (On Enter and On Exit), On Start, and On Event, which ties into a second toolset which the Audio Box uses known as the Event Tag System (more below).
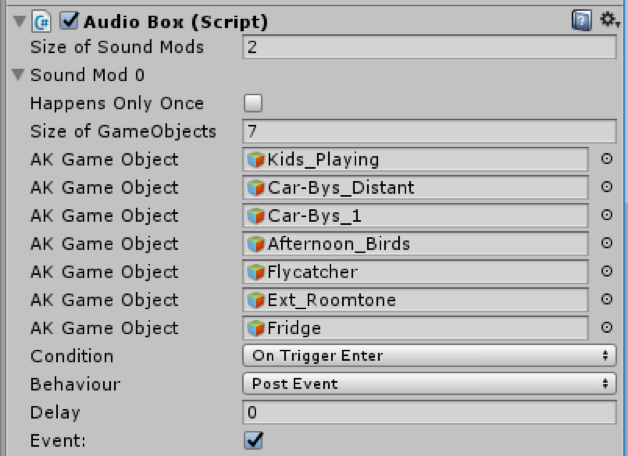
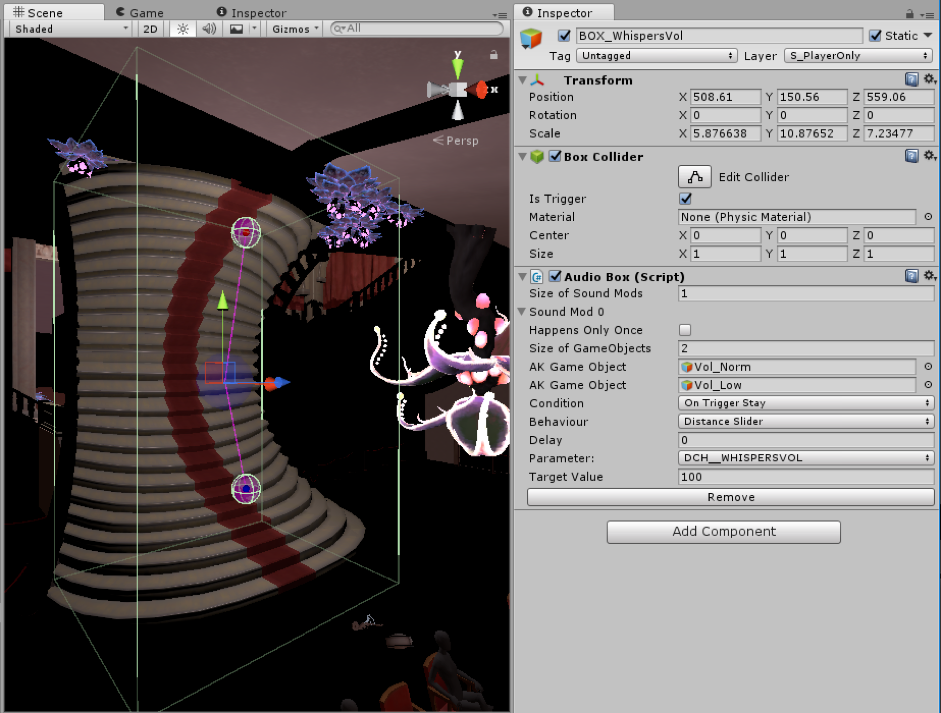
Something extra special in my ability to post events is that I can simply reference an existing game object with an AkAmbient or AkEvent component, and the Audio Box will pull it’s contained event and trigger it when programmed to. Referencing multiple game objects with a single post event component works wonders - each game object will have their own respective event triggered. This allows me to, for example, trigger environmental areas as the player enters them, or trigger a series of sound events when a single game event is triggered by the player. By unchecking the “Event” box I can also trigger events without having to reference any existing game objects by selecting the event from a drop-down menu inside the Audio Box.
SETTING RTPCs
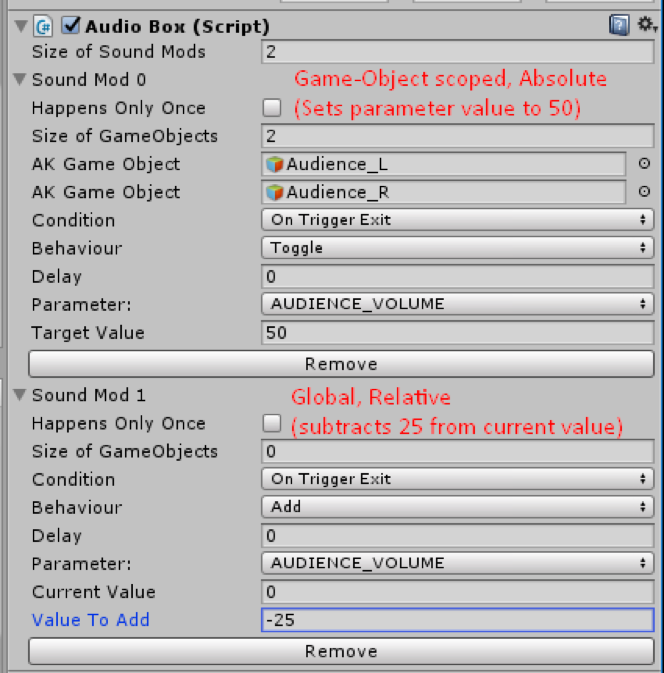
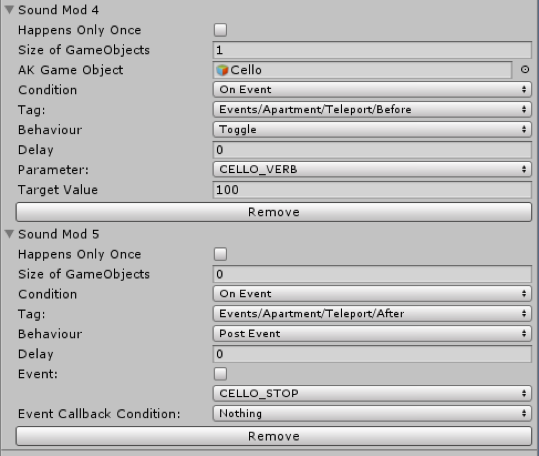
I can also set up and manipulate RTPCs using the Audio box. I have Absolute and Relative toggles for parameter changes using the Toggle and Add functions respectively. These can control parameters globally or at a game-object scope depending on whether I specify game objects within the component.
I also can trigger States and Switches

And where it really gets interesting is that I have some additional tools that allow me to shift parameter values according to player position.
Curve Over Distance sets up a parameter gradient wherein the center of the collider represents one extreme of the scale and the edge the other. Player movement through this trigger area will change the parameter value accordingly.
Distance Slider sets the parameter’s extremes at any two points set up by myself, and exiting the collider at any point will set the final parameter value as its current value.
ATTACH / MOVE-TOWARD
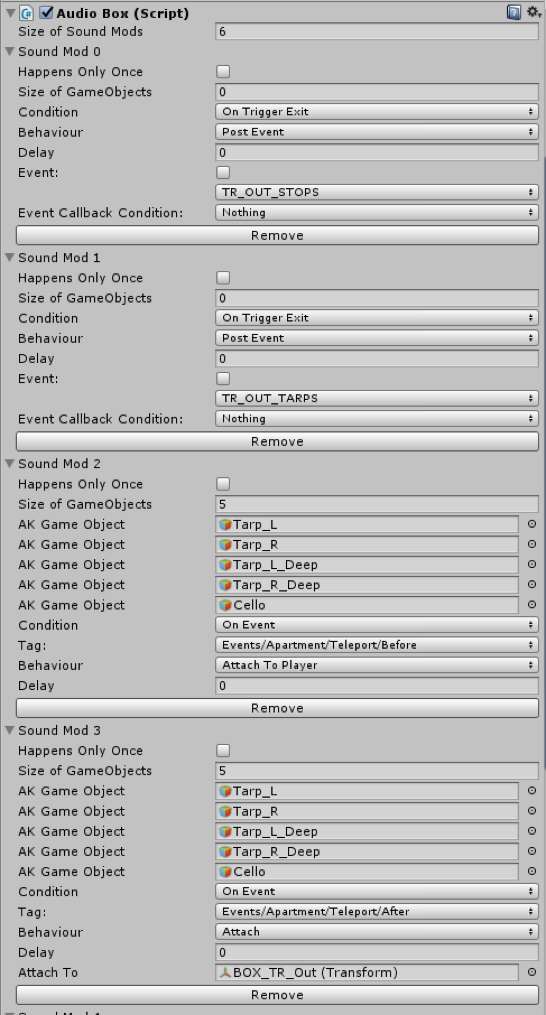
The Attach and Move options added a whole new level of functionality, which became extremely important to my work in Anamorphine for their ability to move audio game objects through transitions and between scenes.
- Attach can attach a game object of my choosing to another game object as long as they live in the same scene.
- Attach to Player allows me to attach any game object to the player, regardless of which scene the character controller lives in.
- Move to and Move Toward Player move one game object toward another or toward the player at a speed of my choosing.
These tools collectively allowed me to travel 3D positional audio sounds relative to the player and according to player actions.
In the screenshots below you can see how I’ve set up a seamless scene transition, using a combination of the Audio Box tools discussed above to dissolve the sound of the previous scene seamlessly into the next. I’m triggering the Attach functionality via an Event Tag triggered by the code scene rather than on Trigger Exit, so that those sounds are attached to the player before the player teleports.You can hear a version of this in the MIGS video.
THE EVENT TAG SYSTEM
The “On Event” trigger functionality demonstrated above links into a secondary toolset known as the Event Tag System, and this is what allows me to trigger audio according to many other in-game triggers such as animation events, story decision points, and so on.
The Event Tag System is a simple event system that couples events to actions. Components within Unity must support events or actions internally so they can then be registered using a tag that typically takes the form of a path such as:
Events / Apartment / Teleportation / Before
Actions and events can have a “many to many” association, which is to say a single event or action can register through many tags and a single tag can be associated to many actions or events.
Cross-referencing between scenes is not allowed in Unity and this system allows us to bypass that limitation and interact with events being triggered in other disciplines’ scene sets. This is what allows each discipline (Art, Code, and Sound) to work in their own respective set of scenes, minimizing Git conflict issues and allowing for parallel workflows.
IN CONCLUSION
The audio box grew organically with the project but came to define the sound workflow and became a valuable asset to me as a sound designer. As I thought of new needs, the programmers added to or adjusted the Audio box as required. New adjustments were flexible and often enhanced my workflow across the board, not just for the single-case instance for which it was designed.
As such, small amounts of effort early in the project led to huge gains for the whole team down the line, and the audio workflow functioned efficiently alongside the growth of the project as a whole.
Moreover, by bringing sound in during the pre-production phase of the game’s design, integral gameplay, storytelling, and game-feel decisions were made with an ear to sound and its strengths. The formulation of the Audio Box so early in the development process, and imbued with specific game ideas in mind, ultimately made for an aesthetically unified game experience strong in immersion and emotion.


Commentaires
Jeremy John Butler
January 30, 2018 at 07:54 pm
This is really great Beatrix, some strong work indeed! In Shanghai we would say "Jai You"!
Beatrix Moersch
February 01, 2018 at 01:41 am
Thanks Jeremy!
David Vazquez
July 12, 2018 at 11:48 pm
Hi Beatrix. That is really cool. Is the audio box on sale anywhere? It wold be very usefull for other designers with nearly zero programming skills like me.