
This article was originally published on gabrielgallardoalarcon.com.
A short jam with the system running. The audio in the videos has been decoded from ambisonics to binaural. The use of headphones is highly encouraged.
In this blog entry I will explain how I tried to apply the Ambisonic audio workflow with Unreal Engine for a school project, how I failed, and how I used that failure as inspiration for trying out something entirely different.
Initial thoughts and exploration
I originally envisioned a generative sound piece that would control the movement of visual objects in Unreal Engine, all in real-time. These visual objects would move in a 3D scene and emit audio. The audio would then be encoded to ambisonics and then decoded using IEM plugins in REAPER, to then finally reach the output through the multi-speaker setup at the Audiovisual Media laboratory (AVM) at my University. My main intention was to get familiar with both Unreal Engine 5 in general, its new DSP audio rendering graph called MetaSounds, and the possibilities of spatial audio for live performances of experimental music. Very soon I encountered roadblocks. Playback of ambisonic recordings in Unreal is pretty straightforward, but it seems that the playback of audio objects encoded into ambisonics outside of the engine is not.
After spending several days researching and asking in numerous forums without an answer, I decided to implement Wwise into the project and try something slightly different. I’ve used Wwise and ambisonics successfully in the past, but I didn’t want to rely on it because then I would need to use samples for my composition, while what I really wanted was to try out MetaSounds' synthesis capabilities. Nevertheless, Wwise offers a wide range of possibilities for open-ended composition and is capable of managing ambisonics up to 5th order. My first tests were successful. Thanks to REAPER’s ReaRoute and its ability to transmit up to 16 channels of audio between applications, I was able to transmit a third-order ambisonic stream for decoding:
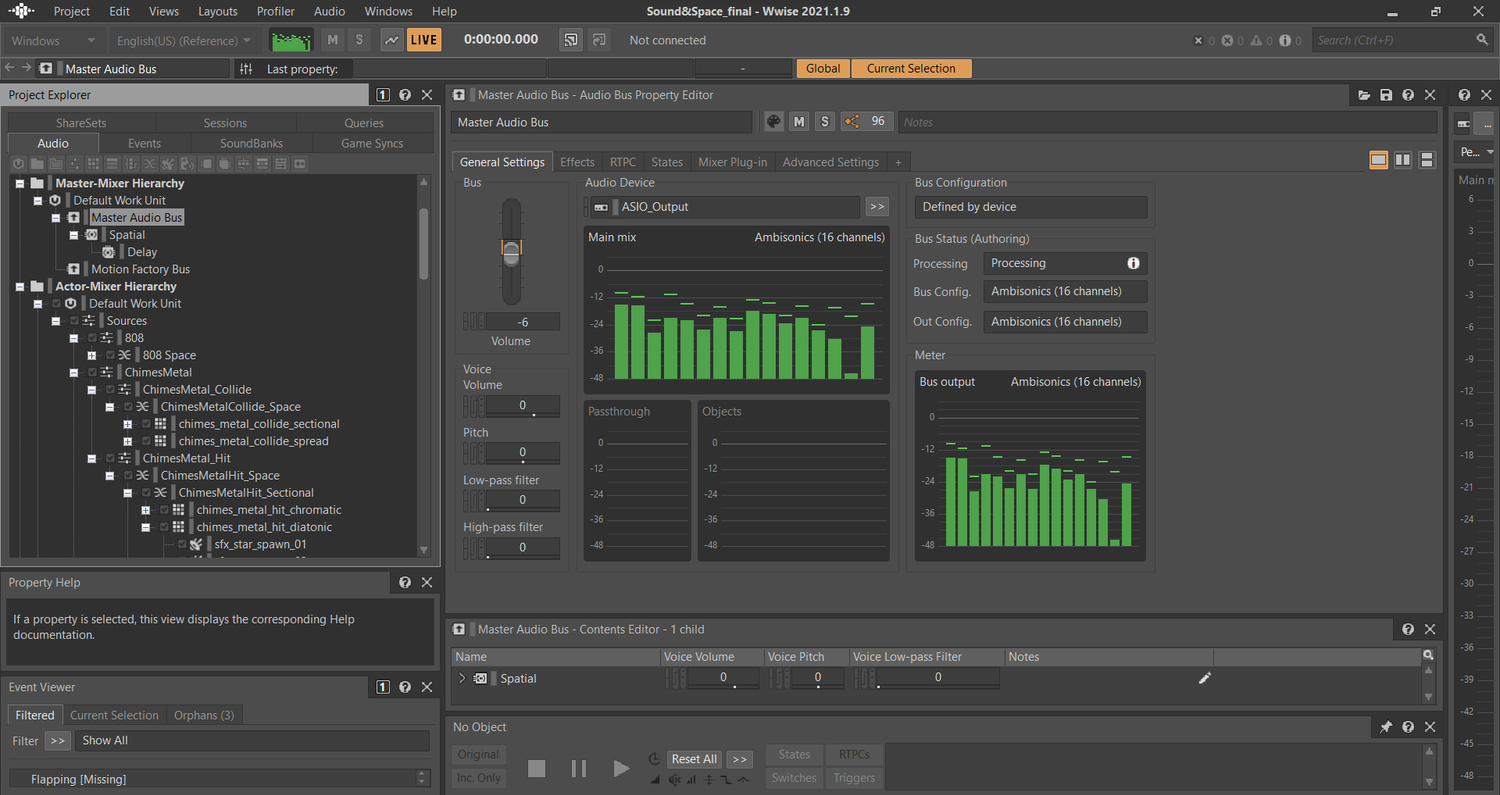
3rd order Ambisonic Bus in Wwise
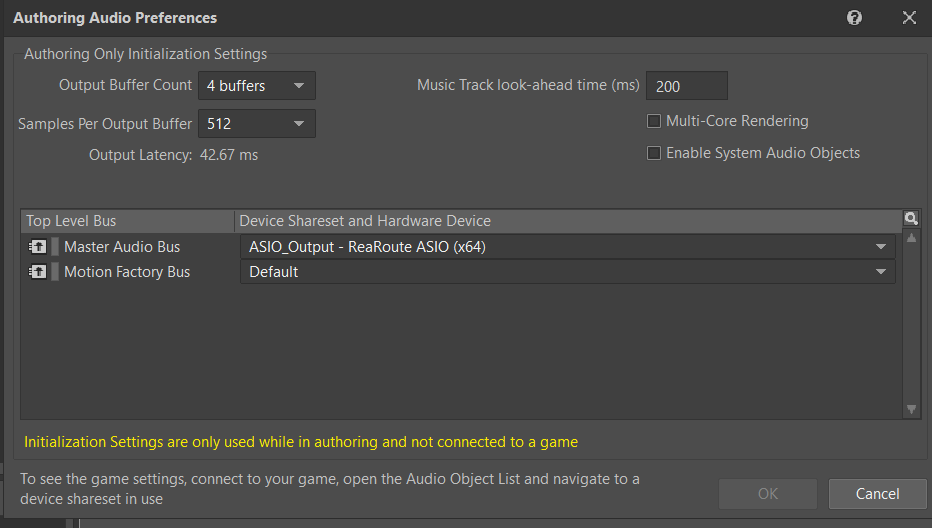
Using ReaRoute as Output
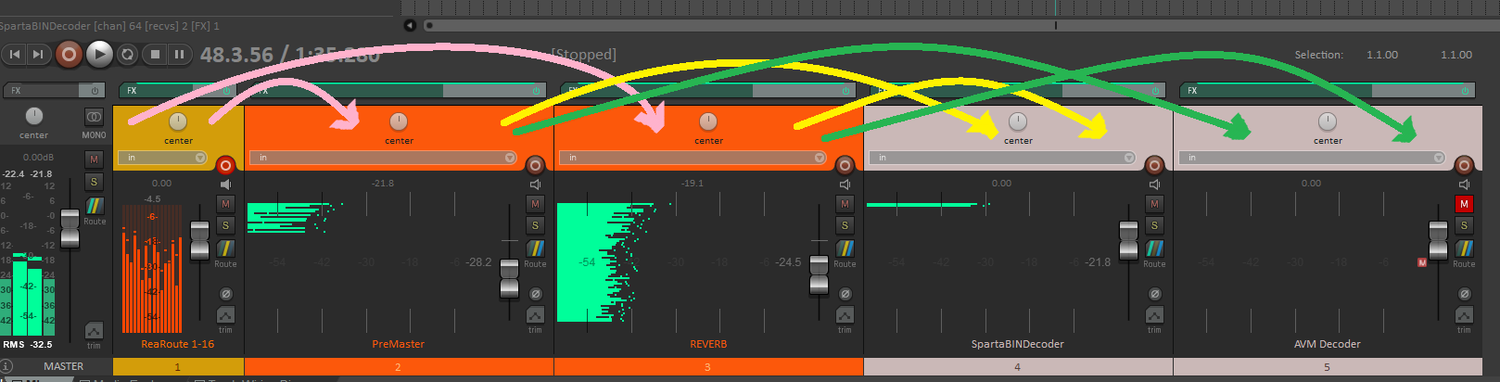
Receiving the Ambisonic stream inside REAPER and distributing it for decoding.
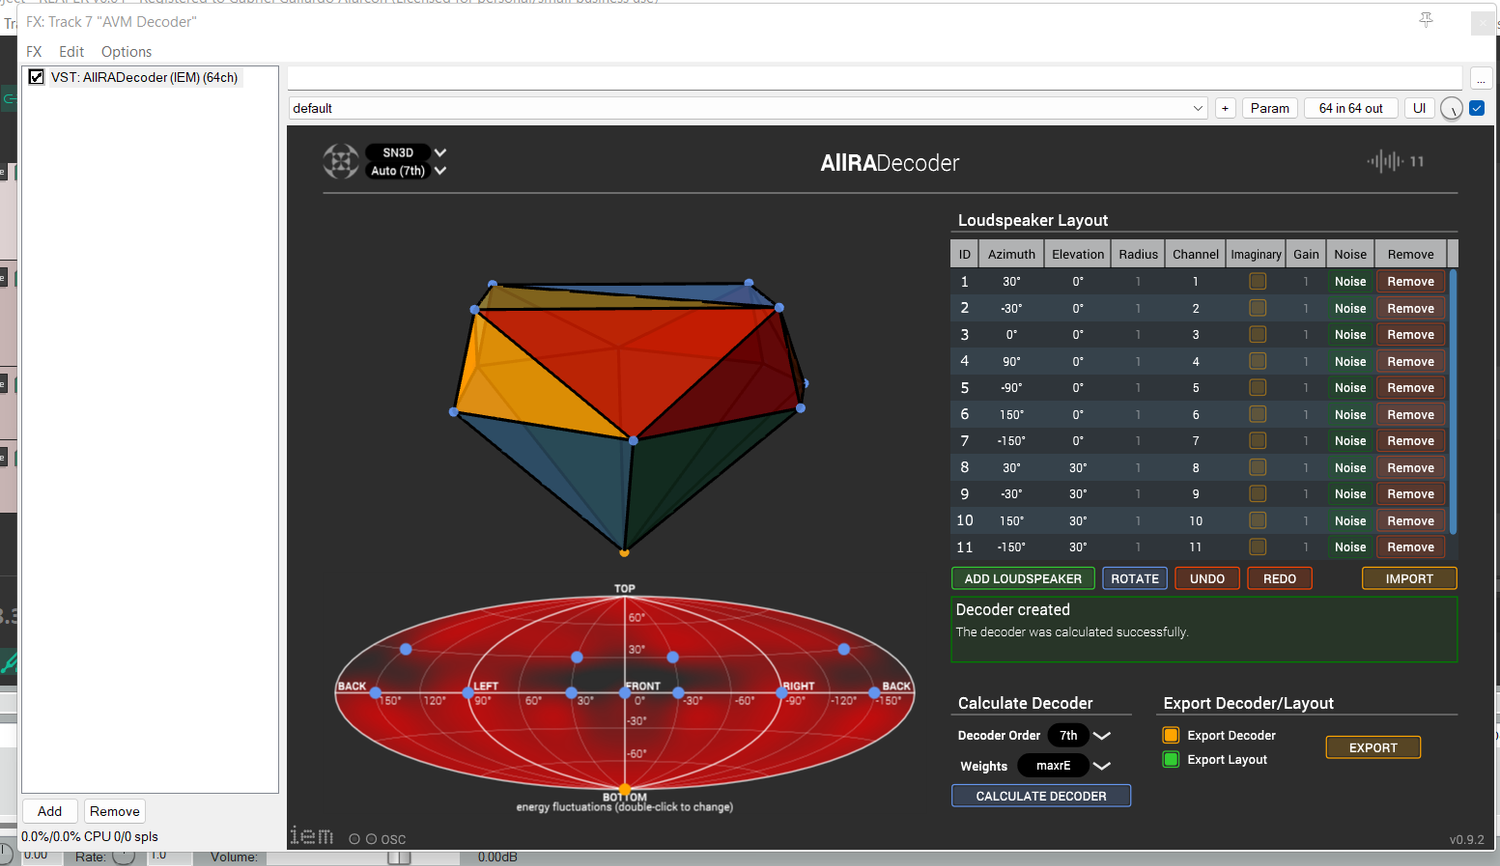
I used IEM’s AIIRA Decoder for outputting ambisonics into the AVM’s custom speaker setup..
Unfortunately, a new roadblock appeared. While Wwise works fine when transmitting spatial audio to external applications by itself, the situation changes when the engine works alongside UE5. Every time I tried to test the audio with Unreal, my Master bus in Wwise stopped recognizing ReaRoute and reverted to stereo.
|
AudioLink is a new protocol in Unreal 5.1 that allows for sounds from Unreal Audio (including MetaSounds) to be mixed by another audio engine, such as Wwise. This functionality did not exist when this article was initially published. |

Audio reverting to stereo when using Wwise alongside Unreal, and ReaRoute disappearing as an endpoint option.
After searching once again through forums and QA posts, I found this thread that appeared to have similar issues to mine. The thread was never officially answered, but the author followed up with a solution that involved engine code modifications in Wwise. I am not a programmer, but I tried to follow anyway, unsurprisingly without success. I also sent a message to Michael G. Wagner, Professor and Department Head of Digital Media at the Antoinette Westphal College of Media Arts & Design, who I follow because of his very useful Spatial Audio tutorials on YouTube. He replied that it is possible to write your own Audio Device and make it work with Wwise by creating a script. I realized that the difficulty and scope of the project were way over my time constraints, so I abandoned it.
Exploring Wwise as a tool for live electronic performance
After these setbacks, I reconsidered my approach. I was not gonna be able to complete the project if I kept trying to make unfamiliar tools work the way I imagined. At the heart of my goal was the exploration of immersive audio and interactivity. I decided to maintain that core while reevaluating the execution and think more about the possibilities of the tools I already had working (Wwise, REAPER, and IEM plugins).
Wwise works by deciding when and how sound events should be played back by grouping sound files into containers that have certain specific characteristics (e.g. a “Random Container” will choose a sound or container from all the sounds that are contained in it at random, according to certain rules that the user decides; a “Blend Container” will crossfade between the sounds or containers as specified by an external control parameter, etc). These containers can then be grouped into “Events” that define the final logic and behavior of when and how these containers are chosen to be played by the system. Usually, the game’s code decides when to fire these events, and an analogy to live performance can be easily drawn: if the game’s code is the performer, Wwise is the launchpad.
Fortunately for us, Wwise offers the possibility of mapping MIDI messages to events inside of the authoring tool. Unfortunately, the mapping method is very cumbersome when compared to what you can find in other tools that have been designed with live performance in mind (e.g. Ableton Live). Wwise’s MIDI mapping is meant for testing, so the sound designer can easily and freely fire many events at a time without having to execute game code first. This works well when launching simple one-shot events, but doesn’t let us map (or at least I haven’t found a way) other important features that Wwise offers like switch and state changes, or real-time 3D positioning and attenuation simulation. Another disadvantage in comparison with traditional music performance software is the lack of a global clock. BPM can be taken into consideration while designing sound behaviors inside of what is called the “Interactive Music Hierarchy”. While I didn’t actually try to map MIDI to BPM in the Music Hierarchy, I always considered the Music Hierarchy limiting, since the tools there focus on the treatment of long pre-rendered audio, and I like the more granular approach of the Actor-Mixer Hierarchy. Clock, positioning and switches were all fundamental operations, so I had to find workarounds.
Sending MIDI
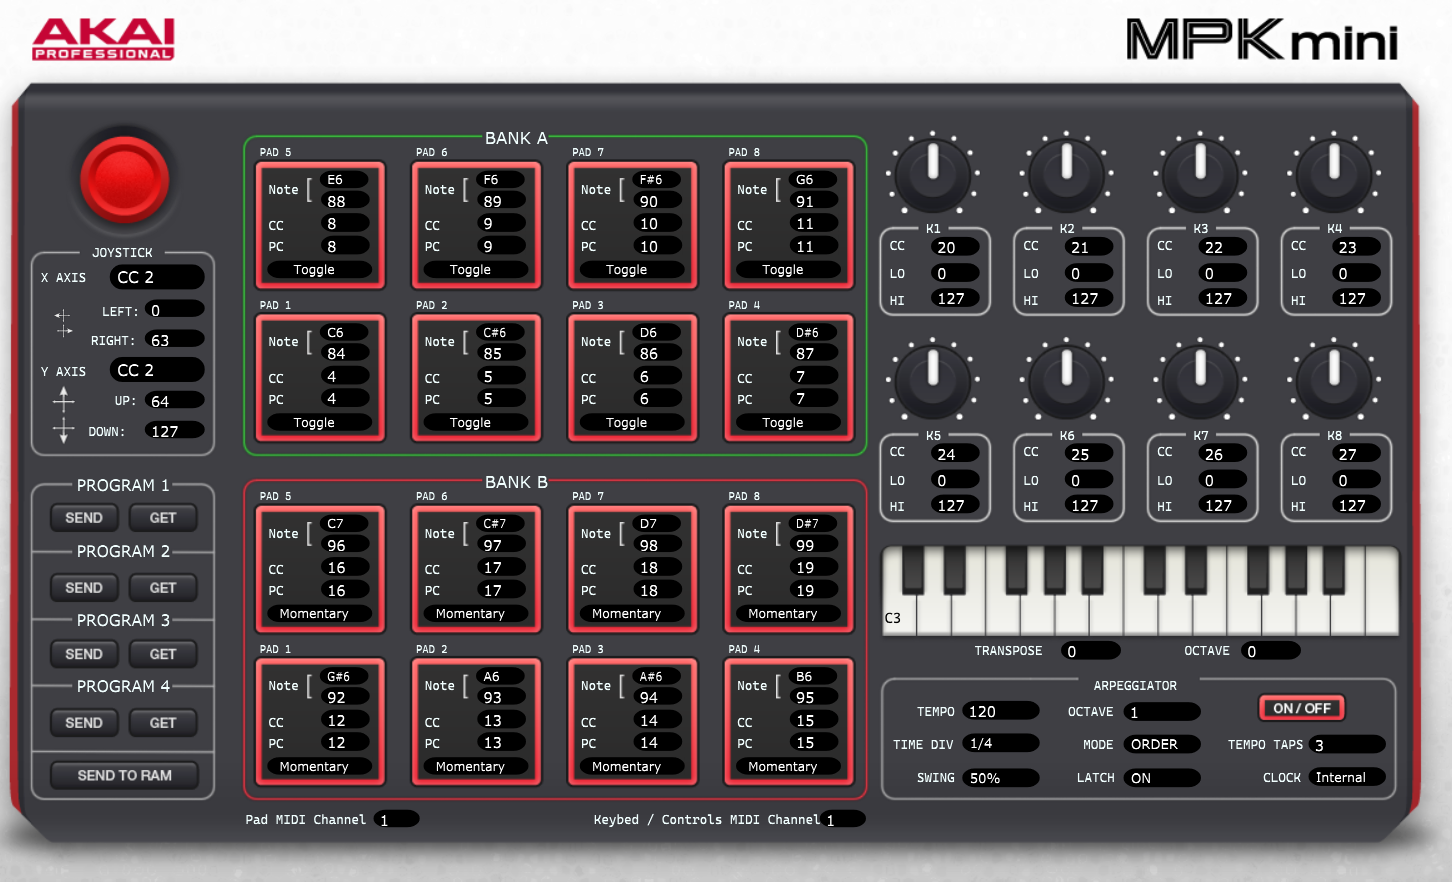
A custom configuration of my MIDI device
After selecting, editing, and implementing my samples in Wwise, I started creating events without logic, and I populated my containers. The behavior of these was in constant iteration and required fine-tuning of settings until the very end of the process. Creating the events first allowed me to start mapping them to MIDI messages from the beginning and do fast testing and iteration while trying out my container behaviors.
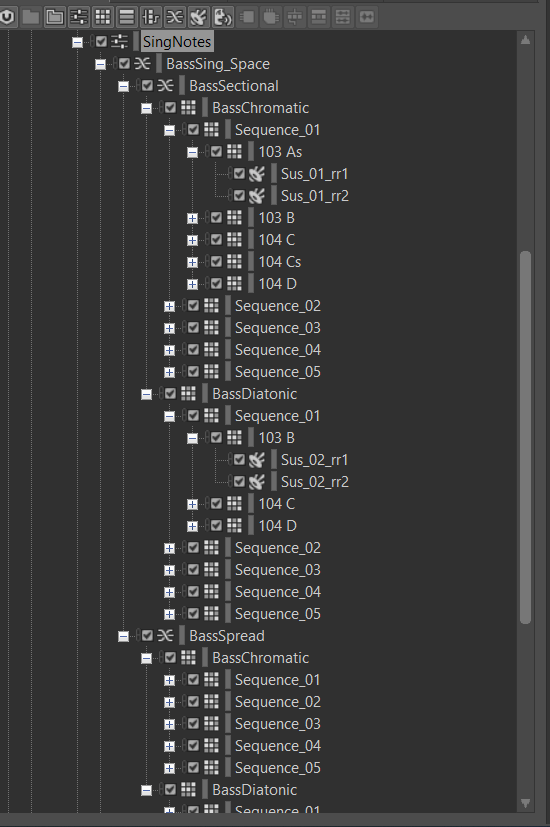
Some of the structures of the sample instruments I created. They ended up using several levels of inheritance.
The next step was to hook up my MIDI controller and configure it so it could work as intended with my behavior structure. I chose to work with my Akai MPK Mini for two reasons: first, it offers the ability to customize the entire layout to choose what messages each knob and pad sends individually; and second, it has its own clock that allows for a variety of different arpeggiator modes and speeds. The fact that I was able to tap tempo and change subdivisions on the fly was very important to give my sequencer musicality and variability.
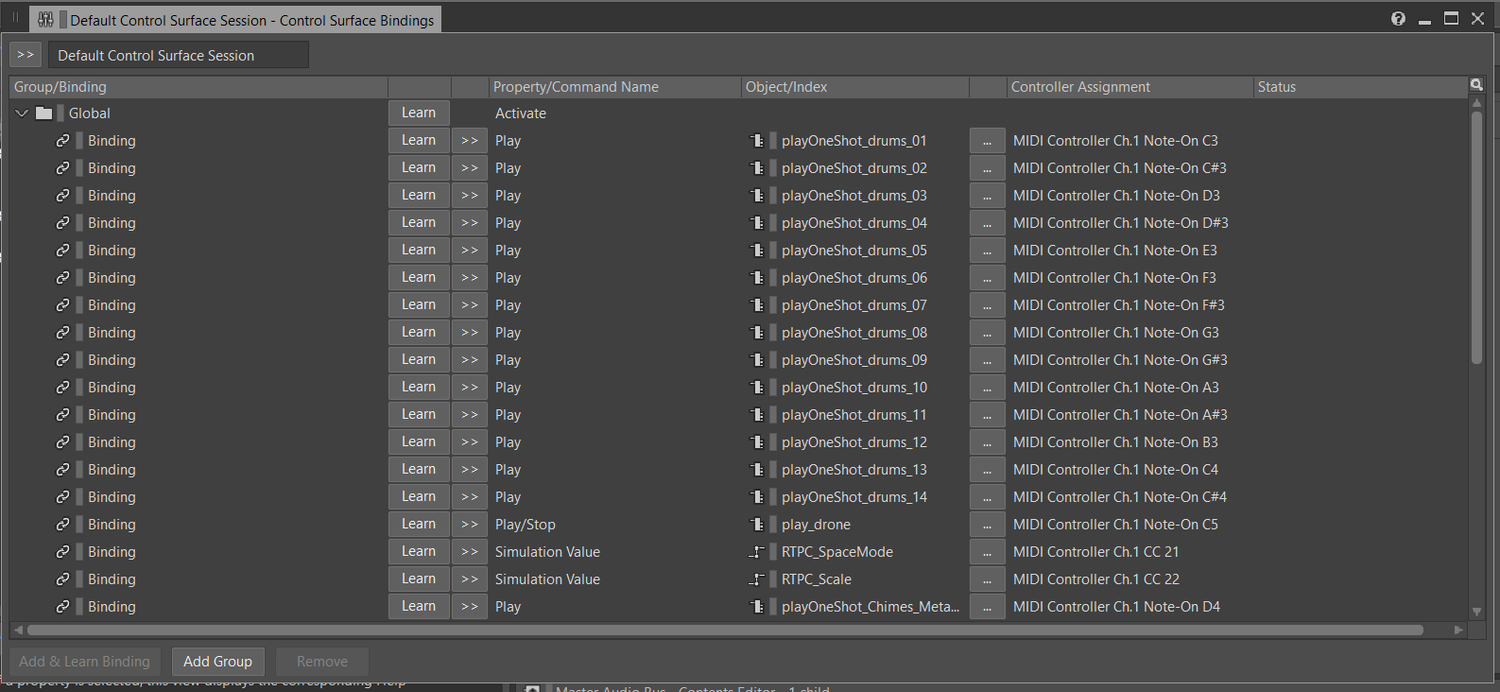
MIDI mapping in Wwise
After configuring my controller, I started mapping the events I created to different MIDI notes as I found it more comfortable to play.
Selecting musical scales
The next step was to work on the behavior of my pitch content. Originally I planned to make everything chromatic but then I considered the possibility of having two modes: one chromatic and one diatonic, for more variation. This would require the programming of two different states, which as mentioned before were not accessible for MIDI mapping. The solution was to use the Blend Container and crossfade between two Random Containers of notes (one containing all 12 tones of the scale, one containing only those of the C major key), and a Real-Time Parameter Control to go from one container to the other. Since RTPCs do offer the option to be mapped to a specific CC value range, I was able to control this feature easily with a knob.
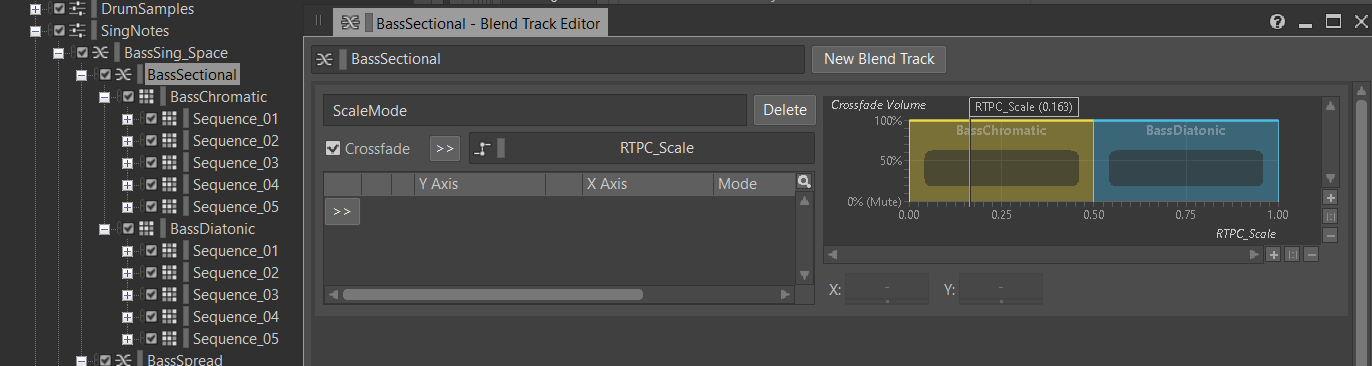
In this example, the Bass voice of the choir can switch between scale modes thanks to a Blend Container.
The challenge of spatialization
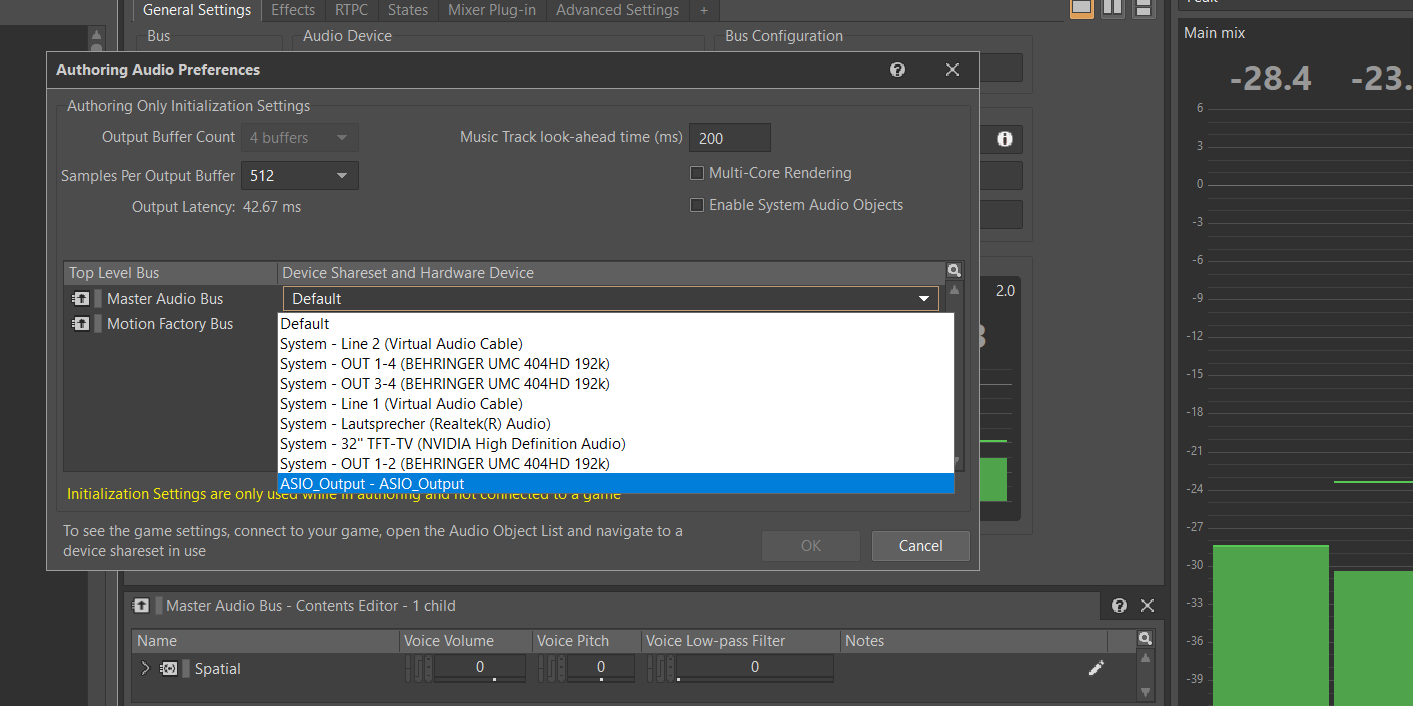
Despite its powerful spatialization engine, Wwise is dependent on a game engine to receive coordinates about the location of sound emitters in space. When no game engine is connected to Wwise, the user can still simulate positioning by using 3D panners or attenuation previews. Although useful for testing and debugging, these tools can only be manipulated via mouse, and as far as I know, no MIDI mapping is offered. This limitation makes real-time spatialization for my specific purposes really challenging, so I needed to find workarounds.
Unfortunately, I didn’t find a way of mapping panning previews to MIDI CC inside of Wwise authoring.
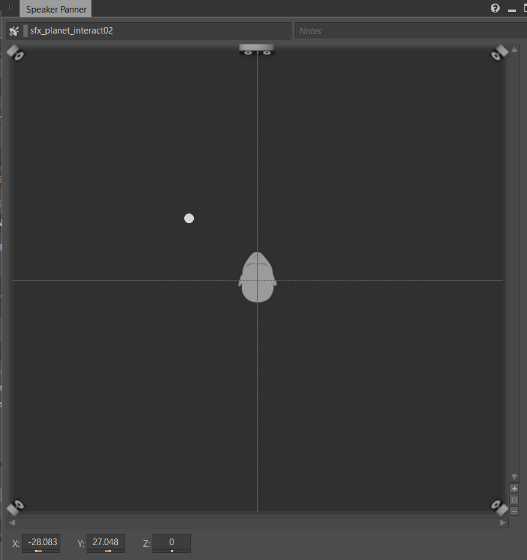
My initial approach was to set my sources to specific points in space as starting points and then program certain default movements. In Wwise, this can be achieved by making use of the “3D Position” section in the “Positioning” tab of a sound or container. From there, when “Emitter with Automation” is selected, a new window can be opened. This window offers the possibility of predefining positions in a simulated 3D space and by defining points in space and time (in a similar fashion as how keyframes work in animation) it is possible to draw a path for the sound to navigate through in a defined timeframe.
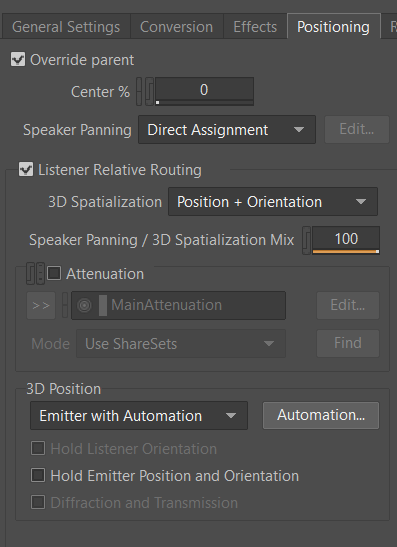
The “Positioning” tab in Wwise
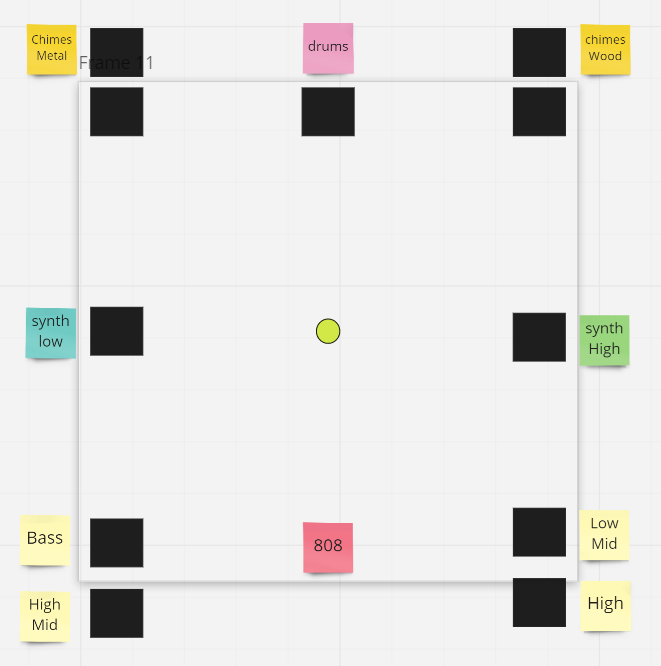
The initial position in space of my sources. I organized them with the layout of the AVM in mind.
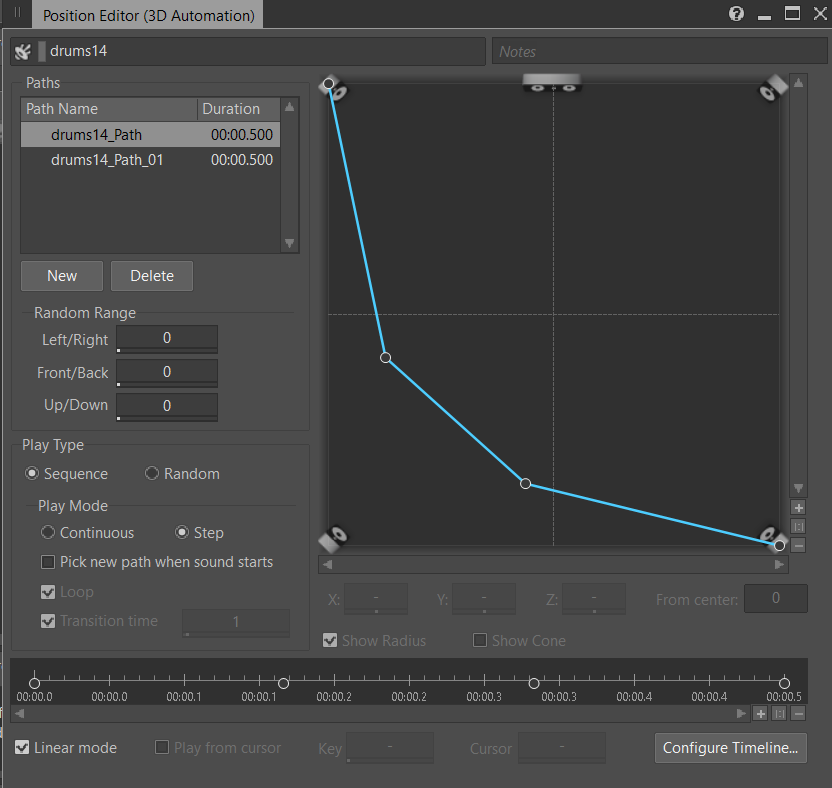
A spatial automation path for a sound in Wwise
This method offered me a way of spatializing sounds in a more creative way, but I still didn’t like the lack of control. I expected that having my sources moving all the time in predefined paths would end up cheapening the whole experience very fast. To try to counteract this problem I decided to use the same Blend Container method as before and created another RTPC that I called “Spatial Mode”. This parameter acted as a sort of “on/off” switch for the moving paths, so I could at least decide when to start and stop the movement of sources through space. I achieved this by populating the container with two versions of each sub-container: one that only had initial positioning data (indicated by the suffix “Sectional”) and another that contained movement automation paths (suffix “spread”).
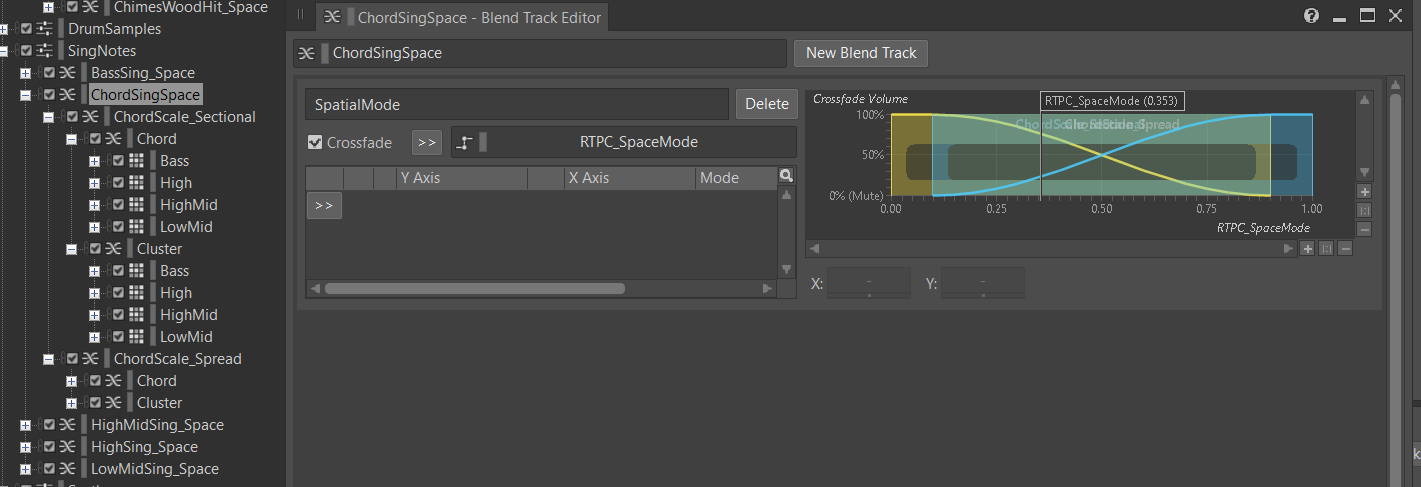
My second RTPC blend control for turning on or off
Exploring spatial granularity
Building upon the work done until then, I adventured a bit further and tried to figure out less obvious solutions for spatialization. The path automation window lets you store up to 64 paths in a list. Every time an event calls the object that contains the automation, a new single path in the list is chosen, and the user can decide if the event cycles through the list sequentially or at random. This gave me the idea to explore the possibilities of spatial “granularity”. I wondered if an illusion of fluent movement in space could be made out of many static positions being fired rapidly. I decided to test out this with percussion sounds because of their brevity. I filled up the list of some of my percussion samples with static positions that together made for individual steps of simple shapes like circles and 8-figures, or that moved in parables through the X and Y axis. The clock of my MIDI controller is capable of firing up to 1/32T notes at 280 BPM. The results were positive and I was able to control the speed of the movement by changing the clock of my arpeggiator or by manually firing MIDI notes. This capability gave my set more unpredictability and dynamism, and although admittedly limited, it allowed me to have some agency over the spatial component of the performance. I would certainly like to make more experiments with this and other concepts in the future since I believe I only touched the surface of what Wwise could offer for performative spatialization.
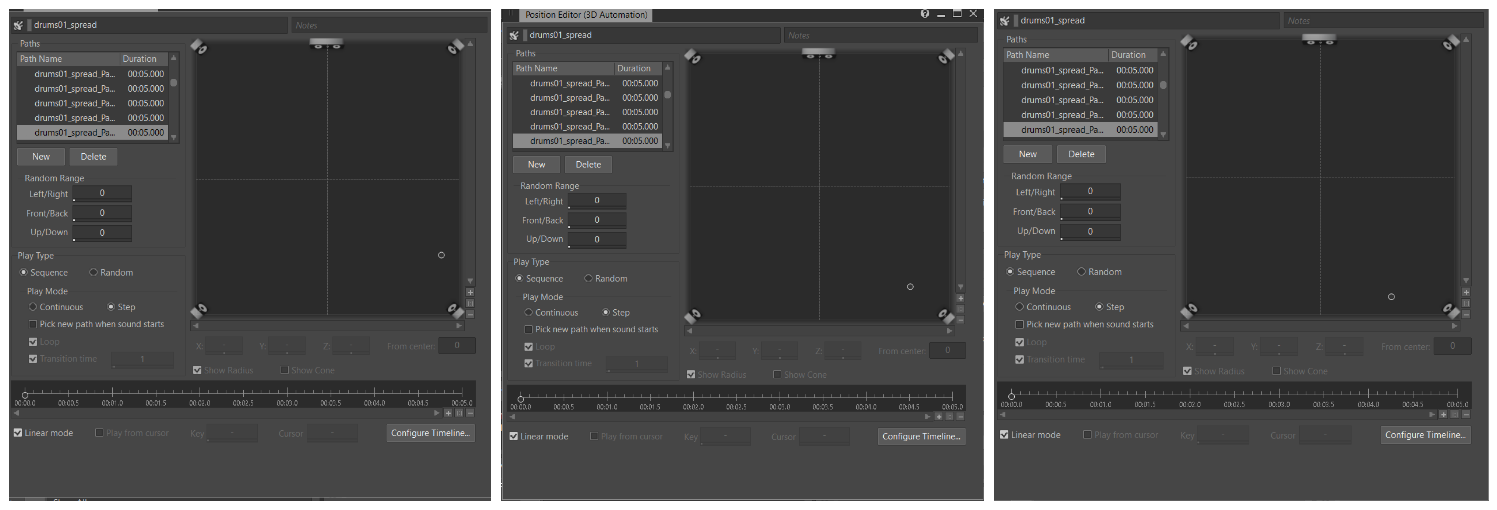
These three pictures show three different static path points on my kick sample, which moves only circa 6º at a time in a circle each time the “playOneShot_drum01” event is fired by MIDI.
Effect controls
After deciding on the spatial behavior, I started working on effect groups. Since I was running out of time, I didn’t go too deep, but I managed to map two effects of my drum group to knobs in my MIDI controller: Low-pass filtering and Pitch transposition. I was especially surprised about how well Wwise manages pitch shifting in real-time, in a range of +/- 24 semitones. I believe both parameters gave my sequencer an extra layer of expression, but I would like to explore more in the future.
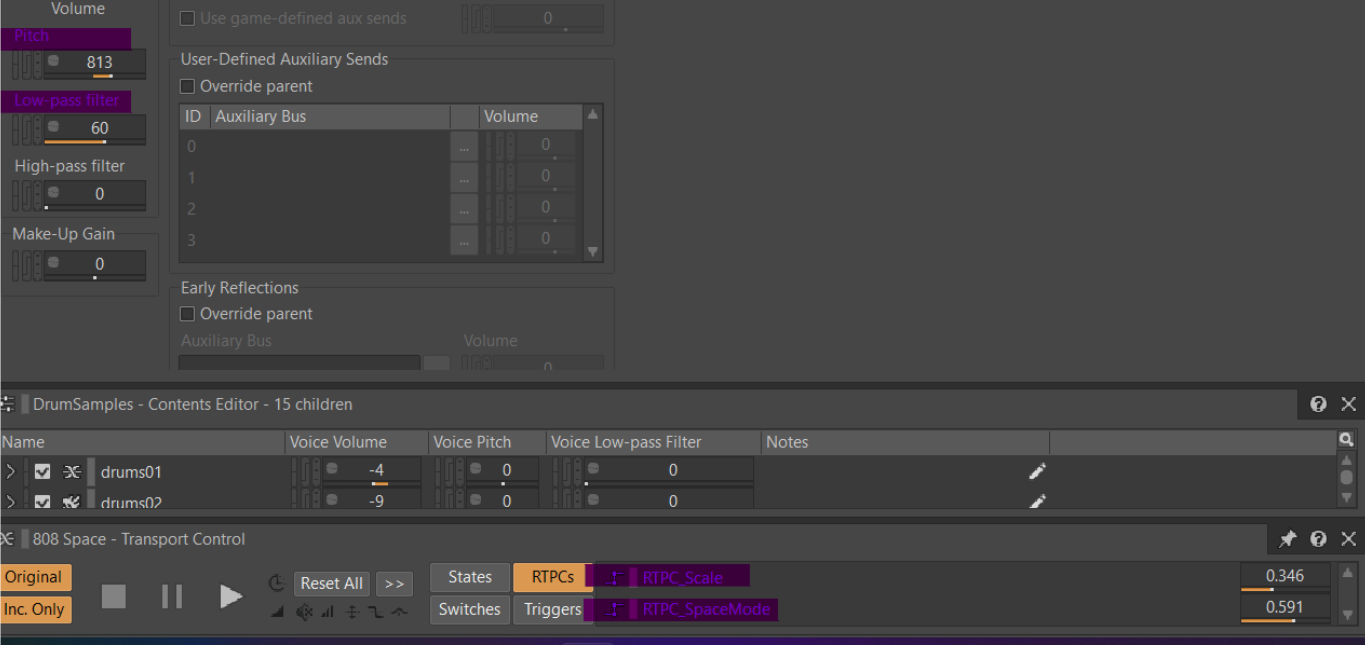
The four parameters I mapped to my MIDI controller.
Conclusions
This project taught me many lessons about spatial audio, but also live electronic performance. Ambisonic audio in Wwise worked very well for this specific setup but I think it would be nice to see the possibility of using VST plugins in audio buses in the future. I would prefer to decode the Ambisonic stream into a custom speaker setup directly inside of Wwise, instead of sending that stream to REAPER to be then decoded with IEM or Sparta plugins. As much as I love REAPER, adding extra software only for playback adds a level of complexity that could easily be avoided if Wwise worked with third-party plugins as a regular DAW. This is especially annoying in Windows, where specialized (and often temperamental) third-party software is required to stream audio from application to application.
On the other hand, I was pleasantly surprised with Wwise and how it works with MIDI input in its authoring environment and I see great potential for creative uses that go beyond game audio implementation. That being said, I believe this potential is cut short by design. I had experience with Wwise before, mainly working on small game projects, and this surely helped me to find alternative solutions to many cumbersome problems. As the popularity of the tool (and the relevancy of interactive audio in general) increases, I hope the team at Audiokinetic realizes the potential and starts to offer more functionalities and better workflows for other types of interactive audio experiences. This exercise showed me that there are a multitude of things that Wwise does much better than established tools like Ableton Live or Logic Pro, but until better workflows are not implemented, that potential will never be realized.
Note: The reader can watch and listen to more examples of the sequencer in action by following this link. The audio in the videos has been decoded from ambisonics to binaural. The use of headphones is highly encouraged.
Comments
Simon Pressey
February 15, 2023 at 10:30 am
Wwise does decode ambisonics in real-time/runtime and you can use the Wwise ASIO output plugin map to a multichannel speaker configuration that you can specify that matches your speaker setup.