
Now that ReaWwise has been released, we thought it would be a good time to share a bit about the process of creating this REAPER extension. This is a two-part blog series; this first part covers the pre-production process of the ReaWwise project, and the second part will go through the development of the extension.
Why We Chose REAPER
The game audio industry has high expectations and very particular needs for a DAW. In the vast majority of DAWs, the workflow is based around a timeline. How can a timeline-based workflow be utilized for interactive bits and pieces?
Here are a few elements that can make a DAW successful for game audio workflows:
- The ability to export content of various forms in batches
- A customizable interface and workflows
- Extensibility
- Ease of automation or scriptability
- Fast, lightweight, and portable
REAPER ticks all of these boxes. Cockos, the company behind REAPER, has been listening to the community. This might be one of the reasons why REAPER is the rising star of DAWs for game audio needs.
Where It Started
We had the idea of making a REAPER integration for a while. It first started with the Reaper-Waapi-Transfer by Karl Davis (@karltechno) a few years ago (https://github.com/karltechno/Reaper-Waapi-Transfer). This project demonstrated that it was possible to have a workflow to transfer audio files from REAPER to Wwise. We wanted to push this idea further, and make it even more accessible.
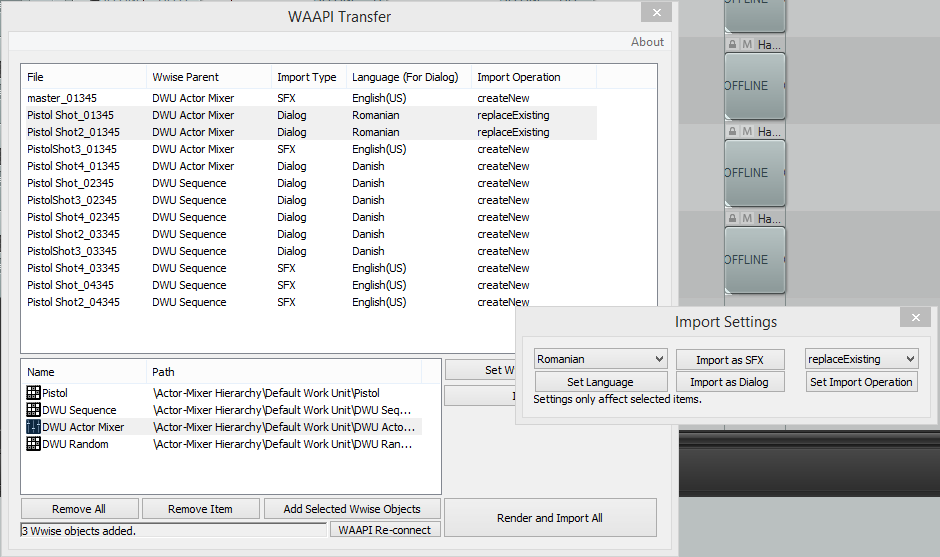
WAAPI Transfer
Knowing that REAPER is gaining traction in the game audio community, we knew we had to make a move someday, but first, we wanted to understand how people in the community use REAPER.
Understanding the Use Cases
We started our research by interviewing sound designers at a couple of studios to understand their workflows, how they organize their content, and also how they customize REAPER. These were some of our observations:
Custom User Interface: While REAPER is super flexible, straight out of the box, it doesn’t provide an optimized workflow for game audio. Studios need to spend time customizing the user interface and workflows to make REAPER feel like home.
Timeline as a Canvas: Most users use the timeline as a big canvas for sound design. REAPER makes it easy to import, sketch and rearrange clips on the timeline. REAPER allows for frictionless and free-form sound design.
Regions: The regions are commonly used to delimitate the individual areas in the timeline. They often correspond to the export boundaries. Regions are also used to store metadata. It is common for REAPER projects to contain dozens of regions, if not hundreds. Naming conventions are also used for the region names, as the region names might be used in the render settings. Regions can be used to identify different variations, different versions, or different states/switches. For example, in a footstep project, the regions might contain multiple variations and multiple surfaces (concrete, grass, rocks, etc.).
Tracks: People not only use the horizontal space as a canvas, they also use the vertical space for organization. The tracks can be used to structure the data. They are not just used to mix audio at playback. We have seen projects with hundreds of tracks, where the mute and solo buttons were used to focus on certain parts of the project.
Render Settings: While the render settings of REAPER might be a little intimidating at first, the render engine is one of the differentiating features of REAPER. The wildcard system makes the render engine very powerful. Wildcards are extensively used to follow the naming conventions and batch export hundreds of WAV files at once.
Region Render Matrix: Also intimidating, the region render matrix allows you to set up which tracks and which regions are rendered. The matrix allows you to specify which parts of the project are mixed down together when rendered.
Subprojects: We have seen a few studios using subprojects as a way to manage large data. Subprojects can be used for the abstraction and organization of content. Subprojects can also be useful in a large team to split the work and minimize conflicts in source control.
Custom Scripts: While a wide variety of scripts are publicly available through ReaPack and other distribution systems, many users have actually developed their own scripts. ReaScript might require a bit of programming knowledge to start, but it remains an accessible system to customize REAPER.
The First Prototype
After we had a better understanding of what people were doing with REAPER and how they used it, we started to define what the integration should be able to do at a high level. We decided on the following two main objectives:
- Import rendered WAV files to Wwise.
- Create a Wwise object structure along with the rendered files.
We also had some UX objectives:
- Set up once, fast iterations.
- Strong control over naming conventions.
For the first demonstration, we have a REAPER project called “FS”, which contains two regions and a couple of tracks.

The Timeline of a REAPER Project Called FS
Let’s say we want to create two WAV files, one per region, and that we use the following wildcards:
- $project: Resolved to the REAPER project name, “FS”.
- $regionnumber: Resolved to the region numbers, “1” and “2”.

The REAPER Render Settings
Now in order to import the WAV files to Wwise, it seemed obvious that WAAPI would be involved and that we would leverage the ak.wwise.core.audio.import function (https://www.audiokinetic.com/library/edge/?source=SDK&id=ak_wwise_core_audio_import.html). This function shares the same core code as the Tab Delimited Text Import (https://www.audiokinetic.com/library/edge/?source=Help&id=importing_media_files_from_tab_delimited_text_file).
To demonstrate, here is an example of a tab delimited import file that defines a Random Container and two Sounds, which can also be done in WAAPI:
|
Audio File |
Object Path |
|
C:\wave\REAPER\FS_GRASS_01.wav |
\Actor-Mixer Hierarchy\Default Work Unit\<Random Container>FS_GRASS\<Sound SFX>SFX_FS_GRASS_01 |
|
C:\wave\REAPER\FS_GRASS_02.wav |
\Actor-Mixer Hierarchy\Default Work Unit\<Random Container>FS_GRASS\<Sound SFX>SFX_FS_GRASS_02 |
This creates the following hierarchy:
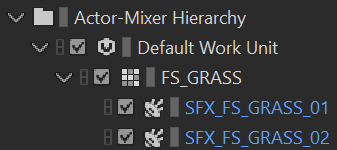
The Hierarchy Created in Wwise
Then, it felt natural that if REAPER allows us to name WAV files using its wildcard system, that we should attempt to use a similar mechanism to name the Wwise objects that will appear in the Project Explorer. Because, ultimately, they should somehow relate to each other. Users should be in control of the naming convention for both the WAV files and Wwise objects.
So the wildcard recipe to generate the Object Path column would be:
\Actor-Mixer Hierarchy\Default Work Unit\<Random Container>$project\<Sound SFX>SFX_$project_$regionnumber
So, we explored what ReaScript had to offer. We wanted to see if it was possible to ask REAPER to resolve its own wildcards on arbitrary strings, that is, not the Render settings. Well, it was not possible. So we attempted something very rough for a test:
1. Backup the file name field value from the Render settings.
2. Set the requested Wwise Object Path in the file name field in the Render settings.
3. Query the rendered file names (which are not file names anymore, but instead the resolved Object Paths).
4. Restore the previous file name in the Render settings.
TADA! It worked. We were able to resolve an Object Path that originally contained multiple REAPER wildcards. However, it was really a big hack. The REAPER UI was flashing, and it was compromising the integrity of the Render settings.
Getting Help From the REAPER Team
So we reached out to the Cockos team, asking for help with our objective. The question was:
Could you expose in ReaScript a function that is able to resolve an arbitrary string that contains REAPER wildcards for each of the rendered files?
Well, they were super responsive and they quickly provided a build that had this feature. We rapidly confirmed that it was working for us. And the following version of REAPER included the new feature. Big shout-out to John Schwartz and Justin Frankel from Cockos! You guys rock!
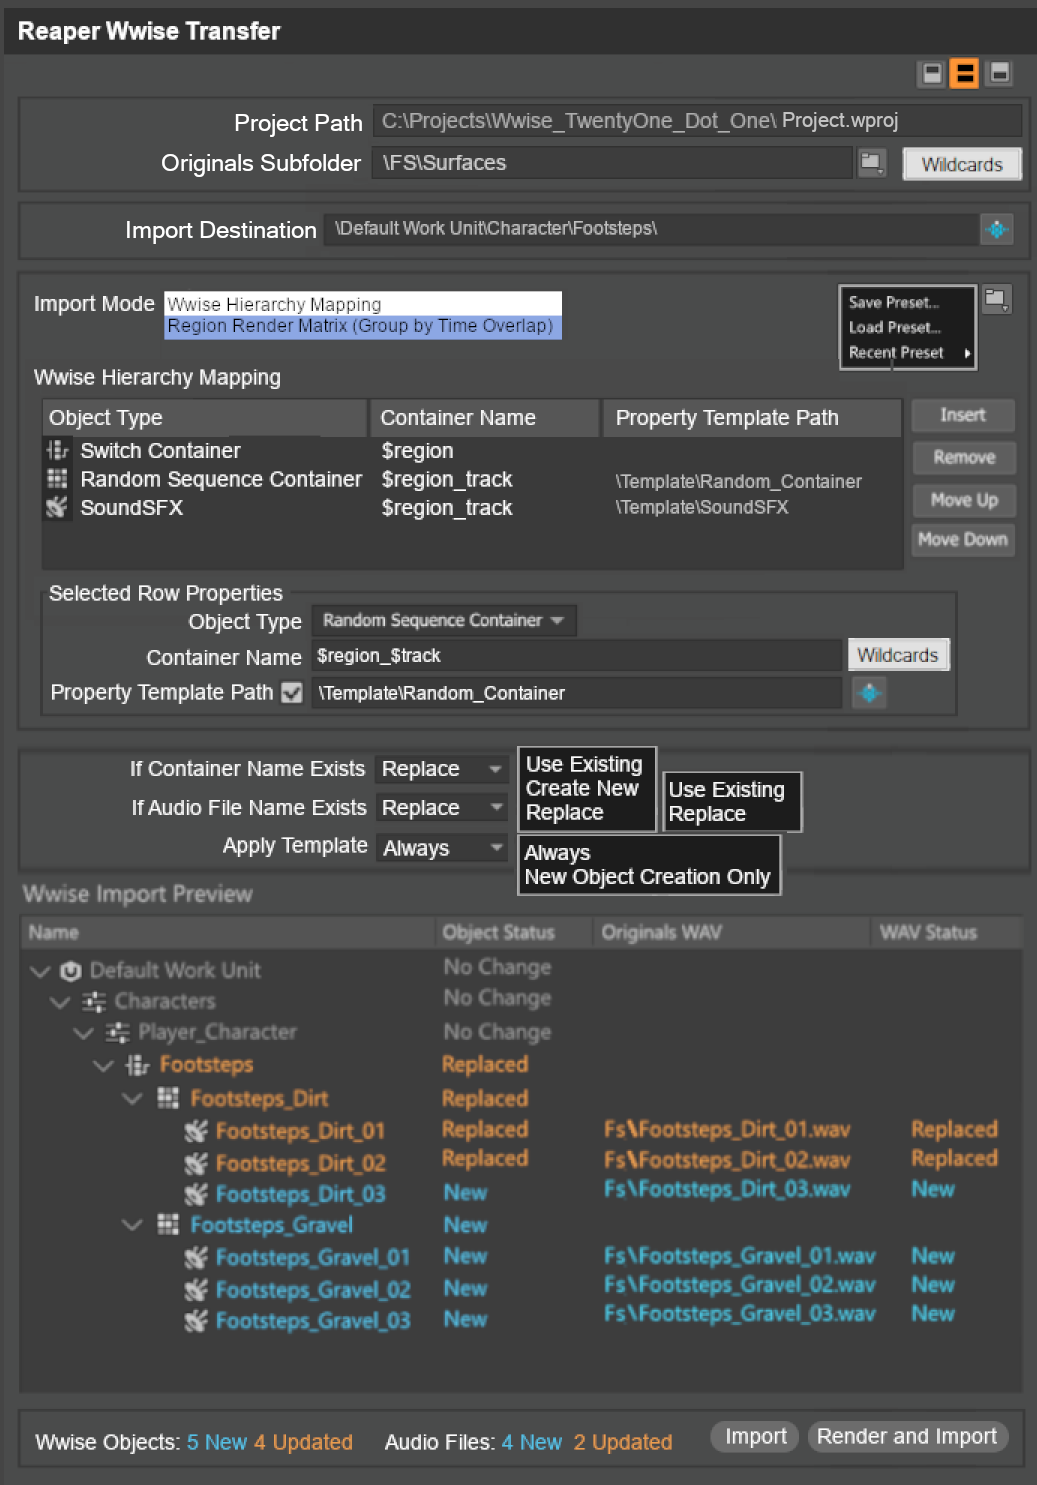
Here is an early prototype showing another import expression containing wildcards that is resolved to object paths:
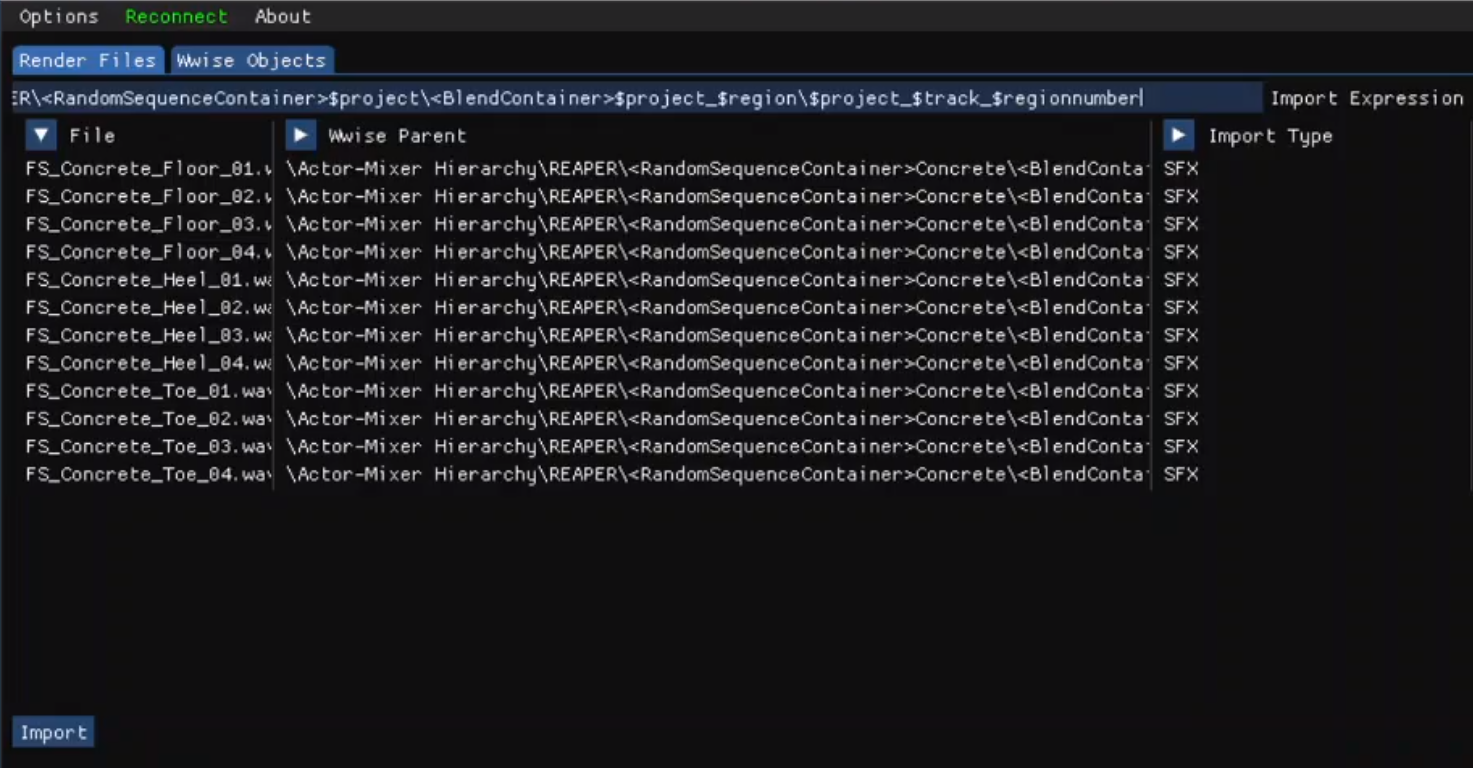
An Early Prototype of ReaWwise
After importing, the following structure was created in Wwise:
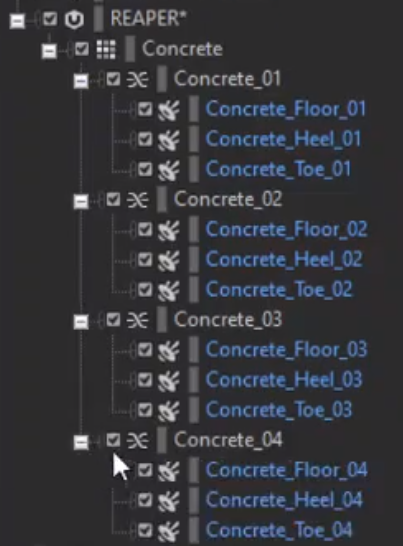
A Wwise Hierarchy Created by ReaWwise
So, at this point, we were confident that we could reach our goals. The next thing we had to do was to work on the user experience of the future extension.
User Experience
So then, we started to iterate on the user experience. This would not happen in code, like the early prototype, but instead would happen using static mockups. Mockups are great because they allow you to iterate quickly. So we started to draft the user interface for the extension. We brought different stakeholders to the discussion, and we iterated for a couple of weeks.
Here is an early collage mockup that shows the result of our iterations.
A Mockup of ReaWwise Made During Development
At some point, we returned to the code to validate more assumptions, and to test some of our ideas with actual REAPER projects. This time, the new prototype was made directly in the WAAPI-transfer code, which already implemented quite a few things, like Visual C++ setup, Win32 windows initialization, REAPER handshakes, WAAPI communication, etc.
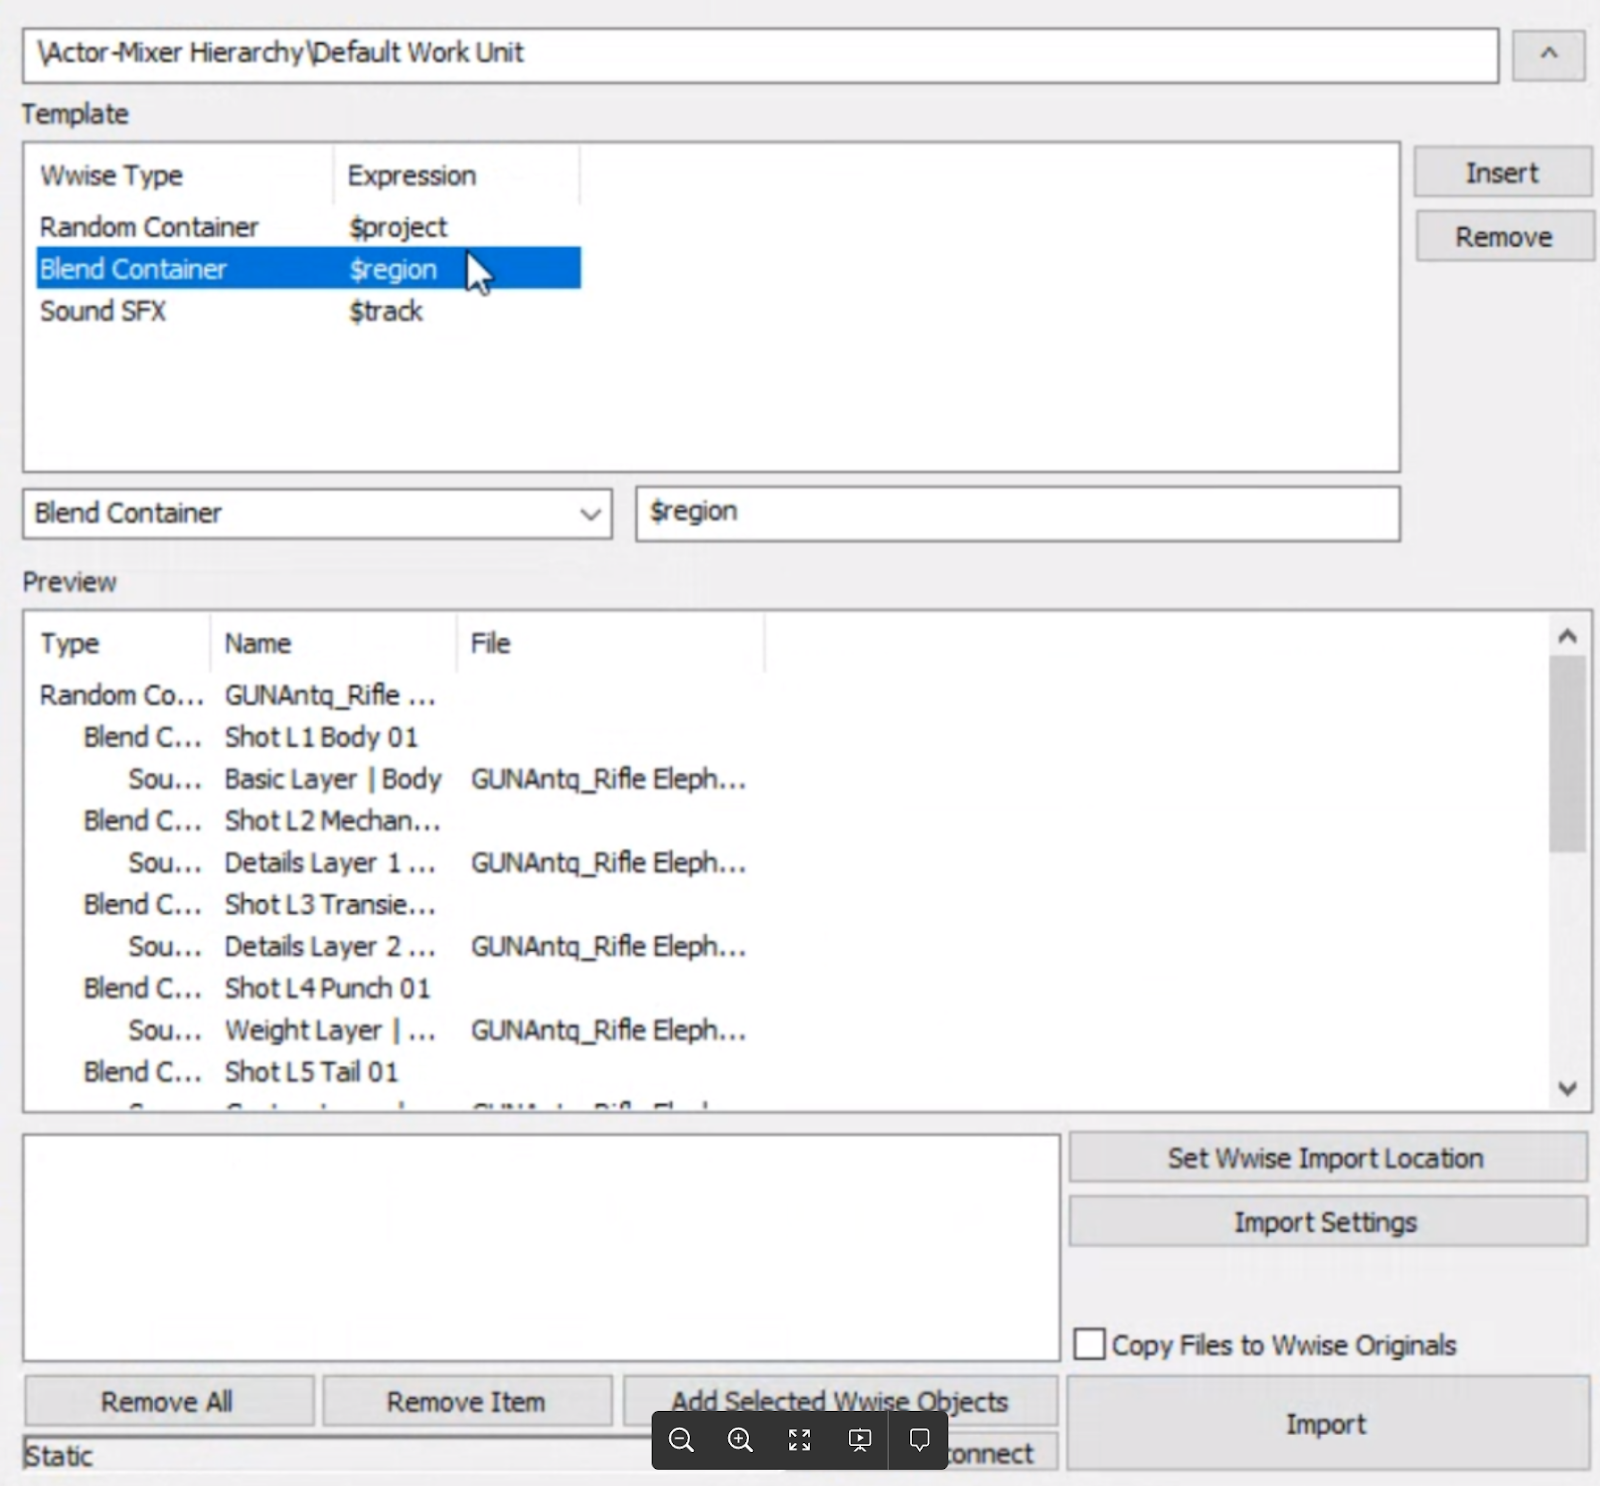
Another Prototype of ReaWwise
This prototype was iterated, demoed, and shared internally. We now had increased confidence that we were going in the right direction. And now we had to find a team to realize the project and schedule the project on the roadmap.
To Be Continued
The next and final part of this blog series will focus on the development of the extension. You will discover what happened after the prototypes. This part will be covered by Andrew Costa, the main developer on ReaWwise.

Comments