
Introduction
Welcome to the fellow coders (or anyone, let’s not limit ourselves!) With this article, I will take you on a journey to unfold Wwise practices in Unreal Engine lands. On this road, we will forge how to use Blueprint and C++, outline the benefits of each, and talk about the best and possible usages of both. If you’re asking yourself, “Why would we dive into C++, if we have Blueprints already?” There are many reasons: efficiency, performance, and extendability. But above all, I want to help fill that gap of C++ knowledge for newcomers and show what’s really happening behind the curtains. Unfolding these pragmas is actually more important than simply calling some Blueprint nodes; it brings a sense of vision about the engine you are using (for both Wwise and UE). Note that this article applies to 2021.1.x and 2019.2.x versions of the Unreal integration.
Enough chit chat, we will learn more on the road! Here's what we'll cover:
- Installation and Project Settings
- First Steps into the Coding Realm: Dependencies
- Flashlight of the Coding Realm: AkGameplayStatics
- Codin’ Time!
- Events
- RTPC
- Switch and State
- Useful Snippets
- Conclusion
(If you want to follow the road through step-by-step videos, check out my video series.)
Installation and Project Settings
I won’t ask you to open a specific project, because it won’t change the goal of this tutorial, so anything 3D would likely work with these steps. I’ll assume you’ve created something like the UE 3D template already. Rest is simply opening your Wwise Launcher and integrating Wwise into your project.
Once you’ve done that, you can open the Unreal project and we can now benefit from new Wwise goodies. You’ll find these goodies inside “Project Settings > Wwise”. The thing I like most, which was added to Wwise a couple of releases back (since Wwise 2019.2), is “Event-based packaging”. This saves millions of lives (or just a couple of project re-openings, a bunch of saves, and those “where the heck is my SoundBank?” moments.) Also, “split media per folder” is a relatively satisfying option to activate for better folder structure. You can find these settings under “Integration Settings > Sound Data”. Lastly, I recommend that you enable automatic asset synchronization under “User Settings > Sound Data” as well. It is a pretty self-explanatory option: it synchronizes assets between Unreal Engine and your Wwise project. You probably noticed a WAAPI section in there too, but we won’t go into that for now.
First Steps into the Coding Realm: Dependencies
Welcome to the Unreal Engine Editor. It is here that we will have to conquer the wastelands (also known as C++.) I use Visual Studio 2022 for my UE projects. You can use whichever IDE (integrated development environment) you like the most, since the folder structure is the same. I also want you to imagine the UE Editor as “mouse work” and VS/coding as “keyboard work”. That somewhat clarifies the usages and way of thinking.
Now we’re on the first page of our story: the project’s folder structure. The project has various folders that are required to be able to compile, but we won’t stick our nose into anything other than the Source folder. When you find the Source folder, go through your project-named folder and you’ll find Build.cs, the one that holds everything… but just dependency modules for now. Don’t mess with the file too much and just add “AkAudio” on PublicDependencyModuleNames.
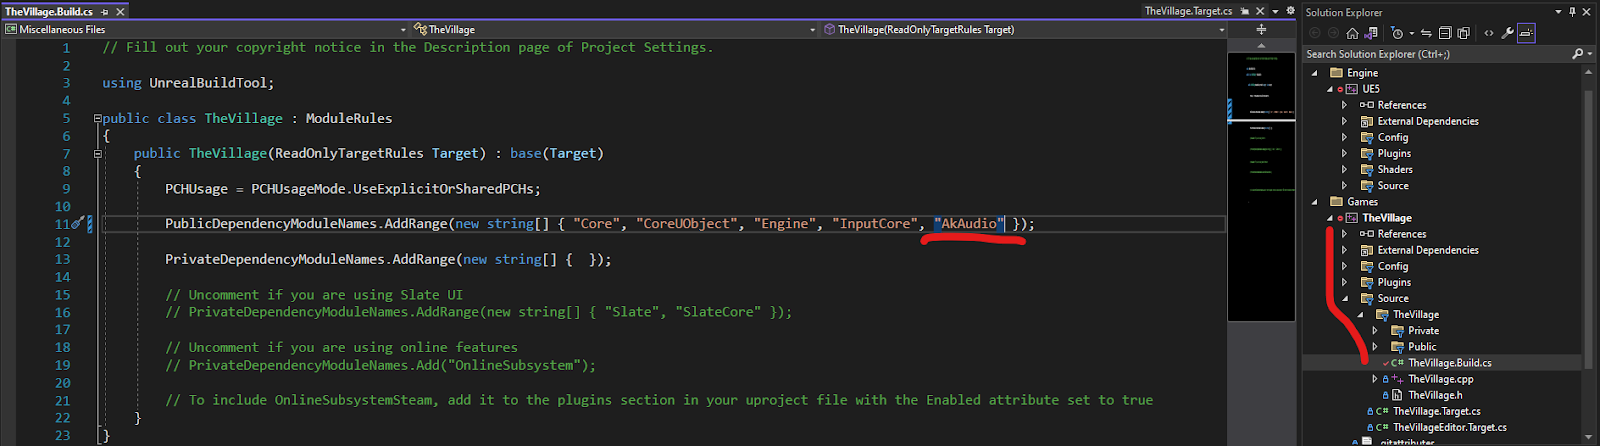
That’s it! Now our compiled project will add Wwise dependencies into the project and let us use C++ coding.
Q) Do we have to do that every time?
A) Yes, unless you want to code it into your project’s build file or use Blueprints. Blueprint handles that background compiling.
Q) Can we compile the project inside UE Editor?
A) Most of the time we can, but this time it requires rebuilding. A better way (and probably the right way) to compile is just closing the Editor and rebuilding the project via VisualStudio. This is called cold-reload, and it’s like re-assembling the whole car instead of changing parts on the road (which would be hot-reload/live coding, where you can update and recompile your code without shutting the project down completely).
Flashlight of the Coding Realm: AkGameplayStatics
This. I can’t stop talking about this and how useful it is to reach for that cheat sheet (well, it’s not a real cheat sheet, but the header of executions we require).
This is the header we require, this is the hero we need (and deserve), this is the source of all coding pragmas we are going to use; but it was hiding real deep. If your project directories don’t include the Wwise plugin path already, you have two ways to include it into your C++ files: using the whole address of the file, or by adding that path to directories and just including the name of it. I’ll just drop the path in here for everyone who is looking for it:
"Plugins/Wwise/Source/AkAudio/Classes/AkGameplayStatics.h"
Whenever we want to access anything Wwise-related, we should include this header in our class (or include the path into project directories, etc.) This beautifully-managed file includes the functions and classes we use, but we still need to tame and understand this powerful object. We will go back and forth to this header file through implementations. Nevertheless, for now, just embrace that header's existence and follow my lead.
Codin’ Time!
I was very verbose about the whole Unreal Engine and Wwise relation, and that ends now. From this point on, we’ll be diving into coding in UE for Wwise for Events, RTPCs, Switches, States, and then end on some final useful snippets.
First stop: Events!
Events
While designing sounds in a Wwise project, we pack necessary sounds under Events we create; and when the time comes, we post these Events.
There are various ways to post Events, either by Blueprints or C++. Blueprint is relatively easy to make and tweak. Note that going forward I’ll categorize some usages as “preferred”, since they all have their pros and cons.
Post Event
I’ll walk you through a couple of different options for Blueprint and C++ executions of posting an Event. You can use any of them in your projects.
Blueprints | The Easy Way
This is the quickest way to post an Event: open a Blueprint you want to post an Event, just simply call it. As an example, I want to post Event when we begin playing. By connecting the “Post Event” node to the execution chain, it’s good to go.
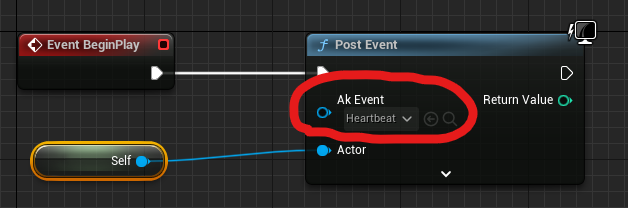
This node posts the Event you choose from the dropdown menu on the Actor you selected.
Q) Does it have to be “Self”?
A) If you Post Event in an Actor based class, it is okay/safe to use Self; but if the Blueprint Class inherits from a non-actor based class, you should consider an Actor-based parameter to send it there. I’ve made that mistake a couple of times, so consider that suggestion if you happen to get stuck.
Q) What is “Return Value”?
A) Post Event is a function that returns an integer value (a specific ID called the Playing ID) for that Event. By using this PlayingID, we can reach that specific instance of the Event later on. You can store this value somewhere, or if you are certain about not using it, just leave this pin empty.
Q) Why can't I see my Event in the dropdown menu?
A) Make sure you can see your Event in the Content Drawer, and if not, generate sound data via the Wwise Picker.
Blueprints | The Better Way
It’s up to you if you want to consider this the “better way”, but it definitely brings more extendability to the execution. With this approach, instead of calling Post Event anywhere, we create an Ak Component (Search for “Ak” in the Add Component menu) for our Blueprint, and then we work on that.
Once you add this component to your Blueprint, you will notice an Ak Event section in the Details panel. Instead of choosing the Event in a dropdown menu, now we include an Event for our Blueprint. Also, it allows us to tweak Ak Component values, such as Occlusion and Attenuation, directly.
For this usage, we drag Ak Component into the Event Graph and call “Post Associated Ak Event”. As the name suggests, this posts the Event we selected in the Details panel of Ak Component. So we can simply change the Event later using the component we included. Once again, it returns the Playing ID value.

The Blueprint side of Event posting is simply these two practices. I recommend both of the Blueprint nodes, but it all depends on how extensively you want to use the same Event. On the topic of extensibility, prepare yourself: we’re about to start coding in C++.
C++ | The Easy Way
I hope the “Easy Way” title comforts you a little bit. When you embrace the pattern, you will agree with me on that.
In general, when we create a C++ class, it generates one header(.h) file and one C++(.cpp) file.
Create a C++ class (you can choose Actor as base class) and open the header file in your IDE of choice. I decided to name mine DummyActor, and you’ll be able to see examples later on under the name DummyActor.h and DummyActor.cpp.
This one’s logic is a bit similar to the previous Blueprints method; we know that we require an Ak Event and a function to post it. So let’s go one by one. Ak Event: Where is it? It is where the almighty AkGameplayStatics lives. To include that file in your class, you can simply add this line of code below in your header file’s first lines:
#include "Plugins/Wwise/Source/AkAudio/Classes/AkGameplayStatics.h"
Take the lines below as a grain of salt, it’s just the red carpet leading to the hall.
// AkGameplayStatics.h
/*============================================================================
AkGameplayStatics.h:
============================================================================*/
#pragma once
#include "AkAudioDevice.h"
#include "AkInclude.h"
#include "AkGameplayTypes.h"
#include "Kismet/BlueprintFunctionLibrary.h"
#include "AkGameplayStatics.generated.h"
// PostEvent functions need to return the PlayingID (uint32), but Blueprints only work with int32.
// Make sure AkPlayingID is always 32 bits, or else we're gonna have a bad time.
static_assert(sizeof(AkPlayingID) == sizeof(int32), "AkPlayingID is not 32 bits anymore. Change return value of PostEvent functions and callback info structures members!");
UCLASS()
class AKAUDIO_API UAkGameplayStatics : public UBlueprintFunctionLibrary
{
GENERATED_UCLASS_BODY()
/** Get an AkComponent attached to and following the specified component.
* @param AttachPointName - Optional named point within the AttachComponent to play the sound at.
*/
UFUNCTION(BlueprintCallable, Category="Audiokinetic")
static class UAkComponent * GetAkComponent( class USceneComponent* AttachToComponent, bool& ComponentCreated, FName AttachPointName = NAME_None, FVector Location = FVector(ForceInit), EAttachLocation::Type LocationType = EAttachLocation::KeepRelativeOffset );
UFUNCTION(BlueprintCallable, Category="Audiokinetic")
static bool IsEditor();
UFUNCTION(BlueprintCallable, Category = "Audiokinetic")
static bool IsGame(UObject* WorldContextObject);
/** Posts a Wwise Event attached to and following the specified component.
* @param AkEvent - Wwise Event to post.
* @param Actor - actor on which to post the Wwise Event.
* @param AttachPointName - Optional named point within the AttachComponent to play the sound at (NOT FUNCTIONAL).
* @param bStopWhenAttachedToDestroyed - Specifies whether the sound should stop playing when the owner of the attach to component is destroyed.
*/
UFUNCTION(BlueprintCallable, BlueprintCosmetic, meta=(DeprecatedFunction), Category="Audiokinetic|Actor", meta = (AdvancedDisplay = "3"))
static int32 PostEventAttached( class UAkAudioEvent* AkEvent,
class AActor* Actor,
FName AttachPointName = NAME_None,
bool bStopWhenAttachedToDestroyed = false,
FString EventName = FString(""));
Now we require two variables, UAkAudioEvent* SkillEvent and (this second one is optional but necessary for extended usages) int32 EventID. Don’t forget to add UPROPERTY(EditAnywhere) on the SkillEvent. The header should include these under the public access modifier. Just to keep the code tidy, you can consider going under the public access modifier that encapsulates properties, instead of functions.
// DummyActor.h
public:
UPROPERTY(EditAnywhere)
class UAkAudioEvent* SkillEvent;
int32 skillEventID;
If you compile the project now (don’t forget the Build.cs dependency integration I mentioned in “First Steps”) and create a Blueprint derived from this class, you can use it like the previous Blueprint method. But the fun has only just begun. Go to the Cpp file of the class, and inside BeginPlay, we will post our Event via C++ function. Where is the function? AkGameplayStatics! This is your go-to file for functions; if you want to call Wwise functions, open this file and find the representative function. The comment sections of each function are helpful to understand parameters and usage as well.
// AkGameplayStatics.h
UFUNCTION(BlueprintCallable, BlueprintCosmetic, Category="Audiokinetic|Actor", meta=(AdvancedDisplay="2", AutoCreateRefTerm = "PostEventCallback,ExternalSources"))
static int32 PostEvent(
class UAkAudioEvent* AkEvent,
class AActor* Actor,
UPARAM(meta = (Bitmask, BitmaskEnum = EAkCallbackType)),
int32 CallbackMask,
const FOnAkPostEventCallback& PostEventCallback,
const TArray<FAkExternalSourceInfo>& ExternalSources,
bool bStopWhenAttachedToDestroyed = false,
FString EventName = FString(""));
// DummyActor.cpp
void ADummyActor::BeginPlay()
{
Super::BeginPlay();
FOnAkPostEventCallback nullCallback;
TArray<FAkExternalSourceInfo> nullSources;
skillEventID = UAkGameplayStatics::PostEvent(SkillEvent, this, int32(0), nullCallback, nullSources, false, FString(""));
}
This is the function we will copy and use in the BeginPlay function of the class. It’s so beautiful, isn’t it? (I know what you’re probably thinking: “What the heck is this and why are so many parameters necessary for such a simple task?”)
Q) Yes, what the heck is this and why does it require so many parameters?
A) These scary and extra parameters are for good use, and extension-wise they are required. Such as callback functions, callback types and external sources.
I will keep things as simple as possible and try to lift some of the heavy weight off you. We can actually post the Event by only 2 parameters - AkEvent and Actor parameters are enough. We don’t need to know about the other variations of this function (there are deprecated ones and this satisfies the result we want to reach).
Now we found the function and we will use it inside our Cpp file. The function should look like this in the end. There are 2 null parameters we need to send, but they have no effect on the usage.
// DummyActor.cpp
void ADummyActor::BeginPlay()
{
Super::BeginPlay();
FOnAkPostEventCallback nullCallback;
TArray<FAkExternalSourceInfo> nullSources;
skillEventID = UAkGameplayStatics::PostEvent(SkillEvent, this, int32(0), nullCallback, nullSources, false, FString(""));
}
It looks similar to the Blueprint node now; it gets Event and Actor as Input, and integer value as return. You can imagine the rest of these parameters as boilerplate for now. Compile it, go to the Editor, drop your DummyActorBlueprint in the scene, and play. If it doesn’t make a sound, make sure you have selected the Event in the Blueprint Class.
This is the easy way to go; you choose the Event and post it via C++. I called the Editor “mouse work” earlier for a reason; you need to choose the Event with a click, and you need to wander inside the Blueprint Class to select Events and such. It just creates more work to do, in my opinion. Let’s move onto the next (and my preferred) method, where we eliminate that Editor work.
C++ | The Better Way
Better how? It is a bit of a general Blueprint vs C++ speed comparison. When we use Blueprint, it creates another set of instructions to generate C++ code afterwards, and while working in the Editor, it affects the speed greatly. So, we can say that we sacrificed our ease of coding for compiling speed. (I compared them in the Editor for now, but it might not reflect that speed comparison when you build the project entirely. I can suggest this video for a more detailed comparison). This approach benefits from the previous C++ method, but it eliminates the Editor side, so it doesn’t require getting input from the input and converging it into the C++ function we called.
It does come with a downside unfortunately; if you are working with sound designers, they will require Blueprint interaction to decide which Event they want to post. Pros and cons, choose your destiny! (Mortal Kombat much?)
This one is almost similar to the previous coding example but buffed. You might consider it “trimmed”, but I like to call it “buffed” because we don’t have to select something in the Editor and execute everything by the code.
We will use the same function as before, but we’ll change one of the parameters.
// DummyActor.cpp
void ADummyActor::BeginPlay()
{
Super::BeginPlay();
FOnAkPostEventCallback nullCallback;
TArray<FAkExternalSourceInfo> nullSources;
skillEventID = UAkGameplayStatics::PostEvent(nullptr, this, int32(0), nullCallback, nullSources, false, (FString)("EventName"));
}
This function no longer requires Wwise specific class (UAkAudioEvent) - it is gone for good. This also means we don’t have to create an Event variable in the header file. But be careful what you type for. Instead of sending an Event variable, now we send the Event name in string, and it should be the EXACT name of the Event, or it will pop up some errors instead of making the intended sound.
Q) What if I put both Event and EventName in the function?
A) Wwise prefers Event over EventName. In AkGameplayStatics.cpp, it can be seen in that order.
There is something else we should acknowledge; how does this function work? I’ll try to explain in simple terms:
- The function checks for necessary parameters, such as Actor, AkEvent and EventName
- It assigns a temporary invalid ID for return value
- It posts the Event through the Wwise system and grabs the Event ID value
- If that ID value is valid, returns it
That’s all for the Event posting section, but there is more to come. Our power over Events has just begun rising!
Execute Action on Event ID
This time we show our might to those Events; we’ve posted an Event and now we can control it, maybe pause or stop it. This function has 2 variations, either by Event or Event ID. I suggest you go with the Event ID because it requires less parameters and has more direct access to the Event we require.
Blueprints
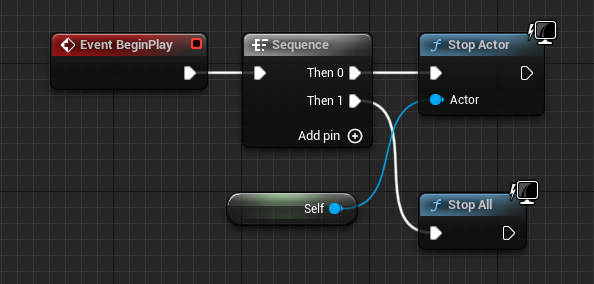
This takes just one call to “Execute Action on Playing ID”. This node allows us to use Stop, Pause, Resume, Break and Release Envelope actions on the Event (using the Event ID). It also has a cool feature to make it use a transition, instead of executing the action instantly. Transition Duration and Fade Curve are available for tweaking.

As an example, this will post the Event and stop it in a second (1000ms) linearly. That’s why you also need to store that return value of Events.
C++
Same goal, same approach. Find the same function inside AkGameplayStatics.h. Both functions have 4 parameters and you can call C++ function using only the first 2 parameters. Let’s analyze this function and its usage.
// AkGameplayStatics.h
UFUNCTION(BlueprintCallable, BlueprintCosmetic, Category = "Audiokinetic|Actor")
static void ExecuteActionOnPlayingID(
AkActionOnEventType ActionType,
int32 PlayingID,
int32 TransitionDuration = 0,
EAkCurveInterpolation FadeCurve = EAkCurveInterpolation::Linear);
// DummyActor.cpp
void ADummyActor::BeginPlay()
{
Super::BeginPlay();
FOnAkPostEventCallback nullCallback;
TArray<FAkExternalSourceInfo> nullSources;
skillEventID = UAkGameplayStatics::PostEvent(nullptr, this, int32(0), nullCallback, nullSources, false, (FString)("EventName"));
UAkGameplayStatics::ExecuteActionOnPlayingID(AkActionOnEventType::Stop, skillEventID, 1000, EAkCurveInterpolation::Linear);
}
Q) How can I choose ActionEventType and CurveInterpolation?
A) Both of them are Enum classes, and you can find their options by going to their definitions (right click on the AkActionOnEventType > Go to Definition). Possible options are:
// AkGameplayTypes.h
UENUM(BlueprintType)
enum class AkActionOnEventType : uint8
{
// AK::SoundEngine::AkActionOnEventType_Stop
Stop = 0,
// AK::SoundEngine::AkActionOnEventType_Pause
Pause = 1,
// AK::SoundEngine::AkActionOnEventType_Resume
Resume = 2,
// AK::SoundEngine::AkActionOnEventType_Break
Break = 3,
// AK::SoundEngine::AkActionOnEventType_ReleaseEnvelope
ReleaseEnvelope = 4
};
UENUM(BlueprintType)
enum class EAkCurveInterpolation : uint8
{
// Log3
Log3 = 0,
// Sine
Sine = 1,
// Log1
Log1 = 2,
// Inversed S Curve
InvSCurve = 3,
// Linear (Default)
Linear = 4,
// S Curve
SCurve = 5,
// Exp1
Exp1 = 6,
// Reciprocal of sine curve
SineRecip = 7,
// Exp3
Exp3 = 8,
// Update this value to reflect last curve available for fades
LastFadeCurve = 8,
// Constant ( not valid for fading values )
Constant = 9
};
Callbacks
Callbacks are functions that have been executed based on a trigger. These triggers are Wwise-specific and can be chosen through a menu (or enum class in C++).
Callback implementation is a bit different than normal usage because it uses delegates and requires some knowledge about the topic. But I’ll keep it as simple as possible.
Blueprints
Compared to C++ implementation, Blueprints are very straight-forward. When we post an Event, it shows 2 options for callbacks: Callback Mask and Post Event Callback.
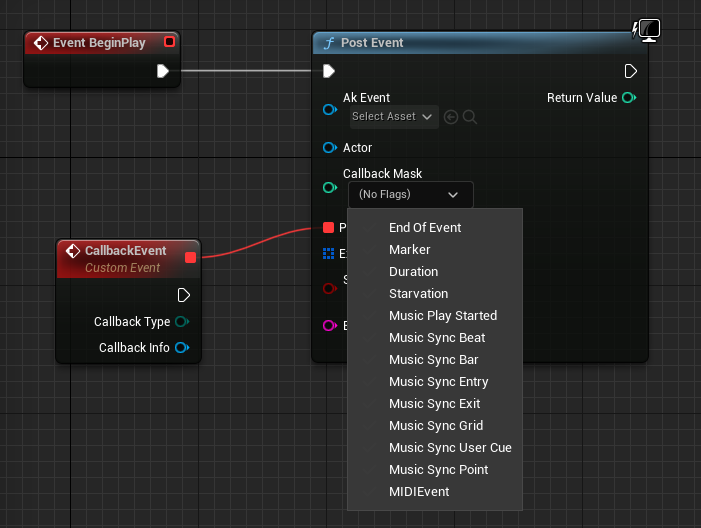
Callback Mask has the trigger options we can use to execute the Post Event Callback function. So, it is purely based on your design and how you will achieve certain scenarios. You can select more than one mask at the same time.
Post Event Callback is the delegate function that should be created in a specific way. It’s required to be an Event with 2 parameters; CallbackType and CallbackInfo. By creating that, you can drag a line from the Post Event Callback pin to anywhere and create a custom Event; Unreal will handle the creation of it.
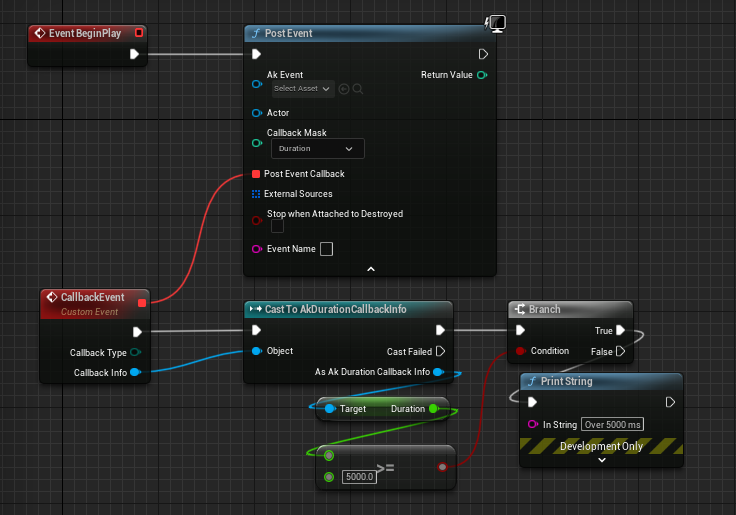
I will give an example of one of these masks; let’s try Duration.
When we create the Event, Callback Info can be cast to any mask on the list, each of which has certain members to use (i.e.DurationCallbackInfo has a Duration variable.)
The rest of the code is just a debug message popping up on the screen when the duration exceeds 5000ms. My humble example just debugs a message, and you can of course implement more.
Also, anything music-specific should be assigned under the Interactive Music Hierarchy of your Wwise project.
I think that is a decent start for Callbacks and a useful way to use it.
C++
Although Blueprints implementation is that quick, the tables turn for C++ implementation. I’ll go through the steps steadily, but we should fix 2 things in the source code before executing the function completely.
At previous Post Event scenarios, we used nullCallback value for our post function. Now, we will create one to use for real. Also, this callback variable is a delegate and will require a function to bind it with a certain template. To find these details, we can go to that class's definition and it will show use delegates declaration as it.
// AkGameplayTypes.h
DECLARE_DYNAMIC_DELEGATE_TwoParams(
FOnAkPostEventCallback,
EAkCallbackType, CallbackType,
UAkCallbackInfo*, CallbackInfo);
// DummyActor.h
public:
FOnAkPostEventCallback BindCallback;
UFUNCTION()
void DurationCallback(
EAkCallbackType CallbackType,
UAkCallbackInfo* CallbackInfo);
Change the callback value in Post Event with the new one (BindCallback) and bind this Callback function to BindCallback with BindUFunction. This function also requires the exact name of the callback function as FName.
// DummyActor.cpp
void ADummyActor::BeginPlay()
{
Super::BeginPlay();
static FName CBName("DurationCallback");
BindCallback.BindUFunction(this, CBName);
TArray<FAkExternalSourceInfo> nullSources;
skillEventID = UAkGameplayStatics::PostEvent(nullptr, this, int32(0), BindCallback, nullSources, false, (FString)("EventName"));
}
Once we’re done binding the function, we can fill the callback function with the desired functionality. As Blueprints, it has 2 parameters and we can cast CallbackInfo to DurationInfo and follow with the rest.
// DummyActor.cpp
void ADummyActor::DurationCallback(EAkCallbackType CallbackType, UAkCallbackInfo* CallbackInfo)
{
UAkDurationCallbackInfo* CBInfo = Cast<UAkDurationCallbackInfo>(CallbackInfo);
if (CBInfo->Duration >= 5000.f) {
// Print debug message or do something
}
}
Q) When I compile this code, it gives a linker error (LNK1120 and LNK2019). How can I resolve this?
A) This was the first problem I encountered with this code. While the code looks correct, at compilation it pops up the error. Thanks to Karel B. in the Audiokinetic Community Q&A, this has an easy fix. Go to the definition of UAkDurationCallbackInfo and add AKAUDIO_API macro before the name. When you compile after that, this will solve the problem. Also, a couple more callbackinfo classes require that, so keep it in the back of your mind. It should look like this;
// AkGameplayTypes.h
class AKAUDIO_API UAkDurationCallbackInfo : public UAkEventCallbackInfo
Now the compilation issues are solved, but we didn’t specify CallbackMask yet. In the definition of the Post Event function, it says that it requires EAkCallbackType, which is an enum class that holds the values for callback triggers (same dropdown menu of Blueprints). We can cast that enum type to an integer value as a parameter for this function. The final version of the Post Event could be like this;
// DummyActor.cpp
void ADummyActor::BeginPlay()
{
Super::BeginPlay();
static FName CBName("DurationCallback");
BindCallback.BindUFunction(this, CBName);
TArray<FAkExternalSourceInfo> nullSources;
skillEventID = UAkGameplayStatics::PostEvent(nullptr, this, int32(EAkCallbackType::Duration), BindCallback, nullSources, false, (FString)("EventName"));
}
Q) It didn’t trigger when it reached 5 seconds. Did I miss something?
A) And that was the second problem I encountered, and once again, Carsten Z. on the Audiokinetic Community Q&A found a solution for this issue. We have done everything correctly, but somehow AkAudio engine tends to use AkCallbackType, instead of EAkCallbackType (even the post function specifies that). So, instead of EAkCallbackType, using AkCallbackType is enough to proceed. For this example, it should look like this;
// DummyActor.cpp
void ADummyActor::BeginPlay()
{
Super::BeginPlay();
static FName CBName("DurationCallback");
BindCallback.BindUFunction(this, CBName);
TArray<FAkExternalSourceInfo> nullSources;
skillEventID = UAkGameplayStatics::PostEvent(nullptr, this, int32(AkCallbackType::AK_Duration), BindCallback, nullSources, false, (FString)("EventName"));
}
It was quite a challenge for Callback and C++, but the result is satisfying enough. I assume this journey of coding Wwise in UE for Events has been quite the ice breaker for those who were afraid to use C++. But we’re not done yet!
RTPC
I assume you’re already familiar with RTPCs so I won’t cover the basics of what they are here.
RTPC controls have 3 functions; Set, Reset and Get. As these names imply, they stand for setting, resetting and getting certain RTPC values. But there is something that is often overlooked: RTPC parameters can be local and global. Local RTPC values are only responsible for the actor they’ve assigned, while the global ones control every RTPC with the same name.
Set RTPC
Blueprints
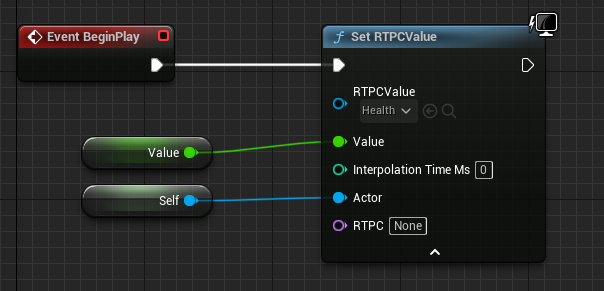
This method is very simple. Just call SetRTPCValue in the Event Graph. There are a couple of things to consider with those parameters:
- RTPCValue is a dropdown menu that shows you ALL the Game Parameters that can control an RTPC. I capitalize “ALL”, because there are a lot - you might end up not using some of these Game Parameters in your Actor.
- Value is a float. It’s understandable and castable for any integer-like value.
- Interpolation Time is a useful value for smooth transitions. If you leave it like that (and didn’t adapt your Game Parameter skew in your Wwise project), value changes will be heard as a bit snappy and uncomfortable to the ear. I often leave it at 0 but adapt my interpolation in the Wwise project.
- Actor: this is the important part. Local vs global value decision. If the RTPC value is Actor-specific (such as the “Health” RTPCValue I used), it should be connected to an Actor of use (or Self if you are using it on the same class). If it’s a global value, you don’t have to connect an Actor there.
Q) What happens if I don’t connect an Actor to the pin, but change a local RTPC?
A) That will change ALL RTPC values that have been used in the game. So let’s say there are 10 Actors using that RTPC for their own implementation - you might cause unexpected updates.
- RTPC (Name): That purple pin allows us to use an RTPC’s name as a string to control it. It is similar to the Events dilemma; you can either use Wwise-specific value (RTPCValue) or the string version of the RTPC. You don’t have to feed both pins, it will prefer RTPCValue if you do.
C++
If you acknowledge the snappiness of Blueprint, this method will be the verbose coding version of the same thing. Like the Blueprint node, it can work with RTPC class or RTPC name. Let me go through both of them at once.
Function requires 2 parameters to handle, UAkRtpc and float. As I described in the Blueprint version, they are RTPC and the value, respectively. RTPC class is selectable in the Editor by this way.
// DummyActor.h
public:
UPROPERTY(EditAnywhere)
class UAkRtpc* HealthRTPC;
float HealthValue;
It is time to revisit our mighty helper AkGameplayStatics again, to unveil RTPC function. But this time, we will look at their definitions.
// AkGameplayStatics.cpp
void UAkGameplayStatics::SetRTPCValue(
const UAkRtpc* RTPCValue,
float Value,
int32 InterpolationTimeMs,
AActor* Actor,
FName RTPC)
{
FAkAudioDevice * AudioDevice = FAkAudioDevice::Get();
if (AudioDevice)
{
if (RTPCValue)
{
AudioDevice->SetRTPCValue(RTPCValue, Value, InterpolationTimeMs, Actor);
}
else if (RTPC.IsValid())
{
AudioDevice->SetRTPCValue(*RTPC.ToString(), Value, InterpolationTimeMs, Actor);
}
}
}
So, what does that hefty function do? Parameters are identical to the Blueprint version, in the same order. But there is the beauty behind the node, the working mechanism. As you can see, the function checks either RTPCValue (Wwise class) or RTPC (string value) to execute. As I mentioned before, it goes with the RTPCValue if both exist.
Q) What is the AudioDevice inside the function?
A) This is the most crucial part of the blog for me. We have been using the header functions to execute commands. Internally, these functions grab the singleton instance of Wwise Audio Device to send commands. It is possible to call FAkAudioDevice::Get() instead of AkGameplayStatics functions, but dare not. These header functions check multiple things before commanding the Audio Device. If you go through these checking pragmas and reach the device itself, you might encounter memory leaks and unexpected crashes. It might seem harmless for certain scenarios, even quicker since some of these Audio Device functions require less parameters, but these scenarios can still be achieved with the gameplay statics and it is highly recommended to grab the heart of the engine with your bare hands.
Using the function is similar to the Blueprint, but it’s keyboard time. You can either use the first one with the name of RTPC, or the second (commented) one with the Wwise class we declared in the header. Both work, but I prefer the first one because I don’t want to go through the Editor to select RTPC again. Don’t forget to send the correct parameter for the Actor (4th parameter).
// DummyActor.cpp
void ADummyActor::BeginPlay()
{
Super::BeginPlay();
UAkGameplayStatics::SetRTPCValue(nullptr, HealthValue, 0, this, "Health"); //First one
//UAkGameplayStatics::SetRTPCValue(HealthRTPC, HealthValue, 0, this, ""); //Second one
}
Reset RTPC
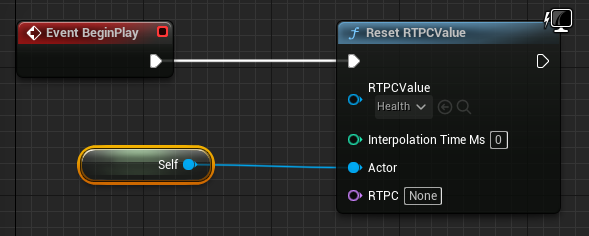
Blueprints
This is very much the same as with the SetRTPCValue node, except the value of course. We can use this node locally or globally as well.
There is not much to explain about this node. But we can consider global usage of local RTPCValues for this one. Let’s say it’s the start of the game and you want to reset everyone’s RTPC value - Just detach the Actor.
C++
It does more check ups behind the scenes when we use ResetRTPCValue, but we don’t actually need to uncover this. It is a good example of why we should use AkGameplayStatics, instead of trying to grab the Audio Device itself.
// AkGameplayStatics.h
UFUNCTION(BlueprintCallable, BlueprintCosmetic, Category = "Audiokinetic", meta = (AdvancedDisplay = "8"))
static void ResetRTPCValue(
class UAkRtpc const* RTPCValue,
int32 InterpolationTimeMs,
class AActor* Actor,
FName RTPC);
Usage of this function is the same as SetRTPC: either go with the Wwise class, or the string value of RTPC. I still recommend you to go with the first one; by doing so, you don’t rebounce to the Editor. But if you want people to decide which is which, second usage makes more sense and has more usability for the people using the Editor side.
// DummyActor.cpp
void ADummyActor::BeginPlay()
{
Super::BeginPlay();
UAkGameplayStatics::ResetRTPCValue(nullptr, 0, this, "Health"); //First one
//UAkGameplayStatics::ResetRTPCValue(HealthRTPC, 0, this, ""); //Second one
}
Get RTPC
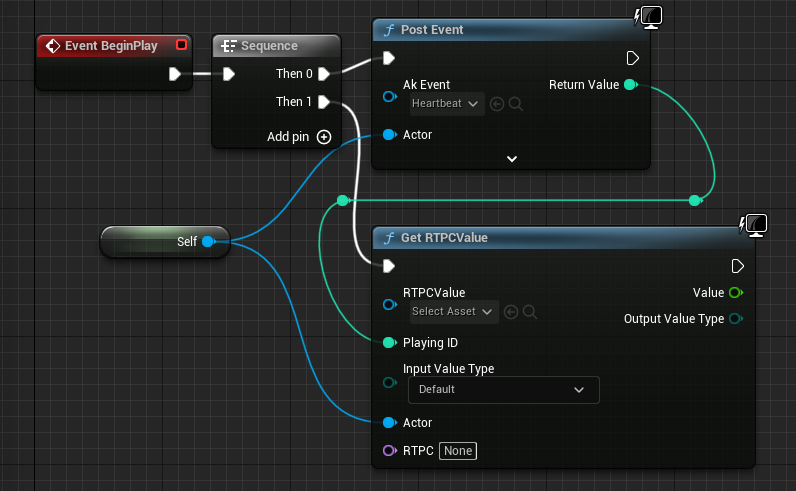
Blueprints
I thought getting RTPC value would be as painless as the other RTPC functions, but I was wrong. It doesn’t create an extra headache, but it also asks you for the Event. It is a logical question, since we can assign the same RTPC to multiple Events with differentiations. So, bear in mind the Event’s existence when you call GetRTPCValue node.
You can leave Input Value Type default, if you are looking for game object-related, global or playing ID-related values, you can select them from the dropdown menu. But we are keeping things simple, so default is fine.
Output Value Type is related to Input Type and it returns either one of these mentioned value types based on the return value.
Value is the float representation of the RTPC we were looking for.
Like previous RTPC functions, you can use this either locally or globally.
C++
AkGameplayStatics shows us the GetRTPCValue function inside, with identical parameters. But there are a couple of differences to the Blueprint node.
// AkGameplayStatics.h
UFUNCTION(BlueprintCallable, BlueprintCosmetic, Category = "Audiokinetic", meta = (AdvancedDisplay = "7"))
static void GetRTPCValue(
class UAkRtpc const* RTPCValue,
int32 PlayingID,
ERTPCValueType InputValueType,
float& Value,
ERTPCValueType& OutputValueType,
class AActor* Actor,
FName RTPC);
The function is a void function, so it doesn’t return anything. But the value is a reference, so this function can change the variable we have sent into it.
Also, it has another reference value for OutputValueType. We don’t require or care for the result of this output value, so we can send a dummy ERTPCValueType in there.
Q) What is ERTPCValueType?
A) ERTPCValueType is another enum class that allows us to choose either one of these, same as the Blueprint node’s dropdown menu. Options are below.
// AkGameplayTypes.h
UENUM(BlueprintType)
enum class ERTPCValueType : uint8
{
// Need to set hard-coded 0, or else UHT complains.
Default = 0, ///< The value is the Default RTPC.
Global = AK::SoundEngine::Query::RTPCValue_Global, ///< The value is the Global RTPC.
GameObject = AK::SoundEngine::Query::RTPCValue_GameObject, ///< The value is the game object specific RTPC.
PlayingID = AK::SoundEngine::Query::RTPCValue_PlayingID, ///< The value is the playing ID specific RTPC.
Unavailable = AK::SoundEngine::Query::RTPCValue_Unavailable ///< The value is not available for the RTPC specified.
};
Using the function requires two output variables to hold return values (reference parameters), but the important one is the float return. Simply create a variable to hold it.
// DummyActor.cpp
void ADummyActor::BeginPlay()
{
Super::BeginPlay();
float TempVal;
ERTPCValueType TempType;
UAkGameplayStatics::GetRTPCValue(nullptr, HeartbeatEvent, ERTPCValueType::Default, TempVal, TempType, this, "Health"); // First one
//UAkGameplayStatics::GetRTPCValue(HealthRTPC, HeartbeatEvent, ERTPCValueType::Default, TempVal, TempType, this, ""); // Second one
}
With these examples and usages, the RTPC section is complete. So far, Events and RTPCs are the most common and bulky topics of the implementation. We have only minor implementations left, but they are as important as these first ones.
Switch and State
Switches and states are often confusing to people. They look similar in a sense, but understanding their differences creates a better world (or a better organized audio architecture). I don’t want to bring up the Switch vs State topic here, so I’ll just skip to the coding side of both.
Blueprints
Both of them only have SetSwitch/SetState functions, no reset or get functions. Also, both of them can be executed by their Wwise class variables, or string values. For string values, you should define both Switch/State group and Switch/State.
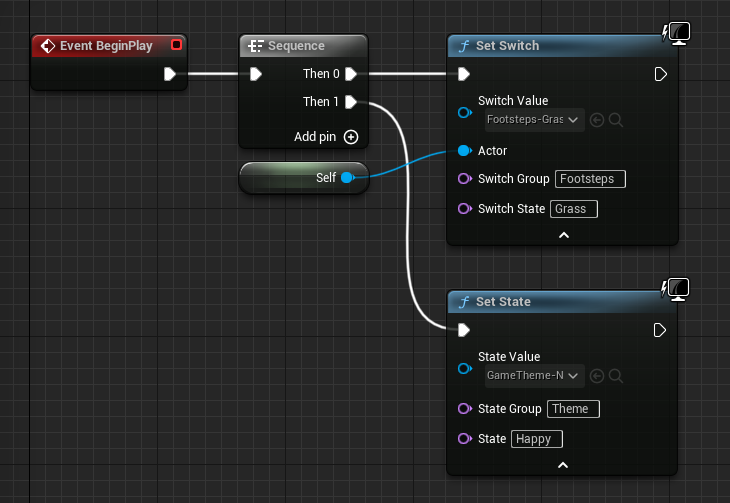
SetSwitch requires the Actor because it’s bound to the Actor, while state is a global manner. I filled string representatives of both switch and state usages as well; these should be the same as the switch/state groups and values you’ve created in your Wwise project. Or, you can simply select by the Switch Value.
C++
As their Blueprint adaptations, C++ functions are almost identical too. SetState doesn’t require an Actor parameter, and the rest is the same. Similar to the SetRTPC, the function executes Wwise class variable over string values.
I will show you both. By creating UAkSwitchValue and UAkStateValue variables, we open a gateway to Editor usage. Also, we can simply use these values for the functions without dealing with strings.
// DummyActor.h
public:
UPROPERTY(EditAnywhere)
class UAkSwitchValue* FootstepsGrass;
UPROPERTY(EditAnywhere)
class UAkStateValue* ThemeHappy;
AkGameplayStatics has nothing fancy about these functions. In their definitions, it is also similar to the SetRTPC function; checks Wwise class and string values, goes with the one available.
// AkGameplayStatics.h
UFUNCTION(BlueprintCallable, BlueprintCosmetic, Category="Audiokinetic|Actor", meta = (AdvancedDisplay = "2"))
static void SetSwitch(
class UAkSwitchValue const* SwitchValue,
class AActor* Actor,
FName SwitchGroup,
FName SwitchState);
UFUNCTION(BlueprintCallable, BlueprintCosmetic,
Category="Audiokinetic", meta = (AdvancedDisplay = "1"))
static void SetState(
class UAkStateValue const* StateValue,
FName StateGroup,
FName State);
Simple usages are below. Go one with the one you desire - one requires precision (writing the exact same names of groups and values) and another requires mouse clicking in the Editor.
// DummyActor.cpp
void ADummyActor::BeginPlay()
{
Super::BeginPlay();
UAkGameplayStatics::SetSwitch(nullptr, this, "Footsteps", "Grass");
//UAkGameplayStatics::SetSwitch(FootstepsGrass, this, "", "");
UAkGameplayStatics::SetState(nullptr, "Theme", "Happy");
//UAkGameplayStatics::SetState(ThemeHappy, "", "");
If you have reached this far, well done. You can see the light at the end of the road. Couple pebbles left that I want to mention.
Useful Snippets
Stop Actor and All
I think these are the most obvious calls by their names. We call these and they stop the sounds an Actor is making, or all of the sounds in the game, respectively.
Coding side, it doesn’t have any other extras than one-liner function calls. You can call them anywhere.
// AkGameplayStatics.h
UFUNCTION(BlueprintCallable, BlueprintCosmetic, Category="Audiokinetic|Actor")
static void StopActor(class AActor* Actor);
UFUNCTION(BlueprintCallable, BlueprintCosmetic, Category="Audiokinetic")
static void StopAll();
Occlusion Refresh Interval
This function lets us decide the occlusion level. This often confuses beginners when they try to play a sound but can’t hear it, or only hear it partially. Because between the source’s location and the listener, some Actors are colliding and creating an occlusion effect. It is a design choice for the game, but if you want to hear a sound without hesitation, simply leave it at 0. Since every Actor has its own occlusion refresh interval, it requires an Actor as an input.
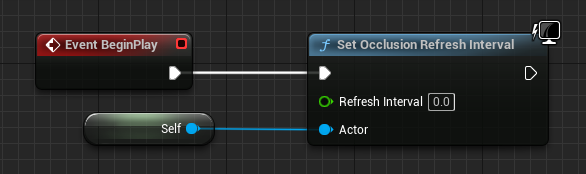
Coding-wise, you don’t have to focus on this much. Another one-liner code that lifts your occlusion problem. It is logical to call this function at the beginning.
// AkGameplayStatics.h
UFUNCTION(BlueprintCallable, BlueprintCosmetic, Category="Audiokinetic|Actor")
static void SetOcclusionRefreshInterval(
float RefreshInterval,
class AActor* Actor );
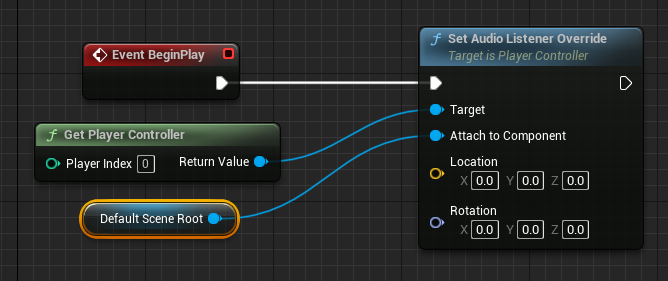
Audio Listener
Wwise uses Unreal’s audio listener decision, so if you want to change the audio listener, you should do that through Unreal (no Wwise-specific method required). It is a design choice as well. If you are going for a FPS game, it makes sense to attach it to the character; if it’s a strategy game, you can put it on the camera. The decision is up to you, and you can always retarget. If you can’t create the node by the name, you can call this by the Get Player Controller value.
The trick is attaching this to a component. If you want to update location and rotation values, you should do that every Tick, quite a headache. Instead of this, just attach that to a component such as mesh or camera.
Conclusion
In this blog post, we unveiled the secrets of coding Wwise in Unreal for beginners. Events, RTPC, Switch and State are the most common usage practices of these function calls. I hope these were clear enough to follow through both Blueprints and C++ methods. The road I made for you to follow ends here, but it leads to somewhere more exciting. It means there are lots of enhanced and extended functions in the library to find, but I’ll leave that to you. For now, enjoy your time, stranger.
Comments
Jiang Shan
August 13, 2023 at 11:26 pm
Great~beneficial!!
Alfredo Romero
September 03, 2023 at 05:15 am
thank you for sharing
Zhiyang Xu
September 18, 2023 at 03:28 am
Hi there,Is there any possible to get a way to reset Swtich/State for an akcomponent?
JungKun Park
January 11, 2024 at 06:55 pm
I appreciate you sharing such useful information.
Jonas Memborg Knudsen
June 19, 2024 at 12:59 pm
An updated version of this would be appreciated.